Horje
Plotting Multiple X-Axes Using Plotly

The Plotly is a versatile plotting library that enables the creation of the interactive and complex visualizations with the ease. One common requirement in the data visualization is displaying the multiple x-axes on the same subplot to the better compare and contrast different datasets or scales. This article will guide we through the steps needed to the show more than two x-axes titles/ranges on the same subplot using the Plotly in Python.

Understanding Plotly Subplots

Plotly is an open-source graphing library that makes interactive publication-quality graphs online supporting a wide range of the plotting functionalities from the basic line plots to the complex 3D charts.

Before diving into the specifics of multiple x-axes, it’s important to understand how subplots work in Plotly. Subplots allow you to create multiple plots within the same figure, which can be arranged in various grid configurations. Each subplot can have its own set of axes, titles, and other customizations.

Why Multiple X-Axes?

Using the multiple x-axes in a single plot allows to:

  • Compare datasets with the different x-axis ranges.
  • Overlay different scales on the same plot.
  • Provide the additional context or reference points.

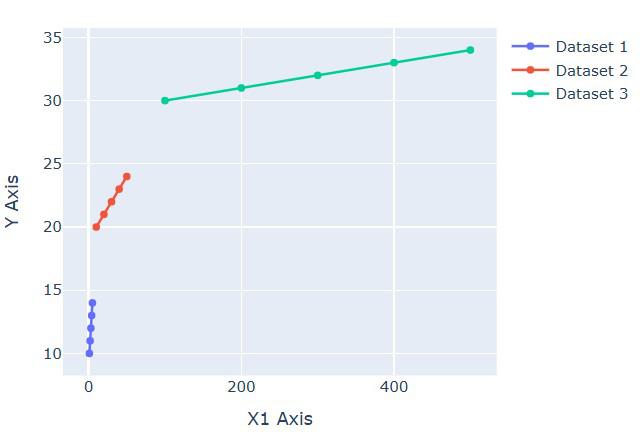
Creating a Basic Plot with Multiple X-Axes

Let’s start by creating a basic plot with multiple x-axes. We’ll use the make_subplots function to create a subplot and then add multiple x-axes to it.

Step 1: Define Your Data

Start by defining the data that we want to the plot. Let’s create a simple example with the three datasets.

Python
x1 = [1, 2, 3, 4, 5]
y1 = [10, 11, 12, 13, 14]
x2 = [10, 20, 30, 40, 50]
y2 = [20, 21, 22, 23, 24]
x3 = [100, 200, 300, 400, 500]
y3 = [30, 31, 32, 33, 34]

Step 2: Create Subplots

Use make_subplots to the create a subplot layout. In this example, we will use a single row with the three columns each sharing the y-axis but having the separate x-axes.

Python
fig = make_subplots(rows=1, cols=1)

Step 3: Add Traces

Add the data traces to the subplot. Each trace will be linked to the different x-axis.

Python
fig.add_trace(go.Scatter(x=x1, y=y1, name='Dataset 1'), row=1, col=1)
fig.add_trace(go.Scatter(x=x2, y=y2, name='Dataset 2', xaxis='x2'), row=1, col=1)
fig.add_trace(go.Scatter(x=x3, y=y3, name='Dataset 3', xaxis='x3'), row=1, col=1)

Step 4: Update Layout with Multiple X-Axes

Update the layout to the define and position the additional x-axes.

Python
fig.update_layout(
    xaxis=dict(
        title='X1 Axis',
        domain=[0, 1],
        anchor='y'
    ),
    xaxis2=dict(
        title='X2 Axis',
        domain=[0, 1],
        anchor='y',
        overlaying='x'
    ),
    xaxis3=dict(
        title='X3 Axis',
        domain=[0, 1],
        anchor='y',
        overlaying='x'
    ),
    yaxis=dict(
        title='Y Axis'
    )
)
fig.show()

Output:

Image Loading

Combining Multiple X and Y Axes

You can combine multiple x and y axes in the same plot to create complex visualizations. Here’s an example:

Python
import plotly.graph_objects as go
from plotly.subplots import make_subplots

fig = make_subplots(specs=[[{"secondary_y": True}]])

fig.add_trace(go.Scatter(x=[1, 2, 3], y=[10, 11, 12], name="Trace 1"), secondary_y=False)
fig.add_trace(go.Scatter(x=[2, 3, 4], y=[20, 21, 22], name="Trace 2", xaxis='x2'), secondary_y=False)
fig.add_trace(go.Scatter(x=[3, 4, 5], y=[30, 31, 32], name="Trace 3", xaxis='x3'), secondary_y=False)
fig.add_trace(go.Scatter(x=[1, 2, 3], y=[40, 50, 60], name="Trace 4"), secondary_y=True)

fig.update_layout(
    xaxis=dict(domain=[0, 0.45], title_text="Primary X-Axis"),
    xaxis2=dict(domain=[0.55, 1], anchor='y', overlaying='x', side='top', title_text="Secondary X-Axis"),
    xaxis3=dict(domain=[0.55, 1], anchor='y', overlaying='x', side='bottom', position=0.15, title_text="Tertiary X-Axis"),
    yaxis=dict(title_text="Primary Y-Axis"),
    yaxis2=dict(title_text="Secondary Y-Axis", overlaying='y', side='right')
)

fig.show()

Output:

multiple-axes

Combining Multiple X and Y Axes

Conclusion

Adding multiple x-axes titles/ranges on the same subplot using Plotly is a powerful feature that allows you to create complex and informative visualizations. By understanding the basics of Plotly’s layout and trace structure, you can customize your plots to meet your specific needs. Whether you’re working with time series data, comparing different datasets, or creating interactive dashboards, Plotly provides the flexibility and functionality to make your visualizations stand out.

Plotting Multiple X-Axes Using Plotly- FAQs

Can I add more than three x-axes to a Plotly subplot?

Yes, we can add as many x-axes as needed. Just follow the same process of the defining additional x-axes in the layout and linking them to the traces.

How can I customize the appearance of each x-axis?

We can customize each x-axis using the update_layout function where we can set properties like title, domain, anchor, overlaying and more.

Can I have different y-axes for each dataset as well?

Yes, we can add multiple y-axes in the similar manner by the defining yaxis2, yaxis3 etc. in the layout and linking them to the traces.

How can I ensure the additional x-axes do not overlap with the data points?

Ensure that the domain properties are set correctly and that the overlaying property is used appropriately to the manage how axes are layered.


Reffered: https://www.geeksforgeeks.org


AI ML DS

Related
Left-Brain AI vs. Right-Brain AI Left-Brain AI vs. Right-Brain AI
Adding progress bar or percentage to tune function in R Adding progress bar or percentage to tune function in R
Fuzzy Logic for Uncertainty Management in Machine Learning Fuzzy Logic for Uncertainty Management in Machine Learning
Repeated Training on the Same Data: Implications for Model Performance Repeated Training on the Same Data: Implications for Model Performance
Semantic Roles in NLP Semantic Roles in NLP

Type:
Geek
Category:
Coding
Sub Category:
Tutorial
Uploaded by:
Admin
Views:
29