|
As we know in the modern world we use Continuous Integration and Continuous Deployment for fast and and efficient delivery of our application to the market. Here in this Article, we are deep-diving into how we can actually deploy Spring boot applications on Kubernetes with the help of Jenkins CI/CD.
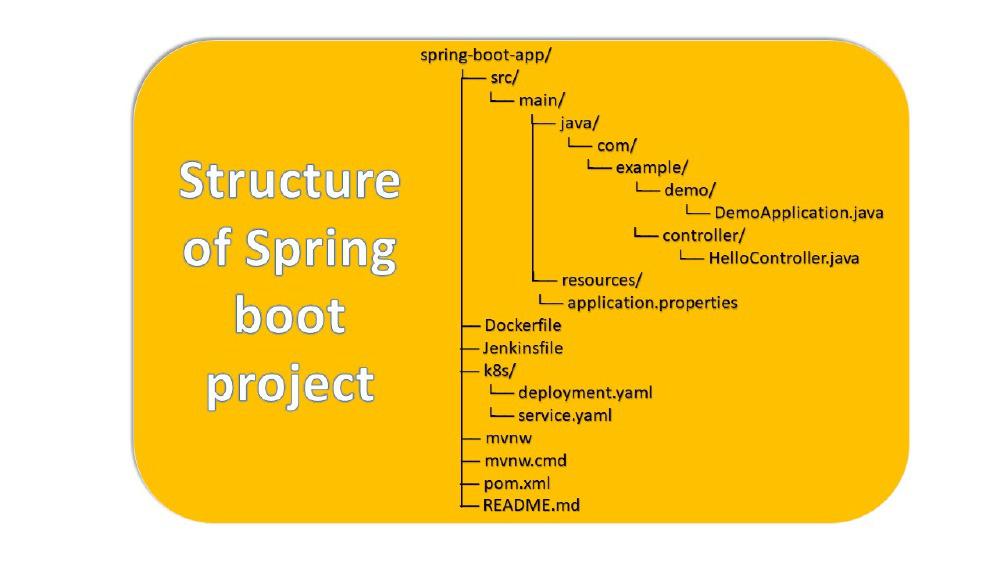
Project WorkFlow
- .java files: These files contain the Java source code for the application.
- application.properties: This file contains configuration properties for the application.
- Dockerfile: This file contains instructions for building a Docker image of the application.
- Jenkinsfile: This file contains instructions for building and deploying the application using Jenkins, a continuous integration and continuous delivery (CI/CD) tool.
- deployment.yaml and service.yaml: These files are YAML files that define how the application will be deployed in a Kubernetes cluster.
- mvnw and mvnw.cmd: These files are wrappers for the Maven commands that can be used to build, test, and package the application.
- pom.xml: This file is the project object model (POM) for the application. It contains information about the project, such as its dependencies and build configuration.
- README.md: This file is a markdown file that contains information about the project, such as how to set it up and how to use it.
Primary Terminologies
- Spring boot: It is free and open-source java framework which is built on the top of the spring framework. Their main benefits are Faster development, Improve the productivity and suitable for stand-alone application, production ready features and production ready features.
- Node.js: This is a free, open-source cross-platform and JavaScript runtime environment that executes JavaScript code outside the browser.
- Jenkins: It’s also free, Open-source CI/CD tools that automate software development processes like Build, Test, and deployment.
- Docker: Docker is a platform that allows you to put all applications and their dependencies in standardized units called containers. These containers are lightweight and portable, allowing for continuity across environments (operating systems and hardware).
- Kubernetes: It is open-source containerized orchestration tool that basically uses it for ease of deployment, auto-scaling, auto-healing, and monitoring purposes.
GitHub: It is a free and open-source version control system which is developed by Microsoft. That provides,
- Storage for our codes
- Continuously track our code.
- the capability of sharing with another
- project collaboration support
Step-by-Step Guide For Spring boot application deployment in Kubernetes with Jenkins CI/CD pipeline
Step 1: Update System packages
sudo apt-get update
The reason for updating is that sometimes some packages of Docker are not working well, so for that reason we update them.
APT stands for Advanced Packaging Tool.

Step 2: creating spring-boot-application
Here First we are creating a directory that names spring-boot-app.
As per the structure of the spring boot application we are creating files and folder.
sudo mkdir spring-boot-app
after creation of spring-boot-app directory we are moving to inside it using below command.
cd spring-boot-app

Then we are creating another directory as per the structure of the spring boot application diagram.
 mkdir -p src/main/java/com/example/demo/controller
 mkdir -p src/main/resources
after completion of the directory we check through “ls” command.

Create DemoApplication.java file inside the demo directory.
nano DemoApplication.java
we use “sudo” for super user permission. and “nano” for file creation instead of it you can also use “vim”.
package com.example.demo;

import org.springframework.boot.SpringApplication;
import org.springframework.boot.autoconfigure.SpringBootApplication;

@SpringBootApplication
public class DemoApplication {
    public static void main(String[] args) {
        SpringApplication.run(DemoApplication.class, args);
    }
}
After writing above scripts then Save and Exit nano:
- Press Ctrl + O to write out (save) the file.
- Press Enter to confirm the filename.
- Press Ctrl + X to exit nano.
Create HelloController.java file inside the controller directory.
nano HelloController.java
we use “sudo” for super user permission. and “nano” for file creation instead of it you can also use “vim”.
package com.example.demo.controller;

import org.springframework.web.bind.annotation.GetMapping;
import org.springframework.web.bind.annotation.RestController;

@RestController
public class HelloController {

    @GetMapping("/hello")
    public String sayHello() {
        return "Hello, World!";
    }
}
After writing above scripts then Save and Exit nano:
- Press Ctrl + O to write out (save) the file.
- Press Enter to confirm the filename.
- Press Ctrl + X to exit nano.
  
Create application.properties file inside the resources directory.
nano application.properties
we use “sudo” for super user permission. and “nano” for file creation instead of it you can also use “vim”.
# Server configuration
server.port=8080

# Spring application name
spring.application.name=spring-boot-app

# Logging configuration
logging.level.org.springframework=INFO
logging.level.com.example.demo=DEBUG

# Custom properties (if any)
# custom.property.name=value
After writing above scripts then Save and Exit nano:
- Press Ctrl + O to write out (save) the file.
- Press Enter to confirm the filename.
- Press Ctrl + X to exit nano.
 
Step 3: Dockerfile Creatition
Create Dockerfile inside the spring-boot-app directory.
sudo nano Dockerfile
we use “sudo” for super user permission. and “nano” for file creation instead of it you can also use “vim”.

Add configuration scripts in the Dockerfile.
# Use a base image with Java and a minimal Linux distribution
FROM openjdk:11-jdk-slim

# Set the working directory inside the container
WORKDIR /app

# Copy the Maven wrapper and source code into the container
COPY .mvn/ .mvn
COPY mvnw .
COPY pom.xml .

# Copy the application source code into the container
COPY src/ src/

# Expose the port your Spring Boot app is running on (default is 8080)
EXPOSE 8080

# Build the application
RUN ./mvnw clean package -DskipTests

# Copy the JAR file into the container
COPY target/spring-boot-app-0.0.1-SNAPSHOT.jar app.jar

# Define the command to run your Spring Boot application
CMD ["java", "-jar", "app.jar"]After writing above scripts then Save and Exit nano:
- Press Ctrl + O to write out (save) the file.
- Press Enter to confirm the filename.
- Press Ctrl + X to exit nano.

Step 4: Jenkinsfile Creatition
Create Jenkinsfile inside the spring-boot-app directory.
sudo nano Jenkinsfile
we use “sudo” for super user permission. and “nano” for file creation instead of it you can also use “vim”.

Add pipeline configuration scripts in the Jenkinsfile.
pipeline {
    agent any

       environment {
        DOCKER_IMAGE = "romilbhai/spring-boot-app"
        K8S_NAMESPACE = "springboot-demo"
        DOCKER_CREDENTIALS_ID = 'dockerhub-credentials-id' // Define Docker Hub credentials ID
        KUBECONFIG_CREDENTIALS_ID = 'kubeconfig-springboot' // Define Kubernetes config credentials ID
    }

    stages {
        stage('Checkout') {
            steps {
                script {
                    checkout scm
                }
            }
        }

        stage('Build and Test') {
            steps {
                script {
                    sh "mvn clean package"
                }
            }
        }

        stage('Build Docker Image') {
            steps {
                script {
                    sh "docker build -t romilbhai/spring-boot-app:${env.BUILD_ID} ."
                    sh "docker tag romilbhai/spring-boot-app:${env.BUILD_ID} romilbhai/spring-boot-app:latest"
                }
            }
        }

        stage('Push to dockerhub') {
            steps {
                script {
                       withCredentials([string(credentialsId: 'dockerhub-password', variable: 'DOCKER_PASSWORD')]) {
                sh """
                    echo \$DOCKER_PASSWORD | docker login -u romilbhai --password-stdin
                """
                sh "docker push romilbhai/spring-boot-app:${env.BUILD_ID}"
                sh "docker push romilbhai/spring-boot-app:latest"
            }
                    }
                }
            }


        stage('Deploy to Kubernetes') {
            steps {
                script {

                     kubeconfig(credentialsId: 'kubeconfig') {

                        sh 'kubectl apply -f k8s/deployment.yaml -n ${env.K8S_NAMESPACE}'
                        sh 'kubectl apply -f k8s/service.yaml -n ${env.K8S_NAMESPACE}'
                    }


                }
            }
        }
    }

    post {
        always {
            cleanWs()
        }
        success {
            echo 'Build and deployment successful!'
        }
        failure {
            echo 'Build or deployment failed.'
        }
    }
}
After writing above scripts then Save and Exit nano:
- Press Ctrl + O to write out (save) the file.
- Press Enter to confirm the filename.
- Press Ctrl + X to exit nano.

Step 5: Kubernetes files creation
Then we are creating another directory as per the structure of the spring boot application diagram.
sudo mkdir k8s
after creation of “k8s” directory we are moving to inside it using below command.
cd k8s

Create deployment file inside the k8s directory.
sudo nano deployment.yaml
we use “sudo” for super user permission. and “nano” for file creation instead of it you can also use “vim“.
Add deployment configuration scripts in the “deployment.yaml” file.

After writing above scripts then Save and Exit nano:
- Press Ctrl + O to write out (save) the file.
- Press Enter to confirm the filename.
- Press Ctrl + X to exit nano.
Create service file inside the k8s directory.
sudo nano service.yaml

we use “sudo” for super user permission. and “nano” for file creation instead of it you can also use “vim“.
Add service configuration scripts in the “service.yaml” file.
apiVersion: v1
kind: Service
metadata:
  name: spring-boot-app-service
  namespace: springboot-demo
spec:
  selector:
    app: spring-boot-app
  ports:
    - protocol: TCP
      port: 80
      targetPort: 8080
  type: LoadBalancer

After writing above scripts then Save and Exit nano:
- Press Ctrl + O to write out (save) the file.
- Press Enter to confirm the filename.
- Press Ctrl + X to exit nano.
Step 6: POM.xml file creation
Create pom.xml file inside the spring-boot-app directory.
sudo nano pom.xml
we use “sudo” for super user permission. and “nano” for file creation instead of it you can also use “vim“.
after completion of the directory we check through “ls” command.

Add xml code in the POM.xml file.
<project xmlns="http://maven.apache.org/POM/4.0.0"
    xmlns:xsi="http://www.w3.org/2001/XMLSchema-instance"
    xsi:schemaLocation="http://maven.apache.org/POM/4.0.0 http://maven.apache.org/xsd/maven-4.0.0.xsd">
    <modelVersion>4.0.0</modelVersion>
    <groupId>com.example</groupId>
    <artifactId>spring-boot-app</artifactId>
    <version>0.0.1-SNAPSHOT</version>
    <packaging>jar</packaging>
    <name>spring-boot-app</name>
    <description>Demo project for Spring Boot</description>

    <parent>
        <groupId>org.springframework.boot</groupId>
        <artifactId>spring-boot-starter-parent</artifactId>
        <version>2.5.4</version>
        <relativePath/> <!-- lookup parent from repository -->
    </parent>

    <properties>
        <java.version>11</java.version>
    </properties>

    <dependencies>
        <dependency>
            <groupId>org.springframework.boot</groupId>
            <artifactId>spring-boot-starter-web</artifactId>
        </dependency>
        <dependency>
            <groupId>org.springframework.boot</groupId>
            <artifactId>spring-boot-starter-test</artifactId>
            <scope>test</scope>
        </dependency>
    </dependencies>

    <build>
        <plugins>
            <plugin>
                <groupId>org.springframework.boot</groupId>
                <artifactId>spring-boot-maven-plugin</artifactId>
            </plugin>
        </plugins>
    </build>

</project>

After writing above scripts then Save and Exit nano:
- Press Ctrl + O to write out (save) the file.
- Press Enter to confirm the filename.
- Press Ctrl + X to exit nano.
Step 7: Building and running Docker image.
docker build -t spring-boot-app:latest .
docker run -d -it spring-boot-app:latest
Here, (‘-t’) stands for tag, which basically allows you to give a name or tag with a Docker image. In this scenario, spring-boot-app:latest is the tag or name that we want to build. and
(‘-i’) stands for interactive and basically allows us to interact with command-line. It keeps STDIN (standard input) open even if not attached.
If we combine (‘-it’), that means that it allows you to run a tagged or named container with an interactive command interface.
Once you write the build command, the image will be created, and through this image, a Docker container will run.
You can check your container working status through ‘Docker -ps’ command.
(‘-d’) stands for daemon that run process in the background.

Step 8: Setup Kubernetes
installing latest minikube stable x86-64 Linux variant, Installation as per your requirement.
Follow Minikube for more detailed guidance.
curl -LO https://storage.googleapis.com/minikube/releases/latest/minikube-linux-amd64
sudo install minikube-linux-amd64 /usr/local/bin/minikube && rm minikube-linux-amd64
minikube start

Step 9: Creating namespace
kubectl create namespace springboot-demo
Here we are creating a namespace called springboot-demo because otherwise namespace is default.

Step 9: Checking deployment in local
kubectl apply -f deployment.yaml -n springboot-demo
kubectl apply -f service.yaml -n springboot-demo
Write above command that are tailored for deployment with specific namespace.
kubectl get pods -n springboot-demo
once you done deployment after check then you will get output like,
Here 0/1 means 0 pods are running out of 1. and it will show 4 times due to replication for disaster recovery.
Then write below command,
eval $(minikube docker-env)
And check again through below command
kubectl get pods -n springboot-demo
now you will get 1/1 ready status like,

then push code in your remote repository or (GitHub repository).

Step 10: Jenkins installation
 sudo apt update
 sudo apt upgrade
update: It is basically used for refreshing list of available software packages and versions but it not download or install anything new by itself.
upgrade: It is installing newer version of software packages that are available on your system.

sudo apt install openjdk-11-jdk -y

We need to install openjdk for Jenkins after that run below commands
curl -fsSL https://pkg.jenkins.io/debian/jenkins.io-2023.key | sudo tee /usr/share/keyrings/jenkins-keyring.asc > /dev/null
echo deb [signed-by=/usr/share/keyrings/jenkins-keyring.asc] https://pkg.jenkins.io/debian binary/
 | sudo tee /etc/apt/sources.list.d/jenkins.list > /dev/null
finally run below commands for jenkins installation.
sudo apt update
sudo apt install jenkins -y
Here we use -y means automatically assign yes permission for automation instead of manually assigning.
sudo systemctl start jenkins
sudo systemctl enable jenkins
 
once you write above command then open the browser and write,
https://localhost:8080
Now Jenkins UI(First page) will display but it require the initialAdminPassword so that reason you need to write below command that will show the password.
sudo cat /var/lib/jenkins/secrets/initialAdminPassword
  
Step 11: Configuring Jenkins
Once you done personal login or as a guest login, you will see the Jenkins Dashboard In that We need to install some necessary plugins: Go to Manage Jenkins > Manage Plugins. And installing following plugins:
- Docker Pipeline
- Kubernetes
- Git
 
Step 12: Create a New Pipeline Job
Create New Item:
Create a new jobs or new item from left-hand side menu on the Jenkins Dashboard.
Enter Job Details:
Name: Enter a name for your new job (e.g., springboot-app-Pipeline).
- Type: Select Pipeline.
- Click OK to proceed.

Step 13: Configure the Job
General Configuration:
Description: Optionally, provide a description for the job to explain what this pipeline does.

Pipeline Configuration:
- Definition: Choose Pipeline script from SCM.
- SCM: Select Git.
- Repository URL: Enter your Git repository URL (e.g., https://github.com/your-username/your-repo.git).

Credentials:
If your repository requires authentication, you need to add credentials.
- Credentials: Click Add to add your credentials (e.g., GitHub username and password, or personal access token).
- Kind: Choose the appropriate kind (e.g., Username with password or SSH Username with private key).
- Scope: Set to Global.
- Username: Enter your GitHub username.
- Password: Enter your GitHub password or personal access token.
Click Add to save.

Branch Specifier:
By default, this is set to */master. If you are using a different branch, update it accordingly (e.g., */main).
Script Path:
Specify the path to your Jenkinsfile if it’s not in the root directory of your repository. By default, it is set to Jenkinsfile.
Adding Pipeline syntax:
click on pipeline syntax and setup the kubeconfig.
you need to add credentials for kubeconfige,
- Credentials: Click Add to add your credentials.
- Kind: Choose the appropriate kind (e.g., Secret text).
- Scope: Set to Global.
- Secret: Here you need to add the kubeconfig data which is present at .kube/config file in your local system.
if you want to check your config file’s data then write below command,
ls -la
After that you can see many files from that you move to config file using below command,
cd .kube/config
   
Save Configuration:
Scroll down and click Save to save the job configuration.

You can check pipeline overview in your Jenkins Dashboard.

when you click on the console then you will get below result.

Then you can see it in your main dashboard.

Conclusion
Deploying Spring Boot applications on Kubernetes using Jenkins CI/CD ensures fast and efficient deployment. By using Docker for containerization and Kubernetes for orchestration, we achieve easy scalability and robust management of our applications. Jenkins builds, tests, and automates deployments, increasing productivity and reliability. GitHub simplifies version control and collaborative development, ensuring code integrity and traceability. This comprehensive approach accelerates development cycles, ensures implementation stability, and enables teams to consistently deliver high-quality software by effectively meeting dynamic market requirements.
Spring boot application deployment in Kubernetes with Jenkins CI/CD pipeline – FAQs
What are the main difference between Spring boot and other framework?
Here main 2 consideration that are given below
1. language preference: If you are comfortable or familiar with java then spring boot is right choice.
2. Project requirements: Spring boot is vary brilliant for micro service and backend development but If other framework may serve broader web development needs then you select as per your project requirement.
What is the main role of Autoconfiguration in spring boot?
Autoconfiguration is a powerful features that automates the configuration of your application that based on library included in your project.
Imagine, that you want to connect MYSQL database with your application. Let’s see, How it simplifies the process.
1. Add dependencies: Add the spring-boot-starter-data-jpa dependencies to your project’s build configuration (e.g., pom.xml). This dependency provides libraries to integrate with the relational database.
2. Autoconfiguration tasks: Spring Boot checks for spring-boot-starter-data-jpa dependencies. It then triggers the appropriate autoconfiguration class, like DataSourceAutoConfiguration.
3. Automatic Configuration: If you do not explicitly configure the DataSource bean yourself, the DataSourceAutoConfiguration class will create one based on the default settings or properties you provide in your application.yml or application.properties file
4. Ready to use: You can now interact with a MySQL database using Spring Data JPA features without writing any manual configuration code for the data source itself.
What is pods and nodes in the Kubernetes?
The nodes are the are physical or virtual machine where pods are the smallest unit of Kubernetes.
Each pods has own IP address and only one application is run per pods.
pods are ephemerals means pods can be die easily.
for example, Our DB pod is die due to docker crashes or application crashes or resource at that new pod will take place with new IP address. To overcome this issues Kubernetes has one features called services.
services has fixed IP address that can’t be change.
Why .kube file is not sometimes showing?
By default, .kube file resides our home directory and your are finding it in another directory.
ls -a ~/.kube
This command is basically used for reveal the hidden files and folders including .kube folder.
- Here “ls” command is used for showing list of content of the directory.
- “-a” command is used for show the hidden files and folder.
- “~/” command is used for expand your home directory path.
How can a basic Spring Boot application be created?
Write the necessary Java classes (e.g. HelloController.java, DemoApplication.java), create directories and files for your application, and put in place the configuration settings of your app.
|