|
In this article, we will guide you through the process of setting up the Spring Boot application with the MySQL database. We will cover how to handle the data source configuration failures and implement the automatic reconfiguration with retry mechanisms. This approach ensures that the application remains robust and recovers from transient database connection issues.
The “Failed to configure the DataSource” error in the spring boot application typically occurs when the application fails to establish a connection with the database. It happens due to several reasons such as incorrect database URL, wrong credentials, database server downtime, or network issues. We will explain how to handle the error by implementing a retry mechanism to make the application more resilient.
Understanding the ErrorWhen the application starts, it attempts to configure the DataSource based on the properties defined in the application.properties. If any of these configurations are incorrect or if the database is not reachable then spring boot will throw the exception and fail to start the application.
Common causes to fail the database:
- Incorrect database URL
- Invalid database credentials
- Database server is down
- Missing or incorrect drivers
Implementing the Retry MechanismTo handle the transient database connection issues, we can implement the retry mechanism. This mechanism will attempt to the reconnect to database a specified number of the times before giving up.
Step-by-step process:- Create the Custom DataSource Configuration Class: We will create the configuration class to define the DataSource bean of the Spring application. In this class, we will add the logic to retry the connection if it fails initially.
- Define the Database Properties: In application.properties file, we will define the properties for the connecting to the MySQL database connection of the Spring application.
- Implement the Retry Logic: In configuration class, we will implement the logic to retry the connection the certain number of the times if it fails the connect to database.
Prerequisites:- Basic knowledge of the Spring Boot.
- JDK and IntelliJ idea installed your local system.
- MySQL database for DataSource configuration.
- Maven for building dependency management.
Implementation of Resolving Failed to Configure a DataSource ErrorStep 1: Create a Spring ProjectCreate a new Spring project using spring Initializr and add the below dependencies into the project.
Dependencies:
- Spring Web
- Spring DevTools
- Spring Data JPA
- MySQL Drivers
After creating the project, the folder structure will look like below image.

Step 2: Configure the Application PropertiesOpen the application.properties file and add the configuration of the MySQL database connection of the Spring Boot project.
spring.application.name=datasource-reconfiguration

spring.datasource.url=jdbc:mysql://localhost:3306/example
spring.datasource.username=root
spring.datasource.password=
spring.datasource.driver-class-name=com.mysql.cj.jdbc.Driver
spring.jpa.hibernate.ddl-auto=update
spring.jpa.show-sql=true
Step 3: Create the DataSource Configuration ClassWe will create the DataSourceConfig class to define the DataSource bean and implement the retry logic to connect the database.
Go to src > main > java > com.gfg.datasourcereconfiguration > DataSourceConfig and put the below code.
Java
package com.gfg.datasourcereconfiguration;

import org.springframework.beans.factory.annotation.Value;
import org.springframework.context.annotation.Bean;
import org.springframework.context.annotation.Configuration;
import org.springframework.jdbc.datasource.DriverManagerDataSource;

import javax.sql.DataSource;

@Configuration // Indicates that this class contains Spring configuration
public class DataSourceConfig {

    @Value("${spring.datasource.url}") // Injects the datasource URL from application.properties
    private String url;

    @Value("${spring.datasource.username}") // Injects the datasource username from application.properties
    private String username;

    @Value("${spring.datasource.password}") // Injects the datasource password from application.properties
    private String password;

    @Value("${spring.datasource.driver-class-name}") // Injects the datasource driver class name from application.properties
    private String driverClassName;

    @Bean // Defines this method as a Spring bean for DataSource
    public DataSource dataSource() {
        DriverManagerDataSource dataSource = new DriverManagerDataSource();
        dataSource.setDriverClassName(driverClassName); // Sets the driver class name for the DataSource
        dataSource.setUrl(url); // Sets the URL for the DataSource
        dataSource.setUsername(username); // Sets the username for the DataSource
        dataSource.setPassword(password); // Sets the password for the DataSource

        int maxRetries = 3; // Maximum number of retry attempts
        int retryCount = 0; // Counter for retry attempts
        while (retryCount < maxRetries) { // Loop to retry connection attempts
            try {
                dataSource.getConnection().isValid(1); // Check if connection is valid with a 1-second timeout
                return dataSource; // Return the configured DataSource if the connection is successful
            } catch (Exception e) { // Catch any exceptions during the connection attempt
                retryCount++; // Increment the retry counter
                System.err.println("Failed to configure DataSource. Attempt " + retryCount + " of " + maxRetries); // Log the retry attempt
                try {
                    Thread.sleep(2000); // Wait for 2 seconds before retrying
                } catch (InterruptedException ie) {
                    Thread.currentThread().interrupt(); // Restore the interrupted status
                }
            }
        }
        throw new RuntimeException("Failed to configure DataSource after " + maxRetries + " attempts."); // Throw an exception if all retries fail
    }
}
Explanation of Retry Logic:
- maxRetries: The maximum number of the retry attempts to connect the database.
- retryCount: The counter to keep the track of the number of the retries.
- dataSource.getConnection.isValid(1): Check if the database connection is valid. The isValid() method checks if connection is still valid with the timeout of 1 second.
- Thread.sleep(2000): It waits for the 2 seconds before attempting the next retry.
- Throw new RuntimeException: If the connection is not established after the maximum number of retries then throw the runtime exception.
Step 4: Create the User ClassGo to src > main > java > com.gfg.datasourcereconfiguration > User and put the below code.
Java
package com.gfg.datasourcereconfiguration;


import jakarta.persistence.Entity;
import jakarta.persistence.GeneratedValue;
import jakarta.persistence.GenerationType;
import jakarta.persistence.Id;
import lombok.AllArgsConstructor;
import lombok.Data;
import lombok.NoArgsConstructor;

@Entity
@Data
@AllArgsConstructor
@NoArgsConstructor
public class User {

    @Id
    @GeneratedValue(strategy = GenerationType.IDENTITY)
    private Long id;
    private String name;
    private String email;

    // Getters and setters
}
Step 5: Create the UserRepository ClassGo to src > main > java > com.gfg.datasourcereconfiguration > UserRepository and put the below code.
Java
package com.gfg.datasourcereconfiguration;


import org.springframework.data.jpa.repository.JpaRepository;

public interface UserRepository extends JpaRepository<User, Long> {
}
Step 6: Create the UserController ClassGo to src > main > java > com.gfg.datasourcereconfiguration > UserController and put the below code.
Java
package com.gfg.datasourcereconfiguration;

import org.springframework.beans.factory.annotation.Autowired;
import org.springframework.web.bind.annotation.*;

import java.util.List;

@RestController // Indicates that this class is a REST controller
@RequestMapping("/users") // Maps HTTP requests to /users to methods in this controller
public class UserController {

    @Autowired // Automatically injects the UserRepository bean
    private UserRepository userRepository;

    @GetMapping // Handles GET requests to /users
    public List<User> getAllUsers() {
        return userRepository.findAll(); // Retrieves all users from the database
    }

    @PostMapping // Handles POST requests to /users
    public User createUser(@RequestBody User user) {
        return userRepository.save(user); // Saves the user to the database and returns the saved entity
    }
}
This class is a Spring Boot REST controller that handles HTTP requests related to user operations. The UserController class has two main functions:
- getAllUsers(): Handles GET requests to
/users and returns a list of all users from the database. - createUser(User user): Handles POST requests to
/users to create a new user and save it to the database.
Step 7: Main ClassNo changes are required in the main class.
Java
package com.gfg.datasourcereconfiguration;

import org.springframework.boot.SpringApplication;
import org.springframework.boot.autoconfigure.SpringBootApplication;

@SpringBootApplication
public class DatasourceReconfigurationApplication {

    public static void main(String[] args) {
        SpringApplication.run(DatasourceReconfigurationApplication.class, args);
    }

}
pom.xml file:
XML
<?xml version="1.0" encoding="UTF-8"?>
<project xmlns="http://maven.apache.org/POM/4.0.0" xmlns:xsi="http://www.w3.org/2001/XMLSchema-instance"
         xsi:schemaLocation="http://maven.apache.org/POM/4.0.0 https://maven.apache.org/xsd/maven-4.0.0.xsd">
    <modelVersion>4.0.0</modelVersion>
    <parent>
        <groupId>org.springframework.boot</groupId>
        <artifactId>spring-boot-starter-parent</artifactId>
        <version>3.3.1</version>
        <relativePath/> <!-- lookup parent from repository -->
    </parent>
    <groupId>com.gfg</groupId>
    <artifactId>datasource-reconfiguration</artifactId>
    <version>0.0.1-SNAPSHOT</version>
    <name>datasource-reconfiguration</name>
    <description>datasource-reconfiguration</description>
    <url/>
    <licenses>
        <license/>
    </licenses>
    <developers>
        <developer/>
    </developers>
    <scm>
        <connection/>
        <developerConnection/>
        <tag/>
        <url/>
    </scm>
    <properties>
        <java.version>17</java.version>
    </properties>
    <dependencies>
        <dependency>
            <groupId>org.springframework.boot</groupId>
            <artifactId>spring-boot-starter-data-jpa</artifactId>
        </dependency>
        <dependency>
            <groupId>org.springframework.boot</groupId>
            <artifactId>spring-boot-starter-web</artifactId>
        </dependency>

        <dependency>
            <groupId>org.springframework.boot</groupId>
            <artifactId>spring-boot-devtools</artifactId>
            <scope>runtime</scope>
            <optional>true</optional>
        </dependency>
        <dependency>
            <groupId>com.mysql</groupId>
            <artifactId>mysql-connector-j</artifactId>
            <scope>runtime</scope>
        </dependency>
        <dependency>
            <groupId>org.projectlombok</groupId>
            <artifactId>lombok</artifactId>
            <optional>true</optional>
        </dependency>
        <dependency>
            <groupId>org.springframework.boot</groupId>
            <artifactId>spring-boot-starter-test</artifactId>
            <scope>test</scope>
        </dependency>
    </dependencies>

    <build>
        <plugins>
            <plugin>
                <groupId>org.springframework.boot</groupId>
                <artifactId>spring-boot-maven-plugin</artifactId>
                <configuration>
                    <excludes>
                        <exclude>
                            <groupId>org.projectlombok</groupId>
                            <artifactId>lombok</artifactId>
                        </exclude>
                    </excludes>
                </configuration>
            </plugin>
        </plugins>
    </build>

</project>
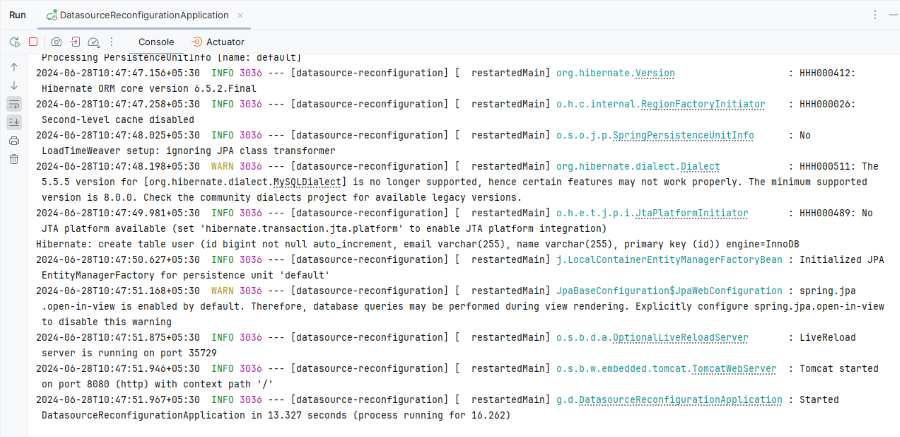
Step 8: Run the applicationNow, run the application and it will start at port 8080 on Tomcat server.
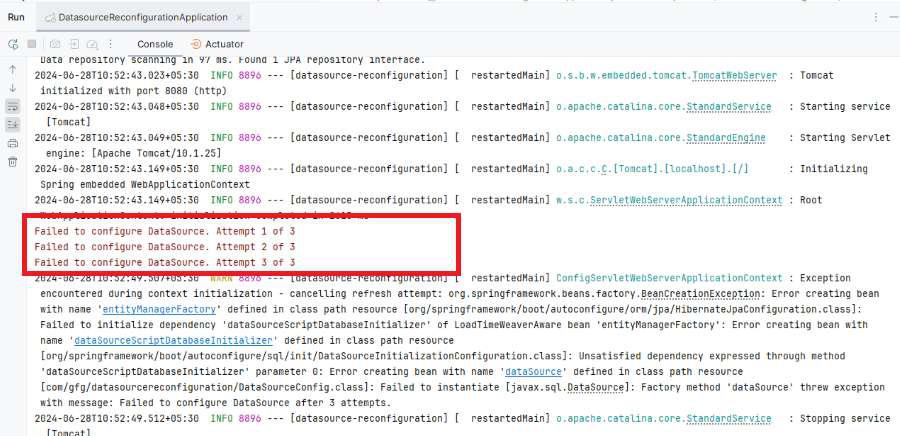
DataSource failure case:
Testing the EndpointsCreate the User:
POST http://localhost:8080/users Output:
GET All the Users:
GET http://localhost:8080/users Output: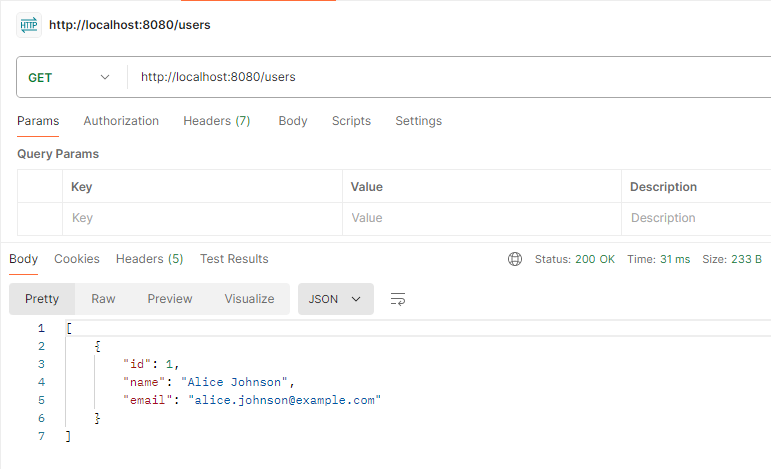 ConclusionIn this article, we discussed how to resolve the Failed to Configure the DataSource error in the Spring Boot application. By the implementing the retry mechanism, we can make the application more resilient and capable of the handling transient database connection issues of the Spring application. This approach ensures that the application can recover from the temporary failures and continue to the function smoothly.
|