|
|
Visual Studio Code (often abbreviated as VS Code) is an Integrated Development Environment (IDE) renowned for its robust support across various programming languages, including procedural, object-oriented, and hybrid languages like C, C++, Dart, Java, Python, PHP, and more. It also supports frameworks such as Spring Boot, Flutter, etc. VS Code stands out due to its lightweight nature, sleek User Interface (UI), and intuitive User Experience (UX), making it the preferred IDE for developers globally, as per the 2023 Stack Overflow Developer Survey. This IDE provides comprehensive one-page documentation on setting up and creating Spring Boot projects. Prerequisites:
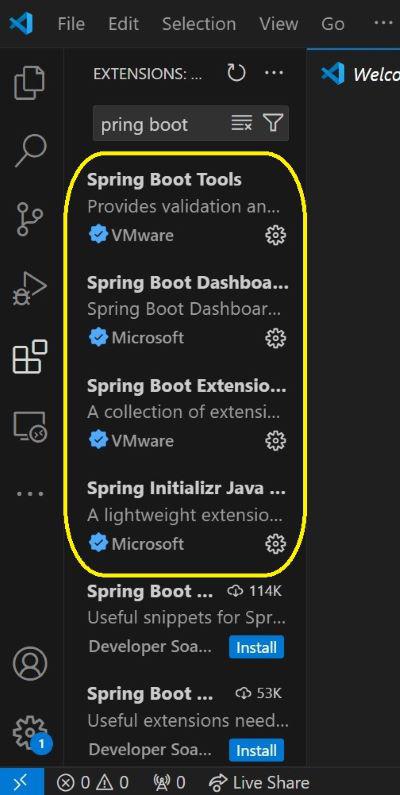
Steps to Create and Setup Spring Boot Project in VSCodeBelow are the steps to create and setup spring boot project in VSCode. Step 1: Preliminary InstallationInstall JDK (Java Development Kit), Spring Boot Extension Pack and the Extension Pack for Java. Step 2: Install Spring Boot ExtensionsInstall verified Spring Boot extensions (identified by a blue-tick) from VMWare and Microsoft. You may also install other extensions if needed as you develop more projects, but never skip installing the verified extensions first for the maximum reliability.
Step 3: Choose the build toolOpen the Command Palette by pressing Ctrl + Shift + P. Select “Spring Initializr: Create a Maven Project” if you wish your project’s build tool to be Maven. Else, if you want it to be Gradle, choose “Spring Initializr: Create a Gradle Project“. 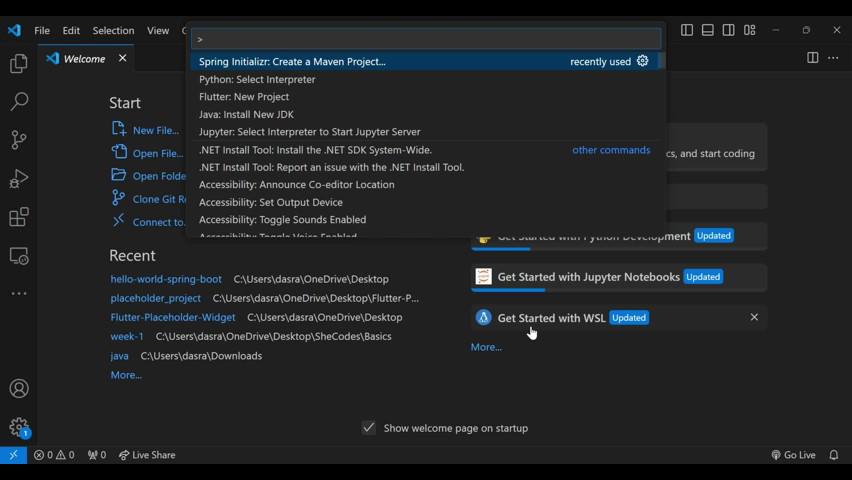
Step 4: Select Spring Boot VersionChoose the Spring Boot version that you want to be the project or not. It is recommended to use stable versions instead of Snapshot versions if you’re a beginner. 
Step 5: Select project languageSelect the programming language that you want the project’s main codebase to be in. 
Step 6: Select Group IDSimilar to a website domain name, this identifies the group/company developing the project. 
Step 7: Select Artifact IDIdentifies the unique name of the project within the developing group. 
Step 8: Select the Packaging TypePackaging of Spring Boot projects are of 2 types, either Jar or War. 
Step 9: Select Java VersionSince we have chosen Java as the project language for this project, we select the Java version to be used in the project. 
Step 10: Select DependenciesAny Spring Boot project runs on various dependencies for accessing libraries from them. 
Step 11: Confirm Project FolderConfirm a folder for the project to be generated in. 
Step 12: Project GenerationThe project is now created and auto-generated into the selected folder. 
Successfully Project Created, 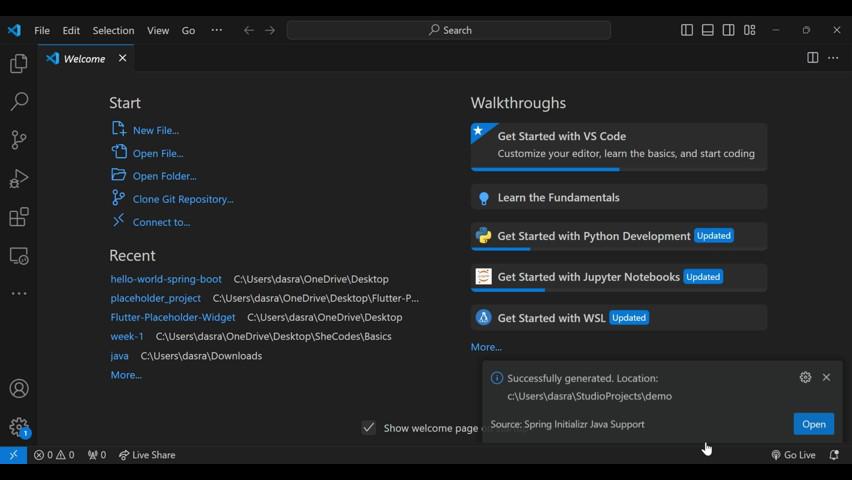
Step 13: Set Open Folder as WorkspaceNow open the selected folder to turn it into the current VS Code workspace 
Step 14: Modify application.propertiesAll real-world Spring Boot projects are connected with a database. The database configuration properties are set in the application.properties file under resources folder. The below are the configuration properties when PostgreSQL dependency is chosen. # PostgreSQL database connection settings
spring.datasource.url=jdbc:postgresql://localhost:5432/yourdatabase
spring.datasource.username=yourusername
spring.datasource.password=yourpassword
spring.datasource.driver-class-name=org.postgresql.Driver
# Hibernate settings
spring.jpa.hibernate.ddl-auto=update
spring.jpa.show-sql=true
spring.jpa.properties.hibernate.dialect=org.hibernate.dialect.PostgreSQLDialect
Step 15: Project Setup CompleteYour Spring Boot project is now completely setup, for you to begin coding. Project Folder Structure Overview:All the below folders are auto-generated by VS Code after successfully creating the Spring Boot project by following the above 15 steps. 
Detailed Overview:1. .mvn folder (will be .gradle if you choose Gradle as your build tool) 
2. .vscode folder
3. src Folder
Conclusion:After IntelliJ IDEA and Spring Tool Suite, VS Code is arguably the most popular IDE amongst Spring Boot developers today. VS Code offers the option of generating the Spring Boot project in the IDE itself, thus not requiring the developer to go to the Spring Boot official starter website for project creation, unlike the IntelliJ IDEA community edition IDE. This saves the developer’s time and energy, hence boosting their productivity, efficiency and output rate. |
Reffered: https://www.geeksforgeeks.org
| Advance Java |
| Related |
|---|
| |
| |
| |
| |
| |
Type: | Geek |
Category: | Coding |
Sub Category: | Tutorial |
Uploaded by: | Admin |
Views: | 16 |