|
FastAPI is a state-of-the-art, high-performance web framework that uses normal Python type hints to develop APIs with Python 3.7+. FastAPI’s ability to automatically generate interactive API documentation using ReDoc and Swagger UI is one of its best features. Without requiring a separate client, Swagger UI offers a web-based user interface (UI) that enables you to interact with your API endpoints, examine their inputs and outputs, and test them. Even while the Swagger UI’s default configuration is rather useful, there might be situations in which you’d like to alter its look or functionality to better meet your requirements. You can customize Swagger UI in FastAPI by following the instructions in this article.
Concepts Related to Swagger UI Customization- Swagger UI: An open-source program called Swagger UI creates a web-based user interface for interacting with APIs that are described using the OpenAPI specification.
- OpenAPI Specification: The OpenAPI Specification is a standard for describing APIs that makes it possible for computers and humans to comprehend a service’s capabilities without having to read its source code.
- FastAPI: FastAPI is a web framework for creating Python APIs that is optimized for speed and user-friendliness, especially with regard to its automatic interactive API documentation.
- Customization: Customization is the process of changing Swagger UI’s default settings and design to better suit individual requirements or tastes.
Basic CustomizationsChanging the ThemeOne of the simplest ways to customize Swagger UI is by changing its theme. You can apply different color schemes and styles to match your brand’s identity. This can be achieved by modifying the CSS files provided by Swagger UI or by using third-party themes available in the Swagger community.
Modifying the LayoutSwagger UI’s layout can be adjusted to better fit the structure and flow of your API documentation. This includes changing the order of sections, adding new sections, or modifying existing ones. The layout can be customized by editing the HTML templates and CSS styles.
Adding Custom CSSFor more granular control over the appearance of Swagger UI, you can add custom CSS. This allows you to override default styles and create a unique look and feel. Custom CSS can be added directly to the Swagger UI HTML file or included as a separate stylesheet.
CSS
<style>
  .swagger-ui .topbar {
    background-color: #123456;
  }
  .swagger-ui .info {
    font-family: 'CustomFont', sans-serif;
  }
</style>
Complete Code
HTML
<!DOCTYPE html>
<html lang="en">
<head>
    <meta charset="UTF-8">
    <meta name="viewport" content="width=device-width, initial-scale=1.0">
    <title>Swagger UI Custom Style Test</title>
    <link rel="stylesheet" type="text/css" href="https://cdnjs.cloudflare.com/ajax/libs/swagger-ui/3.52.0/swagger-ui.css" >
    <style>
        .swagger-ui .topbar {
            background-color: #123456;
        }
        .swagger-ui .info {
            font-family: 'CustomFont', sans-serif;
        }
    </style>
</head>
<body>
    <div id="swagger-ui"></div>

    <script src="https://cdnjs.cloudflare.com/ajax/libs/swagger-ui/3.52.0/swagger-ui-bundle.js"></script>
    <script src="https://cdnjs.cloudflare.com/ajax/libs/swagger-ui/3.52.0/swagger-ui-standalone-preset.js"></script>
    <script>
        window.onload = function() {
            const ui = SwaggerUIBundle({
                url: "https://petstore.swagger.io/v2/swagger.json",
                dom_id: '#swagger-ui',
                presets: [
                    SwaggerUIBundle.presets.apis,
                    SwaggerUIStandalonePreset
                ],
                layout: "StandaloneLayout"
            })
            window.ui = ui
        }
    </script>
</body>
</html>
Injecting JavaScriptInjecting custom JavaScript can extend the functionality of Swagger UI. You can use JavaScript to add new features, modify existing ones, or integrate with other tools and services. For example, you might add custom validation, analytics tracking, or additional UI components.
JavaScript
<script>
  window.onload = function() {
    const ui = SwaggerUIBundle({
      url: "path/to/your/swagger.json",
      dom_id: '#swagger-ui',
      presets: [
        SwaggerUIBundle.presets.apis,
        SwaggerUIStandalonePreset
      ],
      plugins: [
        // Add custom plugins here
      ],
      layout: "BaseLayout"
    });

    // Custom JavaScript code
    document.querySelector('.topbar').style.backgroundColor = '#123456';
  }
</script>
Customizing the DocumentationYou can also customize the content of the API documentation itself. This includes adding descriptions, examples, and other metadata to your OpenAPI Specification file. By enhancing the documentation, you can provide clearer and more comprehensive information to users of your API.
Steps Needed for Customizing Swagger UIStep 1: Set up Uvicorn and FastAPIMake sure Uvicorn and FastAPI are installed. Applications using the FastAPI are run on the ASGI server Uvicorn.
pip install fastapi uvicorn Step 2: Develop a Simple FastAPI ProgramTo lay the groundwork for customisation, create a simple FastAPI application.
Python
from fastapi import FastAPI

app = FastAPI()

@app.get("/items/{item_id}")
async def read_item(item_id: int, q: str = None):
    return {"item_id": item_id, "q": q}
Output
 A Simple FastAPI App(fast.py) Step 3: Personalize the Title and Description of the Swagger UIThe Swagger UI’s title and description are directly modifiable within the FastAPI application instance.
Python
app = FastAPI(
    title="Custom API",
    description="This is a custom description for the API.",
    version="1.0.0"
)
Step 4: Give Tags MetadataYou can use metadata to improve documentation and tags to arrange your endpoints.
Python
from fastapi import FastAPI, APIRouter

app = FastAPI(
    title="Custom API",
    description="This is a custom description for the API.",
    version="1.0.0"
)

router = APIRouter()

@router.get("/items/{item_id}", tags=["items"])
async def read_item(item_id: int, q: str = None):
    """
    Read an item with a specific ID.

    - **item_id**: The ID of the item you want to retrieve.
    - **q**: An optional query parameter.
    """
    return {"item_id": item_id, "q": q}

app.include_router(router)
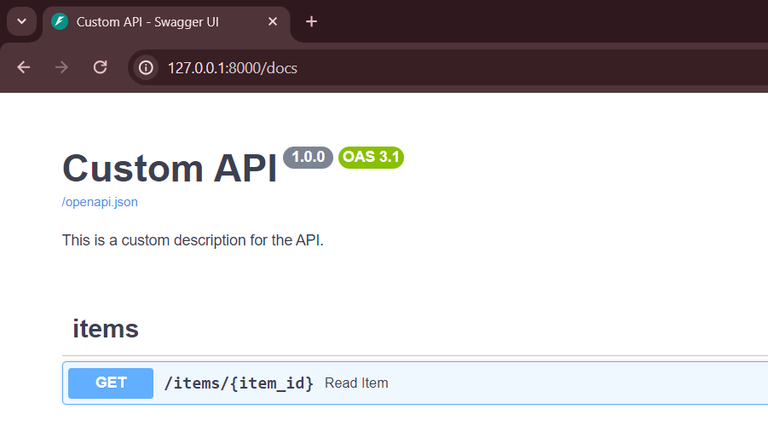
Output:
 The Output For GET API call Step 5: Apply a Custom Theme to Personalize Swagger UIYou must provide a custom swagger-UI HTML file in order to completely alter the appearance and feel of Swagger UI.
1) Make an original HTML template: Make an HTML file (custom_swagger_ui.html, for example) with the required Swagger UI configuration and modifications.
Python
<!DOCTYPE html>
<html lang="en">
<head>
    <meta charset="UTF-8">
    <title>{{ title }}</title>
    <link rel="stylesheet" type="text/css" href="https://cdnjs.cloudflare.com/ajax/libs/swagger-ui/3.52.3/swagger-ui.css">
    <style>
        /* Custom styles */
        .swagger-ui .topbar { background-color: #333; }
        .swagger-ui .topbar a { color: #fff; }
    </style>
</head>
<body>
    <div id="swagger-ui"></div>
    <script src="https://cdnjs.cloudflare.com/ajax/libs/swagger-ui/3.52.3/swagger-ui-bundle.js"></script>
    <script src="https://cdnjs.cloudflare.com/ajax/libs/swagger-ui/3.52.3/swagger-ui-standalone-preset.js"></script>
    <script>
        window.onload = function() {
            const ui = SwaggerUIBundle({
                url: "{{ openapi_url }}",
                dom_id: '#swagger-ui',
                presets: [
                    SwaggerUIBundle.presets.apis,
                    SwaggerUIStandalonePreset
                ],
                layout: "StandaloneLayout",
                docExpansion: "none"
            })
            window.ui = ui
        }
    </script>
</body>
</html>
2) Use FastAPI to provide the customized HTML file: To provide the custom HTML, use the get_swagger_ui_html function provided by FastAPI.
Python
from fastapi import FastAPI
from fastapi.openapi.docs import get_swagger_ui_html
from fastapi.openapi.utils import get_openapi

app = FastAPI(
    title="Custom API",
    description="This is a custom description for the API.",
    version="1.0.0"
)

@app.get("/items/{item_id}", tags=["items"])
async def read_item(item_id: int, q: str = None):
    return {"item_id": item_id, "q": q}

@app.get("/docs", include_in_schema=True)
async def custom_swagger_ui_html():
    return get_swagger_ui_html(
        openapi_url=app.openapi_url,
        title=app.title + " - Swagger UI",
        swagger_ui_html="custom_swagger_ui.html"
    )

@app.get("/openapi.json", include_in_schema=True)
async def openapi():
    return get_openapi(
        title=app.title,
        version=app.version,
        openapi_version=app.openapi_version,
        description=app.description,
        routes=app.routes,
    )

if __name__ == "__main__":
    import uvicorn
    uvicorn.run(app, host="0.0.0.0", port=8000)
Output:
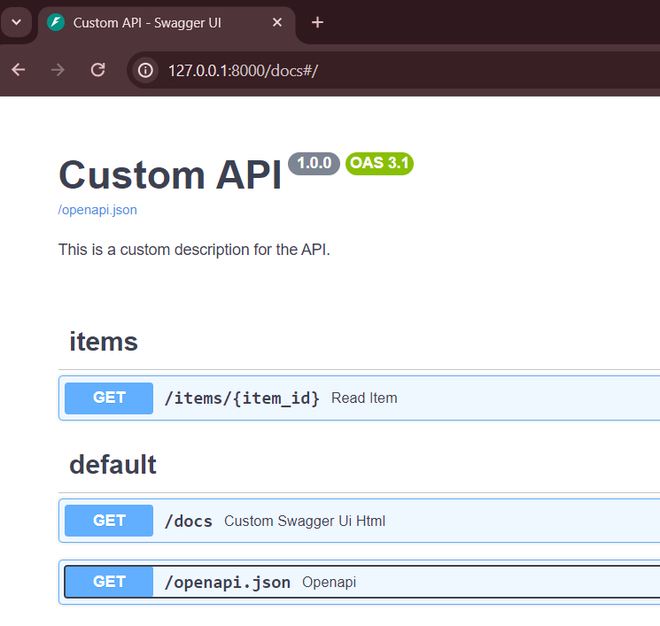 Customized Swagger Step 6: Launch the ProgramUse Uvicorn to run your FastAPI application and view the modified Swagger UI.
uvicorn fast:app --reload Navigate to http://127.0.0.1:8000/docs to view the customized Swagger UI.
Benefits of Customizing Swagger UICustomizing Swagger UI can bring several benefits:
- Enhanced Branding: Align the UI with your company’s branding for a cohesive user experience.
- Improved Usability: Tailor the interface to better suit your audience’s needs, making it easier to navigate and understand.
- Additional Functionality: Add custom features or integrations that are specific to your API or development workflow.
ConclusionYou may adjust the API documentation in FastAPI to better suit the needs of your users and give them a more polished, branded experience by customizing the Swagger UI. You can modify Swagger UI’s title, description, and appearance by following the instructions in this article. You can also use tags to arrange your endpoints more neatly. Your API documentation will look better and be easier to use with these modifications in addition to making it more functional.
|