
|
|
Exporting MySQL databases using the command line utility in Windows is a knowledge every Database Administrator and developer should possess. The mysqldump utility is an easy-to-use program that can back up databases, replicate or transfer data from one server to another and migrate databases. In this article, We will outline how to back up one database, multiple databases and particular tables in a database using the Windows Command Prompt in detail. Prerequisites:
Advantages of mysqldump
Export MySQL Database Using Command LineSteps we are using in this article to export MySQL database using the command line:
1. Open Command PromptOpen the Command Prompt by pressing Win + R or typing cmd, and hitting Enter. 2. Navigate to the MySQL Bin DirectoryIf mysql and mysqldump commands are not in our system’s PATH, navigate to the MySQL bin directory. This is usually located at: cd C:\Program Files\MySQL\MySQL Server X.Y\bin
Replace X.Y with our MySQL version. Example: We can see in the below image that my version is 5.7. So the syntax becomes: cd C:\Program Files\MySQL\MySQL Server 5.7\bin
MySQL Bin Directory Exporting a Single DatabaseNow first lets see the list of databases which we have and select which database we want to export: show databases
Output:  Show database command 3. Use the mysqldump CommandThe basic command to export a single database is: mysqldump -u [username] -p [database_name] > [output_file.sql]
Replace [username], [database_name], and [output_file.sql] with your MySQL username, the name of the database, and the desired output file name, respectively. Example: To export a database named bookstoredb to a file named bookstoredb_dump.sql: mysqldump -u root -p bookstoredb > D:\Dumps\bookstoredb_dump.sql
4. Enter Your PasswordAfter entering the command, we’ll be prompted to enter your MySQL password. Type your password and press Enter. 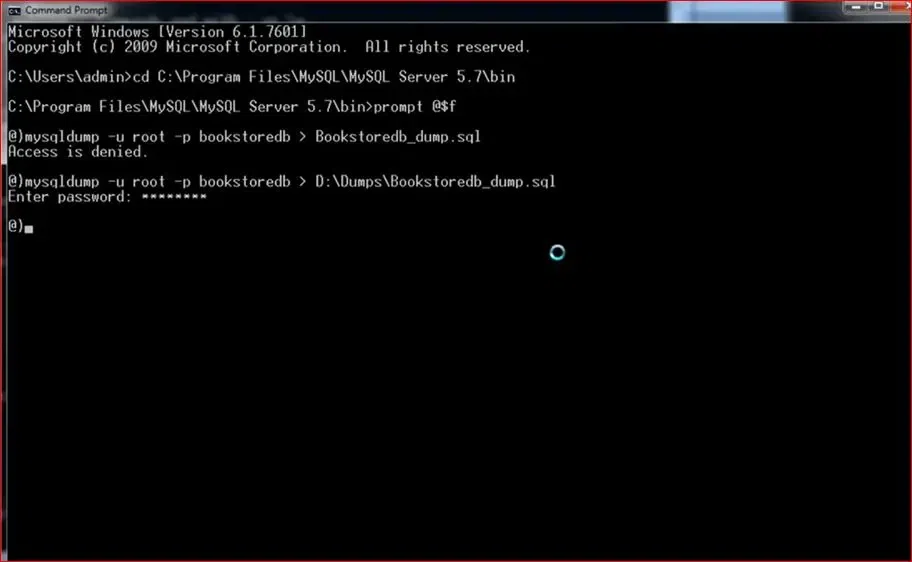 Enter password 5. Verify the Export
Exporting Multiple DatabasesThe same steps for exporting multiple databases also: Syntax: To export multiple databases, use the –databases option followed by the database names: mysqldump -u [username] -p --databases [db1] [db2] > [output_file.sql]
Replace [username], [db1], [db2], and [output_file.sql] with your MySQL username, the names of the databases, and the desired output file name, respectively. Example: Select the databases which we want to export using the below command: show databases
Now lets export databases named bookshop, namdb and salesdb to a file named multiple_backup.sql: mysqldump -u root -p --databases bookshop namdb salesdb > D:\Dumps\multiple_backup.sql
Enter your MySQL password when prompted. Exporting Specific Tables from a DatabaseSame steps for exporting multiple databases also: Syntax: To export specific tables, list the table names after the database name: mysqldump -u [username] -p [database_name] [table1] [table2] > [output_file.sql]
Replace [username], [database_name], [table1], [table2], and [output_file.sql] with your MySQL username, the database name, the table names, and the desired output file name, respectively. Example: Lets select the customer and users tables from the bookstoredb database: show tables
Output: .webp) Show tables command To export table customer and users from the bookstoredb database to a file named tables_backup.sql: mysqldump -u root -p bookstoredb users customer > D:\Dumps\bookstoredb_customer_users.sql
Enter your MySQL password when prompted. ConclusionThe mysqldump utility in the Windows Command Prompt is a reliable way of backing up and exporting MySQL databases. Regardless of whether you require exporting a single database, multiple databases or certain tables, the directions provided herein make the exercise easy and convenient. Addition options make it possible to have different exports to meet as many needs as possible. It is also advisable to regularly check your backup files to confirm that your data is safe and secure so that the database functions effectively. |
Reffered: https://www.geeksforgeeks.org
| Databases |
Type: | Geek |
Category: | Coding |
Sub Category: | Tutorial |
Uploaded by: | Admin |
Views: | 18 |