|
|
Running a single test or method using Maven is straightforward and can be accomplished using Maven commands. By default, Maven runs all tests in your project, but you can specify a single test class or even a single test method to execute. In this article, we will learn how to run a single test or method with Maven, providing a related example. Project Setup:
Implementation to Run a Single Test or Method With MavenBelow are the implementation steps to run a Single Test or Method With Maven. Step 1: Create a Maven ProjectFirst, create a simple maven project by using your favorite tool. Here, we use STS IDE By using required dependencies. Dependencies:<?xml version="1.0" encoding="UTF-8"?>
<project xmlns="http://maven.apache.org/POM/4.0.0" xmlns:xsi="http://www.w3.org/2001/XMLSchema-instance"
xsi:schemaLocation="http://maven.apache.org/POM/4.0.0 https://maven.apache.org/xsd/maven-4.0.0.xsd">
<modelVersion>4.0.0</modelVersion>
<parent>
<groupId>org.springframework.boot</groupId>
<artifactId>spring-boot-starter-parent</artifactId>
<version>3.2.6</version>
<relativePath/> <!-- lookup parent from repository -->
</parent>
<groupId>com.app</groupId>
<artifactId>mavencommends</artifactId>
<version>0.0.1-SNAPSHOT</version>
<name>mavencommends</name>
<description>Spring Reactive</description>
<properties>
<java.version>1.8</java.version>
</properties>
<dependencies>
<dependency>
<groupId>org.springframework.boot</groupId>
<artifactId>spring-boot-starter-web</artifactId>
</dependency>
<dependency>
<groupId>org.springframework.boot</groupId>
<artifactId>spring-boot-devtools</artifactId>
<scope>runtime</scope>
<optional>true</optional>
</dependency>
<dependency>
<groupId>org.springframework.boot</groupId>
<artifactId>spring-boot-starter-test</artifactId>
<scope>test</scope>
</dependency>
</dependencies>
<build>
<plugins>
<plugin>
<groupId>org.springframework.boot</groupId>
<artifactId>spring-boot-maven-plugin</artifactId>
</plugin>
</plugins>
</build>
</project>
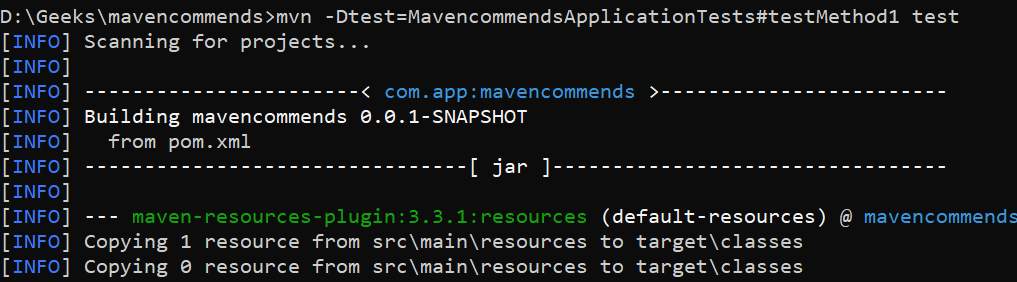
Project Structure:Step 2: Write Test ClassNow, navigate to src/test/java folder after this the is a by default Test class is available in that package. Now write your test logic in that test class. This class contains two test methods, testMethod1 and testMethod2. MavencommendsApplicationTests.java: Step 3: Configure DependenciesMake sure your pom.xml is setup to use JUnit 5. If you don’t have below we provide that dependency copy into your pom.xml then update the Project. <dependencies>
<dependency>
<groupId>org.junit.jupiter</groupId>
<artifactId>junit-jupiter-api</artifactId>
<version>5.7.1</version>
<scope>test</scope>
</dependency>
<dependency>
<groupId>org.junit.jupiter</groupId>
<artifactId>junit-jupiter-engine</artifactId>
<version>5.7.1</version>
<scope>test</scope>
</dependency>
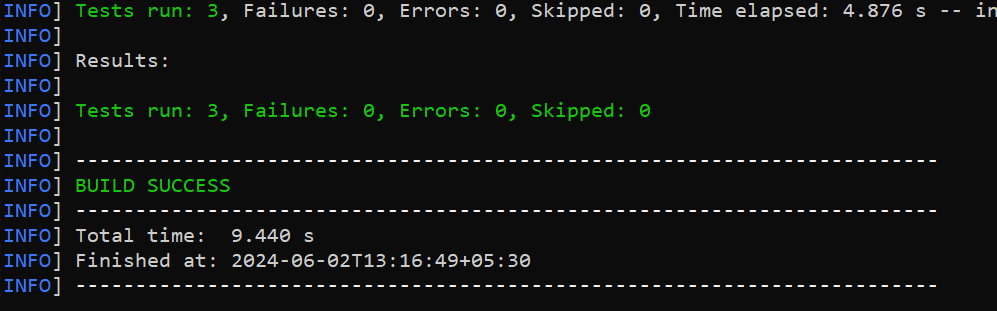
</dependencies>Step 4: Run Entire Test ClassThe following command will run all the test methods in the MavencommendsApplicationTests class. Here we run entire test methods in the test class. mvn -Dtest=MavencommendsApplicationTests testOutput:
|

Reffered: https://www.geeksforgeeks.org
| Advance Java |
| Related |
|---|
| |
| |
| |
| |
| |
Type: | Geek |
Category: | Coding |
Sub Category: | Tutorial |
Uploaded by: | Admin |
Views: | 15 |