|
|
Arduino is an important device used in electronics engineering for creating mini-projects or for integrating large projects. Arduino itself consists of various components that can be programmed according to the project requirements using some assembly languages like C/C++. Arduino is the first choice of many professionals due to the ease with which it can be programmed and how it allows interactive features for user experience. Arduino is programmed to include both hardware and software components which account for its use in different fields like designing, sensing, and testing. Since Arduino is an open-source platform, it is used globally by users all across the globe. Let us study what is an Arduino, what functionalities it has and how can we use it in daily life. Table of Content What is Arduino?The Arduino is one of the most popular and widely used Arduino boards. It’s based on the ATmega328P microcontroller and offers a good balance of features, performance, and affordability, making it suitable for a wide range of projects, from simple to moderately complex. Most electronic devices involve circuit-making using hardware components. The purpose of introducing Arduino was to make an easy-to-use device that can offer the feature of programming along with circuit making. Therefore, Arduino is a programmable device that is used mostly by artists, designers, engineers, hobbyists, and anyone who wants to explore programming in electronics. The Arduino uses its components to gather information from the surroundings and generate a precise output accordingly. The information is gathered using some components like sensors, and input pins, and an output is generated depending on the programming done. This output can range from illuminating an LED to turning the motors on. Arduinos are great devices that can be used for creating interactive projects. They can either be used alone to create basic projects or they can be integrated with Arduino, Raspberry Pis, NodeMCU, or nearly anything else using some programming in their software to create some advanced level of projects. It is good to know the specifications of different Arduino so that you can select the right Arduino for your project. Arduino HardwareLet us look at the hardware components of Arduino : Arduino hardware
Basic OperationMost of the Arduino can perform a single task using the help of a microcontroller. These tasks can be performed in a cycle as defined by the variables. This basic task can be from blinking an LED to rotating a motor. This is how the loop in the setup will be defined
Depending on all the delays introduced, the program takes around microseconds to execute. Circuit BasicsConsider this basic LED circuit 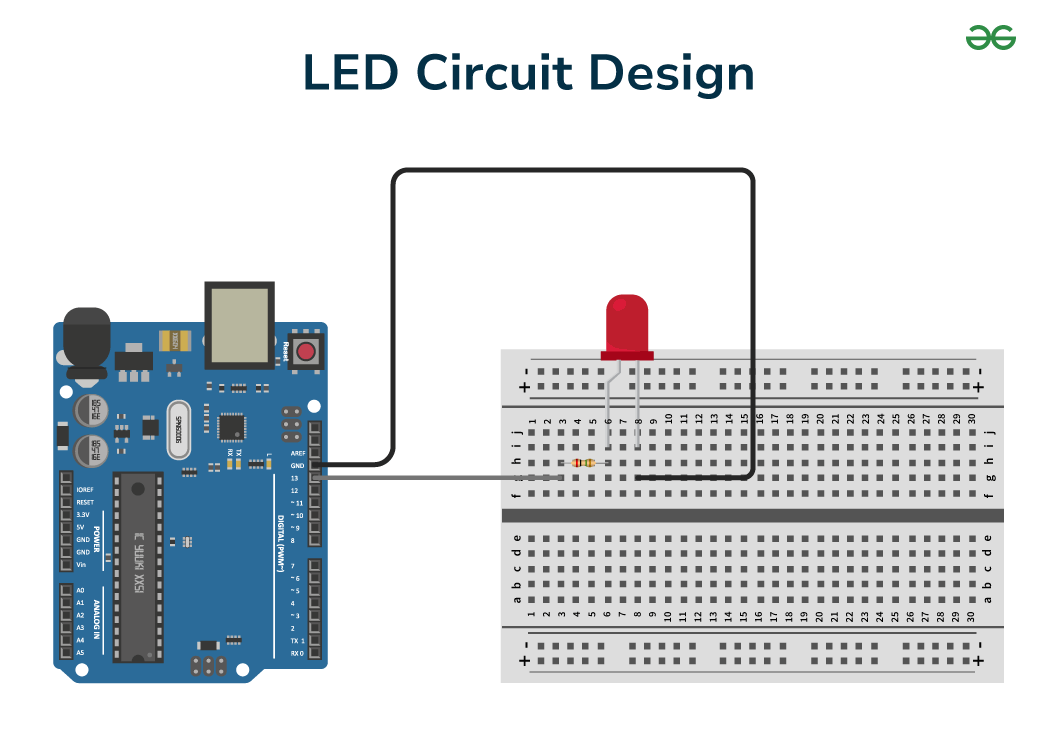 LED Circuit Design Consider the circuit shown above, the LED is connected to pins on the Arduino using some resistors to limit the amount of current flowing through the LED. The reference level is set using the ground pin. During the high or the ‘ON’ state, the circuit connections will be complete, and current will flow through the circuit components as programmed in the microcontroller. In this state, the LED will glow. When the circuit is turned ‘OFF’, the pins are set to low and the LED becomes dim due to no current flow. Electronic SignalsLet us study the two types of signals: Analog Signal: Analog signals are the ones that can have any value in a given range of values. This range can vary from 0V to 5V. To take the input from the input pins, the analog pins are used that can have a range of 0-255 with an 8-bit resolution. This is how we can read a large input value in an Arduino board. Digital Signal: Unlike analog signals, digital signals can only take a set of two values, high(‘1’) and low(‘0’). The advantage of these signals is that they can be used to turn the Arduino on or off. Although they can take only two values, we can use these values to generate a sequence known as the binary sequence which is a collection of zeroes and ones which can be sent easily for communication. Sensors And ActuatorsLet us discuss about sensors and actuators : SensorsThe term ‘sensor’ is self-explanatory and indicates a device that can sense any physical quantity and convert it to a form that can be measured like a signal. Sensors can be categorized into different forms depending on the type of quantity they measure. For example, the temperature sensor is a device that measures temperature. The most common example of a sensor is an analog sensor that can be used for measuring a continuous range of values generally from 0-5V. Another type of sensor are digital sensors that sense inputs and then generate an output in digital bits. Certain libraries have been designed to read this digital sequence generated by the sensor for measuring purposes. This line of code is used for reading the value.
ActuatorsContrary to sensors, actuators are used to change a physical state based on something they sense. Actuators perform the task of using the signal to actuate something like causing mechanical movement when an input is sensed or turning a light bulb on when voltage is received. Let us see how digitalWrite() and analogWrite().
Arduino APIArduino API refers to “Arduino Programming Language” which is generally written. Let us see what the “Arduino Programming Language” consists of
The Arduino API simplifies the task of writing the code due to the additional libraries that control the hardware part of Arduino. LibrariesLibraries are useful for controlling the hardware and software part of Arduino without the need to write the already written code. Libraries are contributed by different developers and need to be imported into your module. By including a library, you don’t have to write complex code like reading a specific sensor, controlling a motor, or adding wi-fi. By simply including the free open-source libraries, you can access these functions. The line of code used for adding a library:
General CommandsLet us see a list of commands that are used in almost every project. setup()It is used to configure the program.
loop()It includes the programs that will run when the board is in an “ON” state.
delay()This is used to add a pause in the function for a certain millisecond as required. The code snippet shows the use of the delay function.
millis()Not used very often but this function can allow you to run multiple functions consecutively without putting anything to a halt. It uses intervals to store the time since the last operation or function was running. Here is a code snippet.
Example SketchSketch is the whole project you created in your IDE. Note that when you save your project, it is saved with the extension of .ino. Let us see a sample sketch to turn on the LED.
Why choose Arduino?We need to know the reason for selecting Arduino over other devices so let us study some advantages of Arduino.
What Can You Do With an Arduino?Arduino finds its applications in various fields due to their ability to perform different things. Let us see some of its applications:
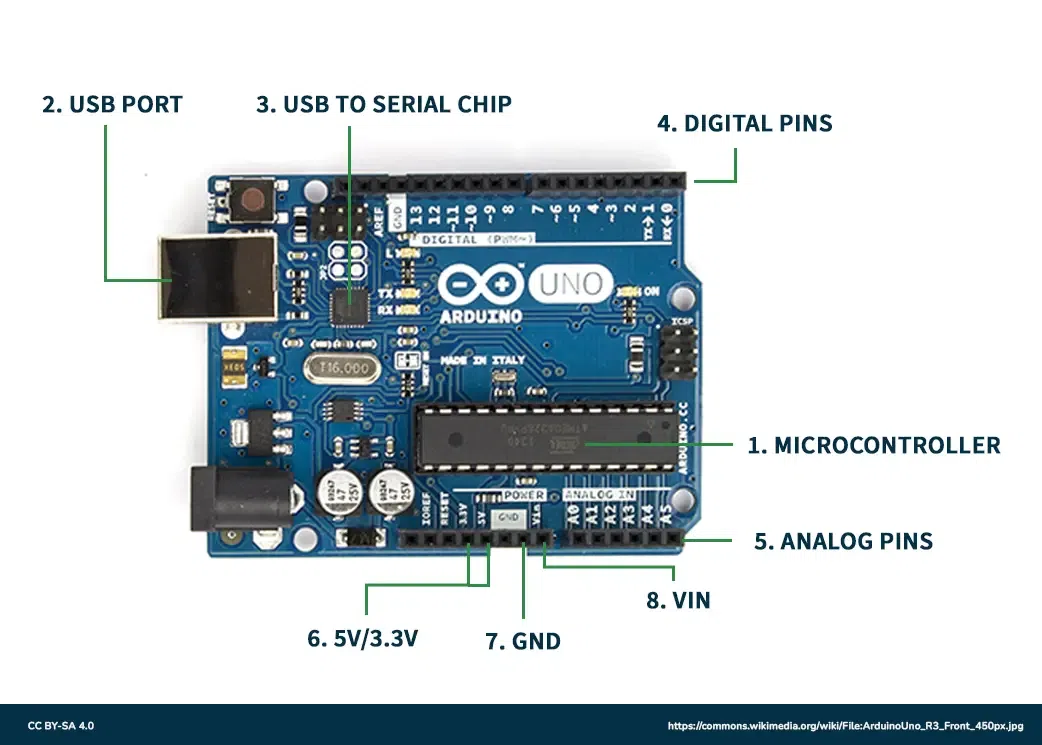
Structure of ArduinoDifferent Arduino are designed to serve different purposes but some basic components are needed in every Arduino. Note that Arduino Uno is the most used board and is the most common choice for different users. Let us study the internal structure of the Arduino Uno model.
Components of ArduinoLet’s study the basic components of Arduino: Breadboard: Breadboards are used to provide a base for setting up the connecting components together. If you look at a breadboard, is a plastic block made up of holes that are left for making connections using wires. The internal of the breadboard consists of different connections that are hidden. They are generally used for smaller circuits LEDs(Light Emitting Diode): LEDs are small devices that illuminate when a small voltage is supplied to them. These LEDs come in a variety of colors ranging from red to green. These LEDs can be used for testing minimum voltages since they don’t burn for a long period. Photo Resistor: Many Arduinos contain a photoresistor that is used for measuring changes in light using Arduino. Tactile Switch: This switch resembles a button that is used to open or close a circuit like any other switch. When the button is turned on, the voltage of Arduino increases from 0V to +5V. This voltage change acts as a trigger for the Arduino and an Arduino detects this change momentarily since the switch is then turned off when the button is released. Microcontroller: An Arduino consists of a microcontroller that controls the whole functioning of the Arduino by generating an apt output corresponding to the input code. Depending on the type of Arduino board you are using, you can select a microcontroller that fits well. Resistors: Resistors are used to resist the flowing electricity. Resistors are often bought to set a limit to the current flowing in the circuit thereby protecting the components of the circuit from getting burnt due to excessive current. Jumper Wires: Jumper wires are thin wires covered with a plastic covering for insulation. These wires are used for connecting different components in the breadboard. Setting Up Your ArduinoThis is an essential step since it allows your computer to communicate with Arduino. Make sure you have a tested and working Arduino board before connecting it to your computer. Any duplicate Arduino will need some modifications in the installation process. Let us see how to connect the Arduino to the computer for the execution of the code. Installing the Arduino Software PackageTo install the Arduino software, you need to visit the official website and download the latest version that is valid for your computer. Here is a list of steps to be followed for installing Arduino Integrated Development Environment (IDE). Windows Setup
Mac OS
Installing the Arduino Software on Package Ubuntu/Linux Installation on Ubuntu/Linux is a bit different since it involves dealing with some commands. Here are the steps.
Running the Arduino SoftwareSince our software has been installed, it is our time to check whether the setup is correct and that our Arduino is working well. To do this, we will use the “Blink” sample application Once the Arduino application has been installed on your device, open the software for the associated Arduino. Then follow these steps:
ConclusionWe have seen how Arduino is a very useful and budget-friendly device that can be used for making basic projects. The ability of Arduino to provide a programming interface and allow features like the detection of data from the environment makes it a great choice for designers, and artists. Despite the versatilities offered, there are certain restrictions associated with Arduino, and developments are being made in the Arduino design. Readers are advised to try some basic projects to enhance their understanding of the subject. Getting Started With Arduino – FAQsWhat are some different Arduino boards that can be used?
What are some basic projects that can be created using Arduino?
Does Arduino have the ability to connect to the internet?
|
Reffered: https://www.geeksforgeeks.org
| Arduino |
Type: | Geek |
Category: | Coding |
Sub Category: | Tutorial |
Uploaded by: | Admin |
Views: | 14 |