|
Creating a Contact Us form in Next.js involves setting up a form component, handling form submissions, and potentially integrating with a backend service or API to send the form data. In this article, we will create a Contact Us Form with NextJS.
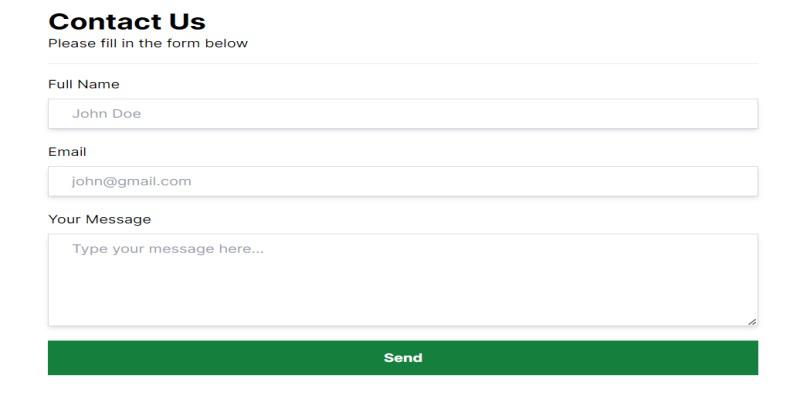
Output Preview: Let’s have a look at what our final project will look like:
 Building a Contact Us Form with Next.js Prerequisites: ApproachTo create contact us form using Next.js, we will use:
- The Home component to renders the contact form.
- The ContactForm component handles user input, submission, and displays success or error messages.
- Accepts POST requests with contact form data.
- Uses Mongoose to connect to MongoDB and store the contact information.
- Returns JSON responses indicating success or failure, including error messages for validation failures.
- The database setup uses MongoDB with Mongoose for defining a schema and interacting with the database.
Steps to Build a Contact Us Form with NextJSStep 1: Set up NextJS project using the command
npx create-next-app@latest What is your project named? > contact-us
Would you like to use TypeScript with this project? > No
Would you like to use ESLint with this project? > Yes
Would you like to use Tailwind CSS with this project? > Yes
Would you like to use 'src/'directory with this project? > No
Use App Router (recommended)? > Yes
Would you like to customize the default import alias? > No Step 2: Navigate to the project folder using the below command.
cd contact-us Step 3: Install the mongoose package using the command.
npm i mongoose Project Structure: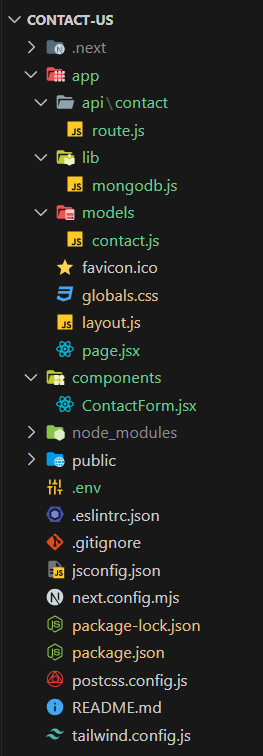 Project Structure of Contact Us Form with Next.js The updated dependencies in the package.json file are:
"dependencies": {
    "mongoose": "^8.5.1",
    "next": "14.2.4",
    "react": "^18",
    "react-dom": "^18"
}
Step 4: Set up MongoDB for database.
- Simply search for MongoDB Atlas and create a free account.
- Create a cluster.
- Create a New Project as ContactForm .
- Build a Database using the Free version.
- Create a username and password.
- Add the IP Address as 0.0.0.0/0 so that we can access this database from anywhere.
- Click on Connect and select MongoDB for VS Code.
- Copy the connection string and replace <password> with your password.
Create a file as .env in the project folder . Paste the connection string you have just copied and put it equal to MONGODB_URL variable with contact_db appended at the end of the connection string as given below.
MONGODB_URL=mongodb+srv://<username>:<password>@cluster0.jxzdjvc.mongodb.net/contact_db
Explanation:
- Create a folder “components” and add a new file in it namely ContactForm.jsx.
- Create a folder “api” under the folder app . Create a sub-folder contact and add a new file in it namely route.js.
- Create a folder “lib” under the folder app and add a new file in it namely mongodb.js.
- Create a folder “models” under the folder app and add a new file in it namely contact.js.
- Modify files of the folder app i.e. global.css, layout.js, and page.jsx.
Example: Below is an example of building a Contact Us Form with NextJS.
CSS
/* Filename - globals.css */

@tailwind base;
@tailwind components;
@tailwind utilities;

form>div {
    @apply flex flex-col gap-2;
}

input,
textarea {
    @apply shadow-md px-6 py-2 border border-slate-300;
}
// Filename - page.jsx

import ContactForm from "@/components/ContactForm";

export default function Home() {
    return (
        <div className="p-4 max-w-3xl mx-auto">
            <h1 className="text-3xl font-bold">
                Contact Us
            </h1>
            <p>Please fill in the form below</p>

            <ContactForm />
        </div>
    );
}
// Filename - layout.js

import { Inter } from "next/font/google";
import "./globals.css";

const inter = Inter({ subsets: ["latin"] });

export const metadata = {
    title: "Contact Us",
    description: "Generated by create next app",
};

export default function RootLayout({ children }) {
    return (
        <html lang="en">
            <body className={inter.className}>
                {children}
            </body>
        </html>
    );
}
// Filename - components/ContaxtForm.jsx

"use client";

import { useState } from "react";

export default function ContactForm() {
    const [fullname, setFullname] = useState("");
    const [email, setEmail] = useState("");
    const [message, setMessage] = useState("");
    const [error, setError] = useState(null);
    const [success, setSuccess] = useState(false);

    const handleSubmit = async (e) => {
        e.preventDefault();

        console.log("Full name: ", fullname);
        console.log("Email: ", email);
        console.log("Message: ", message);

        const res = await fetch("api/contact", {
            method: "POST",
            headers: {
                "Content-type": "application/json",
            },
            body: JSON.stringify({
                fullname,
                email,
                message,
            }),
        });

        const { msg, success } = await res.json();
        setError(msg);
        setSuccess(success);

        if (success) {
            setFullname("");
            setEmail("");
            setMessage("");
        }
    };

    return (
        <>
            <form
                onSubmit={handleSubmit}
                className="py-4 mt-4 border-t flex flex-col gap-5"
            >
                <div>
                    <label htmlFor="fullname">Full Name</label>
                    <input
                        onChange={(e) => setFullname(e.target.value)}
                        value={fullname}
                        type="text"
                        id="fullname"
                        placeholder="John Doe"
                    />
                </div>

                <div>
                    <label htmlFor="email">Email</label>
                    <input
                        onChange={(e) => setEmail(e.target.value)}
                        value={email}
                        type="text"
                        id="email"
                        placeholder="[email protected]"
                    />
                </div>

                <div>
                    <label htmlFor="message">Your Message</label>
                    <textarea
                        onChange={(e) => setMessage(e.target.value)}
                        value={message}
                        className="h-32"
                        id="message"
                        placeholder="Type your message here..."
                    ></textarea>
                </div>

                <button className="bg-green-700 p-3 text-white font-bold"
                    type="submit">
                    Send
                </button>
            </form>

            <div className="bg-slate-100 flex flex-col">
                {error && (
                    <div
                        className={`${success ? "text-green-800" : "text-red-600"
                            } px-5 py-2`}
                    >
                        {error}
                    </div>
                )}
            </div>
        </>
    );
}
// Filename - api/contact/route.js

import connectDB from "@/app/lib/mongodb";
import Contact from "@/app/models/contact";
import { NextResponse } from "next/server";
import mongoose from "mongoose";

export async function POST(req) {
    const { fullname, email, message } = await req.json();

    try {
        await connectDB();
        await Contact.create({ fullname, email, message });

        return NextResponse.json({
            msg: ["Message sent successfully"],
            success: true,
        });
    } catch (error) {
        if (error instanceof mongoose.Error.ValidationError) {
            let errorList = [];
            for (let e in error.errors) {
                errorList.push(error.errors[e].message);
            }
            console.log(errorList);
            return NextResponse.json({ msg: errorList });
        } else {
            return NextResponse.json({
                msg: ["Unable to send message."]
            });
        }
    }
}
// Filename - lib/mongodb.js

import mongoose from "mongoose";

const connectDB = async () => {
    try {
        if (mongoose.connection.readyState === 0) {
            await mongoose.connect(process.env.MONGODB_URL);
            console.log("db connected");
        }
    } catch (error) {
        console.log(error);
    }
};

export default connectDB;
// Filename - modals/contact.js

import mongoose, { Schema } from "mongoose";

const contactSchema = new Schema({
    fullname: {
        type: String,
        required: [true, "Name is required."],
        trim: true,
        minLength: [2, "Name must be larger than 2 characters"],
        maxLength: [50, "Name must be lesser than 50 characters"],
    },

    email: {
        type: String,
        required: [true, "Email is required."],
        match: [/^[\w.%+-]+@[\w.-]+\.[A-Za-z]{2,}$/i,
            "Invalid email address"],
    },

    message: {
        type: String,
        required: [true, "Message is required."],
    },

    date: {
        type: Date,
        default: Date.now,
    },
});

const Contact =
    mongoose.models.Contact || mongoose.model("Contact",
        contactSchema);

export default Contact;
Start your application using the following command.
npm run dev Output : Open web-browser and type the following URL http://localhost:3000/
 Building a Contact Us Form with NextJS
|