|
|
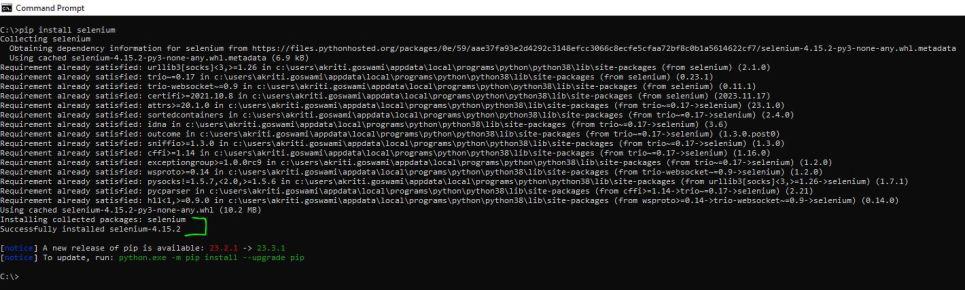
Selenium IDE is an open-source tool that is widely used in conducting automated web testing and browser automation. This tool is intended mainly for Web Application testers and developers to develop, edit, and run automated test cases for Web Applications. Table of Content Selenium IDE lets you easily playback and record interactively web application activities during test automation on the browser-based interface. What are Selenium test cases?Selenium is an open-source/license-free web automation framework. It is a quick and easy way to test functional scenarios as it minimizes manual efforts thereby reducing human errors. This article is going to describe how to set up your local systems to run a selenium test case in Chrome Browser using Python. Create Selenium test casesStep 1: Install Selenium: Open Command Prompt and type command > pip install selenium
pip install selenium Step 2: Download chrome binary and chrome driver. Make sure both are compatible i.e., have the same version. For example, if you are using windows platform then, download the latest driver and binary for win64 or win32 based on your system’s settings.
 Chrome binary/browser Version Step 3: Import the modules of selenium for web automation and sys for managing command line arguments. Step 4: A search function is defined which will be called using 1 argument ( keyword to search in Google ). This search function contains the main implementation of the “Search Google” task and is called once when the script is run. Step 5: webdriver_path variable should be configured to match the location of the Chrome WebDriver folder. Ensure that this variable points precisely to the location where the folder has been downloaded and extracted in alignment with the automation script. For example, both “SearchGoogle.py” script and extracted “chromedriver-win64” folder are in the same location , so webdriver_path is defined with value = “/chromedriver-win64“  webdriver_path Step 6: An instance of “ChromeOptions” Class is created with name chrome_options. The executable_path argument inside formatted string literal (f”…”) is used to direct Chrome for finding the WebDriver executable using webdriver_path variable. Step 7: Chrome WebDriver initialized as “driver” variable uses WebDriver module ( which is part of the Selenium library ) with specific configuration options provided through the chrome_options variable Step 8: Using the above driver, first the Chrome window is maximized using maximize_window() method and get() method is used to navigate the browser to the specified URL which is Google HomePage. The browser window will then display the content of the Google webpage in the Chrome Browser. Step 9: find_element() method of the WebDriver instance (driver) is used to locate an HTML element having “name” attribute with value = “q” on the webpage which is used for Search Box input and this element is assigned to variable “search_box”. Step 10: Next, send_keys() method simulates typing on the keyboard into a specific element, in this case, “search_box” variable defined in above step. Here, “keyword” argument is the command line argument which we will pass while calling the script. This “keyword” variable will hold the search term that needs to be entered into the search box. Keys.RETURN is a constant provided by the selenium.WebDriver.common.keys module which is used to simulate pressing the “Enter” key after typing the search term which triggers the search action. Step 11: save_screenshot() method is used to save a screen snippet of the result displayed from the above actions at the same location as that of the python script. The browser is closed at the end using quit() method. Save the above code as fileName.py and run the script using below command in the command prompt: python fileName.py “Keyword to search” Example: if file name is saved as SearchGoogle.py Then, below command is run: python SearchGoogle.py “Sun” OutputConclusionTo summarize the above procedure, install selenium and download the chrome binary and driver in your local system. Create an object of ChromeOptions class and use this configurable object to create a Chrome webdriver for the web automation. There are various web tasks that can be automated such as navigating to URLs, interacting with webpage elements, extracting information, waiting for elements to load and executing actions like a Google search. Finally, it’s crucial to close the WebDriver after completing the automation tasks to release system resources and close the browser window. |
Reffered: https://www.geeksforgeeks.org
| Geeks Premier League |
Type: | Geek |
Category: | Coding |
Sub Category: | Tutorial |
Uploaded by: | Admin |
Views: | 12 |