.png)
|
|
Imagine a user story is like a towering mountain. Scaling it alone seems impossible, right? But this is where the subtasks come in – as your trusty climbing gear. They break down the climb into crystal clear steps, which make the ascent smooth and successful. The acceptance criteria act as checkpoints, it will ensure you reach the summit with all the necessary flags planted. Table of Content Breaking down the user stories into smaller parts, in the development process more manageable tasks is essential for agile development teams. And to do so this is where subtasks come in. Subtasks are the smaller units of work that truly contribute to the completion of a user story. They help to:
In addition to breaking down user stories into different subtasks, it is also important to define the acceptance criteria with it. Acceptance criteria are the conditions that should be met for a user story to be considered complete. By defining the clear acceptance criteria, you can make sure that everyone is on the same page about what exactly needs to be done and that user stories are not completed prematurely. Understanding User StoriesUser stories are the most important thing in agile development, serving as concise bridges between the user needs and the software features regarding the project. Imagine them as bite-sized narratives, where each of the capturing has a desired functionality from the user’s perspective. They answer the conclusive questions of “what” and “why”:
Defining Key Terms
Creating Subtasks in JiraStep 1: Navigate to Your User StoryFirst, find the user story you want to work with in Jira software. Think of it as your target. User story Step 2: Unleash the Subtask Power Now to start click the “…” menu (… button) on your selected user story. It’s like opening a top-secret menu for subtasks! Select “Create Sub-task” from the menu. 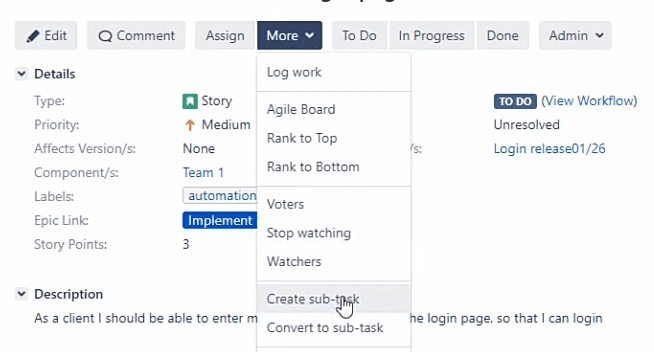 Create sub-task option Step 3: Name the subtask and Launch Now as you open the crates of the task you need to give your subtask a clear name that exactly reflects its purpose. Then hit “Create” and boom, you’ve spawned a mini-mission!  Create sub-task popup Step 4: More Bites, More Fun It is the optional step if you need more subtasks follow the second and third steps to create as many as needed subtasks. Think of it as building your task list. Defining Acceptance CriteriaStep 1: Acceptance Criteria the Checkpoint for User StoryNow successfully created subtask you need to follow these steps for further process just start by clicking the “…” menu on the specific subtask then select “Edit Issue.” This will open its edit panel.  Edit issue panel Step 2: Checkpoint creation Now In the “Description” field, list all the conditions that must be met for this subtask to be considered completed according to your subtask think of it as the “done” checklist, this is the finish line!  Acceptance criteria description Step 3: Save and Savor Success Now you have come to the end you just need to click “Update” to save your acceptance criteria. And done you’ve just established a clear goal for your subtask to strive towards! You can repeat steps 5 and 6 for all your subtasks.  Update button Linking Subtasks to User StoriesSubtasks will automatically inherit the user story’s sprint, assignee, and other attributes, simplifying the project management process. You can also manually link the subtasks to other issues for deeper dependencies which are regarding the main task.
Managing Changes and UpdatesAs projects evolve with time, so might your user stories and subtasks. Jira allows you to edit, delete, and re-prioritize subtasks seamlessly.
Reporting and Monitoring ProgressJira offers different kinds of reports and dashboards to visualize progress and also identify potential bottlenecks. It will track subtask completion, identify dependencies, and also celebrate achievements as your team navigates the project landscape.  Reporting and monitoring dashboard Useful Tips for Creating Effective Subtasks and Acceptance Criteria
ConclusionBy using these tools well, you and your team can conquer those mountains of work with ease. You’ll work together smoothly, track progress clearly, and avoid getting stuck. By following these steps and tips, you’ll be a subtask and acceptance criteria pro in no time, that will exactly lead your team to smooth project completion and software success! FAQs1. How many subtasks?Make them small generally Aim for tasks you can finish in a few hours, like bite-sized pieces of a burger. This keeps things moving and avoids overwhelm. 2. What makes good acceptance criteria?Clear, simple, and measurable. Everyone should understand what “done” looks like for each task. Like a checklist with boxes to tick. 3. Should I update the acceptance criteria?Yes, as things change, so should update your criteria. Think of it like updating a recipe if you have new ingredients. 4. How do I track progress and find problems?Use Jira’s reports and dashboards. They show you how things are going and if any tasks are stuck, like a car in traffic. 5. Can I make subtasks for subtasks?Yes, you can, Keep it simple and organized. |
Reffered: https://www.geeksforgeeks.org
| Geeks Premier League |
Type: | Geek |
Category: | Coding |
Sub Category: | Tutorial |
Uploaded by: | Admin |
Views: | 14 |