import React, { useEffect, useState } from 'react';
function App() {
const [cursorX, setCursorX] = useState(0);
const [cursorY, setCursorY] = useState(0);
const [deviceType, setDeviceType] = useState('');
const [isClicking, setIsClicking] = useState(false);
const [buttonHovered, setButtonHovered] = useState(false);
const isTouchDevice = () => {
try {
document.createEvent('TouchEvent');
setDeviceType('touch');
return true;
} catch (e) {
setDeviceType('mouse');
return false;
}
};
const move = (e) => {
const touchEvent = e.touches ? e.touches[0] : null;
const x = !isTouchDevice() ? e.clientX : touchEvent?.clientX || 0;
const y = !isTouchDevice() ? e.clientY : touchEvent?.clientY || 0;
setCursorX(x);
setCursorY(y);
const cursorBorder = document.getElementById('cursor-border');
if (cursorBorder) {
cursorBorder.style.left = `${x}px`;
cursorBorder.style.top = `${y}px`;
}
};
const handleMouseDown = () => {
setIsClicking(true);
};
const handleMouseUp = () => {
setIsClicking(false);
};
const handleButtonHover = (hovered) => {
setButtonHovered(hovered);
};
useEffect(() => {
document.addEventListener('mousemove', move);
document.addEventListener('touchmove', move);
document.addEventListener('mousedown', handleMouseDown);
document.addEventListener('mouseup', handleMouseUp);
return () => {
document.removeEventListener('mousemove', move);
document.removeEventListener('touchmove', move);
document.removeEventListener('mousedown', handleMouseDown);
document.removeEventListener('mouseup', handleMouseUp);
};
}, []);
return (
<div>
<style>
{`
* {
margin: 0;
cursor: none;
}
body {
background-color: #0984e3;
height: 100vh;
overflow: hidden;
display: flex;
justify-content: center;
align-items: center;
}
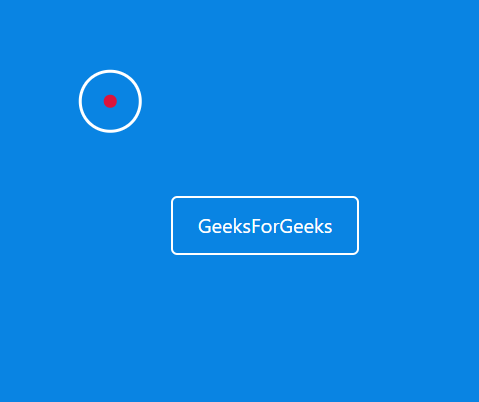
#cursor {
position: absolute;
background-color: ${isClicking ? 'crimson' : 'crimson'};
height: 10px;
width: 10px;
border-radius: 50%;
transform: translate(-50%, -50%);
pointer-events: none;
transition: background-color 0.2s ease;
}
#cursor-border {
position: absolute;
width: 50px;
height: 50px;
background-color: transparent;
border: 3px solid ${buttonHovered ? 'red' : '#fff'};
border-radius: 50%;
transform: translate(-50%, -50%);
pointer-events: none;
transition: all 0.2s ease-out;
}
`}
</style>
<div
id="cursor"
style={{ left: `${cursorX}px`, top: `${cursorY}px` }}
></div>
<div id="cursor-border"></div>
<button
onMouseEnter={() => handleButtonHover(true)}
onMouseLeave={() => handleButtonHover(false)}
style={{
backgroundColor: buttonHovered ? 'green' : 'transparent',
color: 'white',
padding: '10px 20px',
border: '2px solid white',
borderRadius: '5px',
cursor: 'pointer',
}}
>
Geeksforgeeks
</button>
</div>
);
}
export default App;