|
|
Node affinity in Kubernetes refers to the ability to assign a Kubernetes pod to a specific node or group of nodes in a cluster based on specific criteria. A feature called node affinity is employed to guarantee that particular pods are located on particular nodes in a cluster. This facilitates better resource management and performance optimization of the application. In Kubernetes, a node is a physical or virtual machine that controls one or more pods. Pods are the smallest deployable components in Kubernetes and are used to run containerized applications. With the use of node affinity, specific pods can be scheduled on particular nodes on the basis of a variety of factors, such as the node’s CPU or memory capacity or its location within a particular region or data center. Table of Content
What is Node Affinity?Node Affinity in Kubernetes is a feature in Kubernetes that facilitates us to specify the rules for scheduling the pod based on the node labels. It facilitates providing a way for pod placement by expressing the requirements about the nodes where the pods should be scheduled. Node Affinity allows to expression of various conditions as preferred such as node attributes, and anti-affinity rules to avoid certain nodes and to have more complex label expressions for pod placement strategies.
What Are Node Labels?Node Labels in kubernetes are key-value pairs to kubernetes nodes. It is used for describing the characteristics of nodes such as hardware capabilities, geographical locations, environment and other any metadata. These labels are used to organize and categorize the nodes on various factors like geo-locations, hardware resources etc.. Node labels are essential in kubernetes in scheduling the workloads on certain required nodes. It facilitates the user to define affinity or anti-affinity rules, node selectors and other scheduling constraints to control the pod distribution across the cluster. These Labels provides the flexible mechanism for grouping and targeting the nodes based on different criteria, with efficient resource allocation and management. What Are the Types of Node Affinity in Kubernetes?Required node affinity and Preferred node affinity. We use the required node affinity to specify which pod needs to be scheduled on which node. The node’s CPU or memory capacity, location in a particular area or data center, or any other special label that the node has been given may all have an impact on this specification. However, it is not a strict requirement. On the other hand, preferred node affinity is used to suggest that a pod should, whenever possible, be scheduled on a node that matches a specific label. If there are no nodes that match the preferred node, the pod can still be scheduled on different node affinity labels. The following are the types of Node Affinity: 1. RequiredDuringSchedulingRequiredDuringExecution 2. RequiredDuringSchedulingIgnoredDuringExecution 3. PreferredDuringSchedulingIgnoredDuringExecution Types of Node AffinityBased on node properties, Node Affinity is used to specify the scheduling preferences for pods. You can further categorize Node Affinity into Three types: 1.RequiredDuringSchedulingRequiredDuringExecutionThis is a hard rule. The pod must be scheduled on a node that complies with the node affinity criteria If no nodes in the cluster satisfy the rule, then the pod will remain unscheduled. If the node labels are changed in the future the pod will be evicted. affinity: In this case, the label key-value pair specified in the “nodeSelectorTerms” prevents the pod from being scheduled on nodes that do not have it. 2.RequiredDuringSchedulingIgnoredDuringExecutionThis is the second hard rule. The pod will be scheduled only if the pod labels are matched with the node labels. If the node labels are changed in the future the pod will not be evicted. affinity: 3. PreferredDuringSchedulingIgnoredDuringExecutionThis is a soft rule. This specifies the primary way for scheduling a node for a pod in accordance with the node affinity rule. The pod will still be scheduled on a node that does not match with the rule if none of the cluster’s nodes do. Below is the example of PreferredDuringSchedulingIgnoredDuringExecution: affinity: In this case, the pod will be scheduled on a node that has the label key-value pair specified in the “match expressions” section. If nodes do not meet this requirement, the pod will still be scheduled on a different node. Node affinity is a powerful resource that may be used to improve Kubernetes cluster performance and resource usage, but it also has pros and cons. The following are some of the advantages and disadvantages of node affinity: Difference Between Node Selector And Node AffinityIn Kubernetes, the concepts of node selector and node affinity are used to control the scheduling of pods onto the required cluster nodes.
So basically, Node Selector provides an easy method for choosing nodes based on labels, whereas Node Affinity offers more advanced capabilities for choosing and avoiding nodes based on complex rules. Difference Between Pod Affnity vs Node AffinityThe following are the differences between Pod Affinity and Node Affinity:
Advantages Of Kuberentes Node AffinityThe following are the advantages of kubernetes Node Affinity:
Disadvantages Of Kubernetes Node AffinityThe following are the disadvantages of kuberentes Node Affinity:
Difference of Pod Affinity, Intra-pod Affinity and Anti-AffinityThe following are the difference of pod affinity, Intra-pod affinity and Anti-Affinity:
How to Assign Pods to Nodes Using Node Affinity ? A Step-By-Step GuideAssigning the pds to Nodes using the node affinity provides the control on which nodes our pods to be scheduled, based on the node labels. The following is the step by step guide for assigning the pods to nodes using node affinity: Step 1: Firstly ensure that the kuberentes cluster is in running state with kubernetes master and worker nodes. Step 2: Create label the nodes with their specifications so that we can make easier to deploy pods on where we want to deploy. The following command helps in setting the labels to the nodes. kubectl label nodes <node-names> <label-key>=<label-value>
Step 3: Define the node affinity in Pod Yaml
spec: Step 4: Apply the pod configuration
kubectl apply -f <file_name.yaml>
Step 5: Verify Pod Placement
kubectl get pods -o wide
Adding A Label to a NodeOn adding the labels to the nodes provides to specify additional metadata to the node, which can be used for various purposes like node selection, scheduling and grouping.
kubectl label nodes <node-name> <label-key>=<label-value>
# Add Label to Node Schedule A Pod Using Required Node AffinityThe following are the steps for sechule a pod using required Node Affinity: Step 1: Identiy the Node Label
Step 2: Deine Pod Yaml
# Define Pod YAML with Required Node Affinity Step 3: Apply Pod Configuration
kubectl apply -f pod-with-required-affinity.yaml
Step 4: Verify Pod Placement
kubectl get pods -o wide
Schedule a Pod Using Preferred Node AffinityThe following are the steps for scheduling the pod using preferred Node Affinity: Step 1: Identify the Node Label
Step 2: Define Pod Yaml
# Define Pod YAML with Preferred Node Affinity Step 3: Apply Pod Configuration
kubectl apply -f pod-with-preferred-affinity.yaml
Step 4: Verify the Pod Placement
kubectl get pods -o wide
Assigning Pods to NodesThe following are the steps for assigning the pods to nodes: Step 1: Label the Nodes
kubectl label nodes node-1 environment=production
Step 2: Create Pod Yaml File
apiVersion: v1 Step 3: Apply Configuration
kubectl apply -f pod.yaml
Step 4: Verify Pod Placement
kubectl get pods -o wide
Command to See Existing labels of the NodeThe following is the command used to see the existing labels of the Node: kubectl get nodes --show-labels
Command to set New Labels to NodeThe following is the command used to set the new labels to the Node: kubectl label nodes <node-name> <label-key>=<label-value>
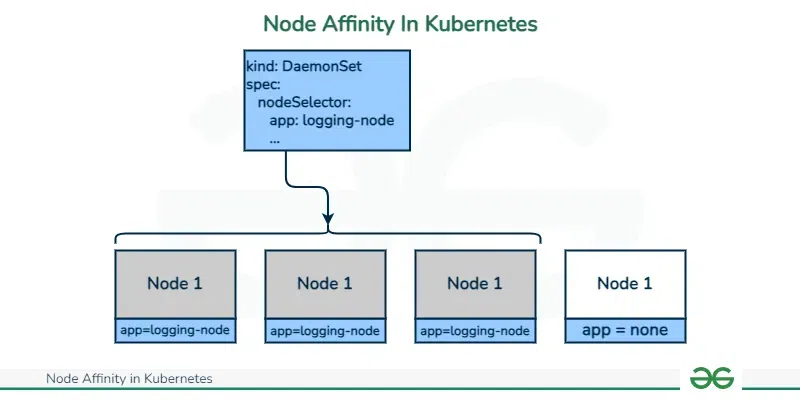
Example of NodeAffinityYou must include the selector rules in the pod’s YAML definition file in order to use the node selector in Kubernetes. For example, the YAML file below defines a pod with a necessary node selector for nodes with the label “nginx”
In the following example, we have used the ‘nodeSelector’ parameter for showing the required node affinity for nodes that do have the label ‘nginx’. This means that the pod will be scheduled on the nodes which contain this label. Let’s take another example of Node Affinity. For this, we will first create a deployment. The deployment will have the following features:
In order to create this deployment we can use two different approaches. However, for simplicity, we will use an imperative approach. We can create this deployment using the command:
As we can see that all the pods are deployed on the node01 node. In Conclusion, your Kubernetes clusters’ performance and resource efficiency may be enhanced by using node affinity. Assuring that your pods are scheduled on nodes with the resources they require through the use of node affinity can help to reduce resource contention and enhance application performance. Kubernetes Node Affinity – FAQsWhat are the two types of Kubernetes Nodes?
What is the affinity rule in kubernetes?
What are hard and soft affinity in kubernetes?
What is Topology key in kubernetes?
How to remove Node affinity in Kubernetes?
|


Reffered: https://www.geeksforgeeks.org
| Kubernetes |
Type: | Geek |
Category: | Coding |
Sub Category: | Tutorial |
Uploaded by: | Admin |
Views: | 12 |