
|
|
This article discusses deploying a Smart Contract on Ethereum with Python, Truffle, and web3py. Prerequisite: In order to write a simple smart contract, deploy it to a personal Ethereum blockchain, and call the contract using Python3, install the below software on a PC: 1. Python3 v3.5.3 or later versions: Install python following the instructions here. If python is already installed in the system, then check the version using the following command on the command prompt or Windows Powershell(In Windows) or Terminal(In Mac):
2. NodeJS v8.9.4 or later: Install NodeJs following the instructions here. If NodeJS is installed in the system, then check its version using the following command on the command prompt or Windows Powershell(In Windows) or Terminal(In Mac):-
Upon installing the above-mentioned Programming Language and Runtime Environment in your system, we are ready to move forward with deploying the smart contract. ApproachThe entire process is divided into 4 major sections:
Let’s discuss each of these steps in detail. Step 1: Setting up the Project1. The first step is to make a directory for the project. Open the command prompt or equivalent software on the system and execute the following commands:
2. Inside the recently made geeks-eth folder, install truffle(globally). A truffle is a popular tool for making smart contracts, a testing framework aiming to make the life of Ethereum developers easier.
3. After the successful installation of truffle, use the truffle CLI tool to initialize an empty smart contract project:
The command will create a project structure for us to set up and start the project. Output like this will be visible when the initialization operation is successful.  Initialization The above command will create the following structure:
Step 2: Scripting the Smart Contract1. Open the folder geeks-eth, which was just created and initialized. In the folder, find a folder named contracts/. In that folder, create and write a new solidity document which can be done using an IDE. Let’s say we create a solidity document gfg.sol and start scripting in it. Solidity
2. After writing the code next task is to compile the solidity code. Here, the truffle will be used to compile the contract from the project root folder. Hence open the command prompt again to run the following commands:
3. Compilation takes a few seconds. After compilation is completed, a message like “Compiled successfully using:” will be displayed. It will output the compiled contract gfg.sol as gfg.json inside build/contracts -> gfg.json. 4. Since we have compiled a contract, it can be now deployed to our running blockchain(local). Step 3: Deploying Smart Contract to the BlockchainIn order to deploy a smart contract to the blockchain migration script and truffle suite are required. 1. A migration script:
Javascript
2. Truffle suite contains its own blockchain that we can use for testing purposes.
3. Upon running the above command, find an output similar to: 
4. Upon getting the above output, migrate the smart contract by using the command migrate:
Migrate command calls each migration in migrations/, deploying the contracts to the blockchain(local). 5. Upon running the migrate command see an output like: 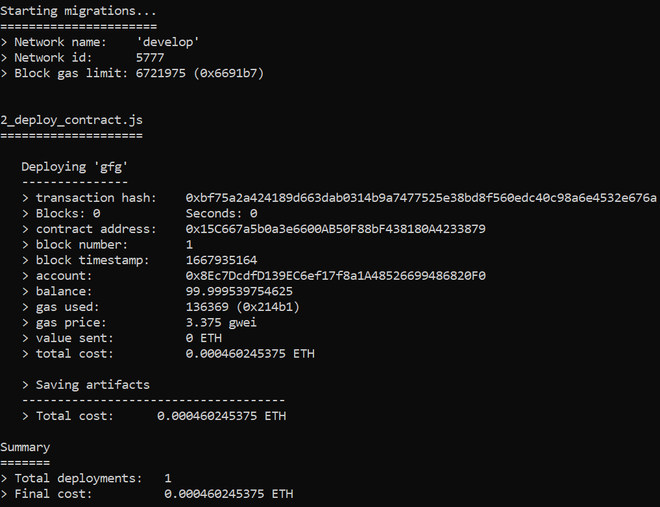 Smart Contract deployed on our personal Ethereum blockchain Explanation:
Step 4: Using Python to call the Deployed Contract1. In root folder “geeks-eth/” create a python file alongside other folders. Code using python so the smart contract that is deployed can be called: Python
2. After scripting the python code, open the terminal to finally call the Smart contract. Before that, install the web3 python library using the pip command.
3. It may take a few seconds, but once completed, we will be ready to call our Smart Contract.
 Output from our Smart Contract As in the smart contract (gfg.sol) we coded the message “Hey there! I am learning from GeeksForGeeks !”, the same is displayed as output when the smart contract is called using python. |
Reffered: https://www.geeksforgeeks.org
| Blockchain |
Type: | Geek |
Category: | Coding |
Sub Category: | Tutorial |
Uploaded by: | Admin |
Views: | 13 |