|
In Android, the Data Binding Library is a support library that allows you to bind UI components in your layouts to data sources in your app using a declarative format rather than programmatically.
What we are going to build in this article?Here is a sample video of what we are going to build in this project. Note that we are going to make this project in Java language.
Step-by-Step ImplementationStep 1: Create a New Project- Open a New Project.
- We will be working on Empty Activity with language such as Java. Leave all other options unchanged.
- Name the application at your convenience.
- There will be two default files named activity_main.xml and MainActivity.java.
If you don’t know how to create a new project in Android Studio then you can refer to How to Create/Start a New Project in Android Studio?
Step 2. Enable DataBindingNavigate to Gradle Scripts > gradle.scripts(module) and add the following code to it.
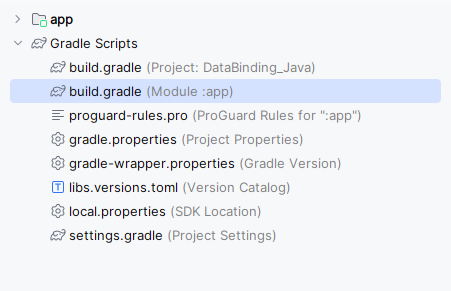
Add the below code snippet to the build.gradle file to activate dataBinding in the application:
buildFeatures
{
    dataBinding = true
}
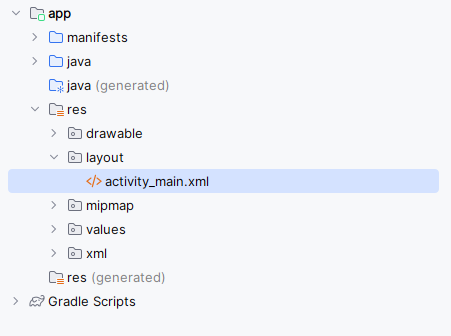
Step 3. Working on XML filesNavigate to the app > res > layout > activity_main.xml and add the below code to that file.
Below is the code for the activity_main.xml file.
activity_main.xml
<?xml version="1.0" encoding="utf-8"?>
<layout xmlns:android="http://schemas.android.com/apk/res/android"
    xmlns:app="http://schemas.android.com/apk/res-auto"
    xmlns:tools="http://schemas.android.com/tools">

    <LinearLayout
        android:layout_width="match_parent"
        android:orientation="vertical"
        android:padding="16dp"
        android:layout_height="match_parent"
        tools:context=".MainActivity">

        <TextView
            android:layout_width="match_parent"
            android:layout_height="wrap_content"
            android:text="Data Binding\nFor Activity"
            android:textSize="24sp"
            android:textStyle="bold"
            android:textColor="@color/design_default_color_primary"
            android:gravity="center" />

        <EditText
            android:layout_width="match_parent"
            android:layout_height="wrap_content"
            android:id="@+id/et_input"
            android:hint="Enter text"
            android:padding="12dp"
            android:layout_marginTop="16dp"
            android:background="@android:drawable/editbox_background" />

        <Button
            android:layout_width="wrap_content"
            android:layout_height="wrap_content"
            android:id="@+id/bt_submit"
            android:text="Submit"
            android:layout_gravity="center"
            android:layout_marginTop="8dp" />

        <TextView
            android:layout_width="match_parent"
            android:layout_height="wrap_content"
            android:id="@+id/tv_output"
            android:textSize="32sp"
            android:textStyle="bold"
            android:gravity="center"
            android:layout_marginTop="8dp" />

        <FrameLayout
            android:layout_width="match_parent"
            android:layout_height="match_parent"
            android:id="@+id/fragment"
            android:layout_marginTop="16dp" />


    </LinearLayout>
</layout>
Navigate to app > right-click > new > fragment > BlankFragment and name it as “MainFragement”:

Use the following code in fragment_main.xml file:
fragment_main.xml
<?xml version="1.0" encoding="utf-8"?>
<layout xmlns:android="http://schemas.android.com/apk/res/android"
        xmlns:tools="http://schemas.android.com/tools">

        <LinearLayout
            android:layout_width="match_parent"
            android:orientation="vertical"
            android:gravity="center_horizontal"
            android:layout_height="match_parent"
            tools:context=".MainFragment">

            <TextView
                android:layout_width="match_parent"
                android:layout_height="wrap_content"
                android:text="Data Binding\nFor Fragment"
                android:textSize="24sp"
                android:textStyle="bold"
                android:textColor="@color/design_default_color_primary"
                android:gravity="center" />

            <EditText
                android:layout_width="match_parent"
                android:layout_height="wrap_content"
                android:id="@+id/et_input"
                android:hint="Enter text"
                android:padding="12dp"
                android:layout_marginTop="16dp"
                android:background="@android:drawable/editbox_background" />

            <Button
                android:layout_width="wrap_content"
                android:layout_height="wrap_content"
                android:id="@+id/bt_submit"
                android:text="submit"
                android:layout_marginTop="8dp" />

            <TextView
                android:layout_width="match_parent"
                android:layout_height="wrap_content"
                android:id="@+id/tv_output"
                android:textSize="32sp"
                android:textStyle="bold"
                android:gravity="center"
                android:layout_marginTop="8dp" />

        </LinearLayout>
</layout>
Step 4. Working on Java filesNavigate to the MainActivity.java file and use the following code in it. Comments are added to the code to have a better understanding.
MainActivity.java
package com.example.databinding;

import androidx.appcompat.app.AppCompatActivity;
import androidx.databinding.DataBindingComponent;
import androidx.databinding.DataBindingUtil;
import androidx.fragment.app.Fragment;

import android.os.Bundle;
import android.view.View;
import android.widget.Toast;

import com.example.databinding.databinding.ActivityMainBinding;

public class MainActivity extends AppCompatActivity {

    // Initialize variables
    ActivityMainBinding binding;

    @Override
    protected void onCreate(Bundle savedInstanceState) {
        super.onCreate(savedInstanceState);

        // Assign variable
        binding= DataBindingUtil.setContentView(this,R.layout.activity_main);

        binding.btSubmit.setOnClickListener(new View.OnClickListener() {
            @Override
            public void onClick(View view) {
                // Get text from edit text
                String sText=binding.etInput.getText().toString().trim();

                // Check condition
                if(!sText.equals(""))
                {
                    // when text is not empty
                    // set text on text view
                    binding.tvOutput.setText(sText);
                }
                else
                {
                    // When text is empty
                    // Display Toast
                    Toast.makeText(getApplicationContext()
                    ,"Please enter text",Toast.LENGTH_SHORT).show();
                }
            }
        });

        // Initialize fragment
        Fragment fragment=new MainFragment();

        // Commit fragment
        getSupportFragmentManager().beginTransaction()
                .replace(R.id.fragment,fragment).commit();
    }
}
Navigate to the MainFragment.java file and use the following code in it.

Comments are added to the code to have a better understanding.
MainFragment.java
package com.example.databinding;

import android.os.Bundle;

import androidx.databinding.DataBindingUtil;
import androidx.fragment.app.Fragment;

import android.view.LayoutInflater;
import android.view.View;
import android.view.ViewGroup;
import android.widget.Toast;

import com.example.databinding.databinding.FragmentMainBinding;

public class MainFragment extends Fragment {

    // Initialize variable
    private FragmentMainBinding binding;
    private View view;

    private static final String ARG_PARAM1 = "param1";
    private static final String ARG_PARAM2 = "param2";

    private String mParam1;
    private String mParam2;

    public MainFragment() {
    // Required empty public constructor
    }

    public static MainFragment newInstance(String param1, String param2) {
        MainFragment fragment = new MainFragment();
        Bundle args = new Bundle();
        args.putString(ARG_PARAM1, param1);
        args.putString(ARG_PARAM2, param2);
        fragment.setArguments(args);
        return fragment;
    }

    @Override
    public void onCreate(Bundle savedInstanceState) {
        super.onCreate(savedInstanceState);
        if (getArguments() != null) {
            mParam1 = getArguments().getString(ARG_PARAM1);
            mParam2 = getArguments().getString(ARG_PARAM2);
        }
    }

    @Override
    public View onCreateView(LayoutInflater inflater, ViewGroup container,
                             Bundle savedInstanceState) {

        // Assign variable
        binding= DataBindingUtil.inflate(inflater,R.layout.fragment_main,container,false);
        view=binding.getRoot();

        binding.btSubmit.setOnClickListener(new View.OnClickListener() {
            @Override
            public void onClick(View view) {
                // Get text from edit text
                String sText=binding.etInput.getText().toString().trim();

                // Check condition
                if(!sText.equals(""))
                {
                    // When text is not empty
                    // Set text on text view
                    binding.tvOutput.setText(sText);
                }
                else
                {
                    // When text is empty
                    // Display Toast
                    Toast.makeText(view.getContext(),
                            "Please enter text",Toast.LENGTH_SHORT).show();
                }
            }
        });

        // Return view
        return view;
    }
}
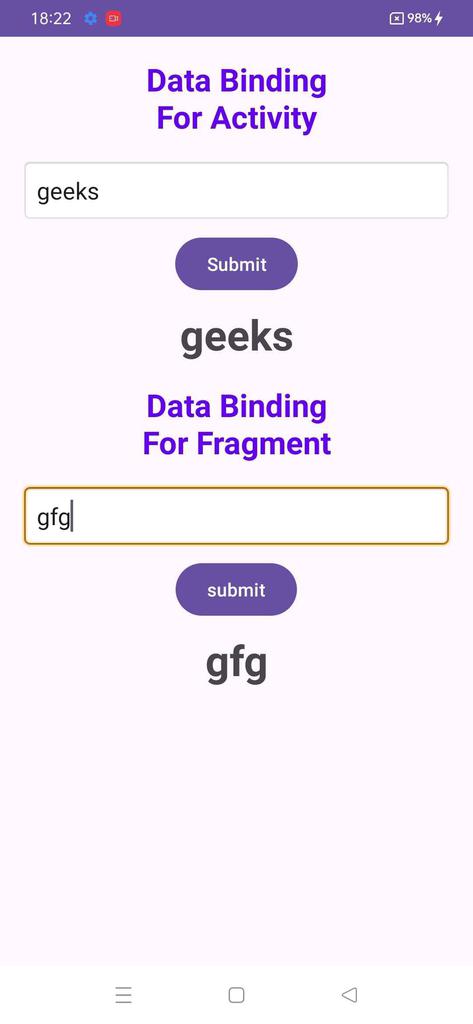
Here is the final output of our application.
Output:
|