|
Multi-Module project with Spring Boot refers to a project structure where multiple modules or subprojects are organized under a single parent project. Each module can represent a distinct component, functionality, or layer of the application, allowing for better organization, maintainability, and code reuse. In simple, we can say a Spring Boot project that comprises nested Maven projects is commonly referred to as a multi-module project.
In a Spring Boot Multi-Module Project, the application is divided into multiple modules, where each module plays an important role in the certain functionality of an application. A module can be considered an independent project or sub-project. In this article, we will discuss how to create a multi-module project with Spring Boot.
Note: Multi-Module Project is just a set of multiple projects where each project has its respective function.
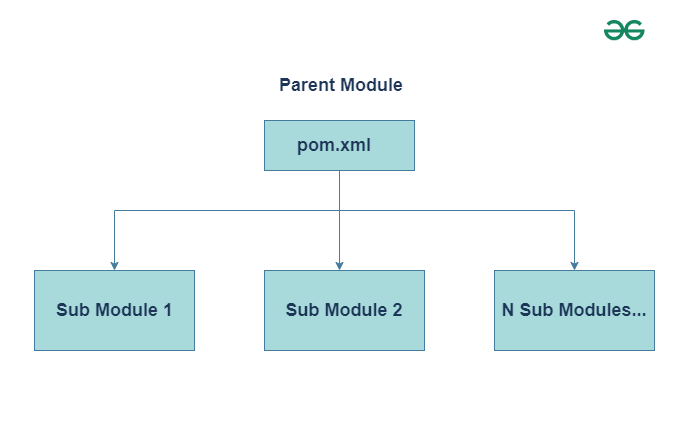
Working of Spring Boot Multi-Module Project- Create a Parent Module
- First, you have to create a Parent module.
- The parent module acts as a container of sub-modules.
- Also, you can use the Parent module for bootstrapping of the application ( main() method ).
- Alternatively, you can also use any of the sub-module by implementing the main() method for bootstrapping the application and deleting the main() method from the parent module.
- Configure Parent Module
- Your Parent module should have pom packaging instead of jar and war.
- When you create sub-modules, all of them get listed in the <modules> tag in pom.xml of the parent module.
- Inheritance
- All the dependencies you have enlisted in the pom.xml of the parent module will be automatically inherited by sub-modules directly.
- Therefore, you don’t need to add dependencies to sub-module’s pom.xml to use them.
Steps to Create a Multi-Module Project in Spring Boot - Step 1: Create a simple Spring Starter Project (File -> New -> Spring Starter Project -> Next -> ( Select Dependencies ) -> Next -> Finish)
- Step 2: Change or add <packaging>pom</packaging>
- Step 3: Add a sub-module (Right click on Parent Module -> New -> other -> Maven -> Maven Module -> Next ( Select both checkboxes ) -> Next -> jar or war -> Finish).
- Step 4: After creating sub-modules, the parent module will contain the folders of sub-modules, and also independent projects of the already created respective sub-modules will be created.

Step 1: Create the Parent Module
ParentGFG – Parent ModuleNow, we will create a simple Parent module using Maven dependencies with pom packaging to the aggregate library and application modules.
pom packaging:
  <groupId>sia</groupId>
     <artifactId>ParentGFG</artifactId>
     <version>0.0.1-SNAPSHOT</version>
  <packaging>pom</packaging>
pom.xml (Configurations):
XML
<?xml version="1.0" encoding="UTF-8"?>
<project xmlns="http://maven.apache.org/POM/4.0.0"
         xmlns:xsi="http://www.w3.org/2001/XMLSchema-instance"
         xsi:schemaLocation="http://maven.apache.org/POM/4.0.0
                             https://maven.apache.org/xsd/maven-4.0.0.xsd">
    <modelVersion>4.0.0</modelVersion>
    <parent>
        <groupId>org.springframework.boot</groupId>
        <artifactId>spring-boot-starter-parent</artifactId>
        <version>2.6.3</version>
        <relativePath/> <!-- lookup parent from repository -->
    </parent>
    <groupId>sia</groupId>
    <artifactId>ParentGFG</artifactId>
    <version>0.0.1-SNAPSHOT</version>
    <packaging>pom</packaging>
    <name>ParentGFG</name>
    <description>Multi Module Project</description>
    <properties>
        <java.version>11</java.version>
    </properties>
    <dependencies>
        <dependency>
            <groupId>org.springframework.boot</groupId>
            <artifactId>spring-boot-starter-thymeleaf</artifactId>
        </dependency>
        <dependency>
            <groupId>org.springframework.boot</groupId>
            <artifactId>spring-boot-starter-web</artifactId>
        </dependency>

        <dependency>
            <groupId>org.springframework.boot</groupId>
            <artifactId>spring-boot-devtools</artifactId>
            <scope>runtime</scope>
            <optional>true</optional>
        </dependency>
        <dependency>
            <groupId>org.projectlombok</groupId>
            <artifactId>lombok</artifactId>
            <optional>true</optional>
        </dependency>
        <dependency>
            <groupId>org.springframework.boot</groupId>
            <artifactId>spring-boot-starter-test</artifactId>
            <scope>test</scope>
        </dependency>
    </dependencies>

    <build>
        <plugins>
            <plugin>
                <groupId>org.springframework.boot</groupId>
                <artifactId>spring-boot-maven-plugin</artifactId>
                <configuration>
                    <excludes>
                        <exclude>
                            <groupId>org.projectlombok</groupId>
                            <artifactId>lombok</artifactId>
                        </exclude>
                    </excludes>
                </configuration>
            </plugin>
        </plugins>
    </build>

    <modules>
        <module>GFG-Module1</module>
        <module>GFG-Module2</module>
    </modules>
</project>
Note:
- After creating Spring Starter Project with a jar or war packaging, make sure that you add or change the ‘packaging’ tag with ‘pom’ -> ‘<packaging>pom</packaging>’.
- When you will create sub-modules, the ‘modules’ tag will automatically get generated with added respective modules.
- You can also remove the ‘src’ folder from Parent Module after implementing the main() method in any of the sub-module, as the Parent Module can also act just like a container.
Step 2: Create the Sub ModulesGFG-Module1:Now, we will create one sub module named GFG-Module1.

pom.xml (Configurations):
- Declares a parent module of which this sub-module will be a part.
- Information tags of this sub-module are also initialized as well.
XML
<project xmlns="http://maven.apache.org/POM/4.0.0"
         xmlns:xsi="http://www.w3.org/2001/XMLSchema-instance"
         xsi:schemaLocation="http://maven.apache.org/POM/4.0.0
                             https://maven.apache.org/xsd/maven-4.0.0.xsd">
  <modelVersion>4.0.0</modelVersion>
  <parent>
    <groupId>sia</groupId>
    <artifactId>ParentGFG</artifactId>
    <version>0.0.1-SNAPSHOT</version>
  </parent>
  <artifactId>GFG-Module1</artifactId>
  <name>GFG-Module1</name>
  <description>GeeksforGeeks</description>
</project>
Step 3: Create Main Application Class
Main.java (Bootstrapping of the Application)
Java
package controller;

import org.springframework.boot.SpringApplication;
import org.springframework.boot.autoconfigure.SpringBootApplication;

@SpringBootApplication
public class Main {

    public static void main(String[] args)
    {
        SpringApplication.run(Main.class, args);
    }
}
Step 4: Create a REST Controller
RestApi.java (Endpoint of the Application)
- This class uses ‘Starter Web’ dependency which is automatically inherited from the parent module’s pom.xml.
- This controller class accepts HTTP requests.
- Here, the HTTP GET request is accepted by get() method.
- This method uses an entity class that is created and declared in a sub-module ( GFG-Module2 ).
- To import classes etc from different modules, you have to hover on the red error underline.
- Click -> ‘fix project setup’ and select the respective sub-module where you have created the class in.
Java
package controller;

import entity.UserModel;
import org.springframework.web.bind.annotation.GetMapping;
import org.springframework.web.bind.annotation.RequestMapping;
import org.springframework.web.bind.annotation.RestController;

@RestController
@RequestMapping("/get")
public class RestApi {

    @GetMapping public UserModel get()
    {

        UserModel entity = new UserModel();
        entity.setId("1");
        entity.setName("Darshan.G.Pawar");
        entity.setEmail("geek@geek");
        entity.setPincode("422 009");

        return entity;
    }
}
GFG-Module2:
pom.xml (Configurations)
XML
<project xmlns="http://maven.apache.org/POM/4.0.0"
         xmlns:xsi="http://www.w3.org/2001/XMLSchema-instance"
         xsi:schemaLocation="http://maven.apache.org/POM/4.0.0
                             https://maven.apache.org/xsd/maven-4.0.0.xsd">
  <modelVersion>4.0.0</modelVersion>
  <parent>
    <groupId>sia</groupId>
    <artifactId>ParentGFG</artifactId>
    <version>0.0.1-SNAPSHOT</version>
  </parent>
  <artifactId>GFG-Module2</artifactId>
  <name>GFG-Module2</name>
  <description>GeeksforGeeks</description>
</project>
Step 5: Create Entity Class in Another Module
UserModel.java (User data entity class)
- This class represents a user entity class, which has been used by the get() method of the RestApi.java class.
- This class requires an important set of Getter and Setter methods of all instance variables fields.
- This class uses ‘Lombok’ dependency which is automatically inherited from the parent module’s pom.xml.
- Therefore, the ‘@Data‘ annotation of the Lombok library is used to automatically generate Getter and Setter methods at runtime.
- The annotation ‘@RequiredArgsConstructor‘ is used to automatically generate a constructor for required ( where the constrain is ‘@NonNull’ ) or final fields of a class.
- If a class doesn’t contain fields, then the ‘@RequiredArgsConstructor‘ annotation acts as a ‘@NoArgsConstructor‘ annotation which creates zero parameter constructor.
Java
package entity;

import lombok.Data;
import lombok.RequiredArgsConstructor;

@Data
@RequiredArgsConstructor
public class UserModel {

    String id;
    String name;
    String email;
    String pincode;
}
Output: RestApi.java of GFG-Module1- GFG-Module2 (sub-module) declares an entity (Data) object.
- This data is used in the body of the response which is returned by the RESTful API of GFG-Module1 ( sub-module ).
 Note: You will have to run the GFG-Module1 as the main() method and the controller class is in this sub-module.
Advantages of a Multi-Module Project- It provides a great ability to build all sub-modules only with a single command.
- We can run the build command from the parent module.
- While building the application, the build system takes care of the build order.
- Deployment of the applications gets very convenient and flexible.
- Also, the code from the various modules across different projects can be re-used.
- Last but not the least, with the help of Multi-Module Project architecture, we can gain benefits from the microservices architecture.
|