|
|
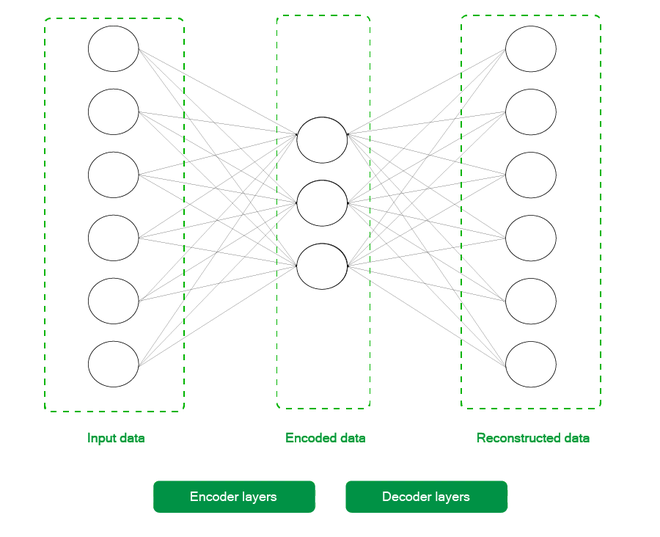
Since the availability of staggering amounts of data on the internet, researchers and scientists from industry and academia keep trying to develop more efficient and reliable data transfer modes than the current state-of-the-art methods. Autoencoders are one of the key elements found in recent times used for such a task with their simple and intuitive architecture. Broadly, once an autoencoder is trained, the encoder weights can be sent to the transmitter side and the decoder weights to the receiver side. This way, the transmitter side can send data in an encoded format(thus saving them time and money) while the receiver side can receive the data at much less overhaul. This article will explore an interesting application of autoencoder, which can be used for image reconstruction on the famous MNIST digits dataset using the Pytorch framework in Python. AutoencodersAs shown in the figure below, a very basic autoencoder consists of two main parts:
Through a series of layers, the encoder takes the input and takes the higher dimensional data to the latent low dimension representation of the same values. The decoder takes this latent representation and outputs the reconstructed data. For a deeper understanding of the theory, the reader is encouraged to go through the following article: ML | Auto-Encoders A basic 2 layer Autoencoder Installation:Aside from the usual libraries like Numpy and Matplotlib, we only need the torch and torchvision libraries from the Pytorch toolchain for this article. You can use the following command to get all these libraries.
Now onto the most interesting part, the code. The article assumes a basic familiarity with the PyTorch workflow and its various utilities, like Dataloaders, Datasets and Tensor transforms. For a quick refresher of these concepts, the reader is encouraged to go through the following articles: The code is divided into 5 different steps for a better flow of the material and is to be executed sequentially for proper work. Each step also has some points at its start, which can help the reader better understand that step’s code. Stepwise implementation:Step 1: Loading data and printing some sample images from the training set.
Code: Python
Output: 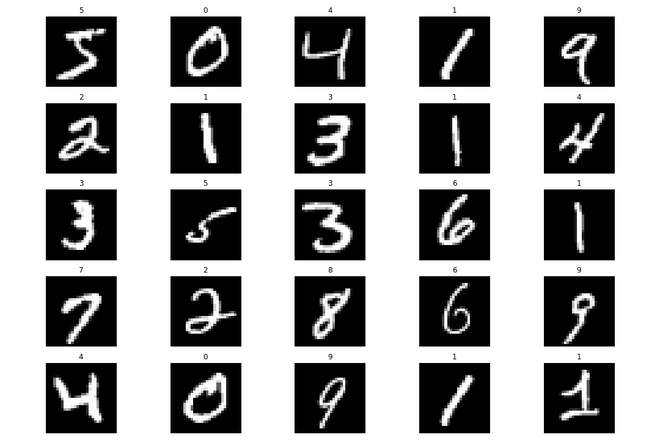 Random samples from the training set Step 2: Initializing the Deep Autoencoder model and other hyperparameters In this step, we initialize our DeepAutoencoder class, a child class of the torch.nn.Module. This abstracts away a lot of boilerplate code for us, and now we can focus on building our model architecture which is as follows: 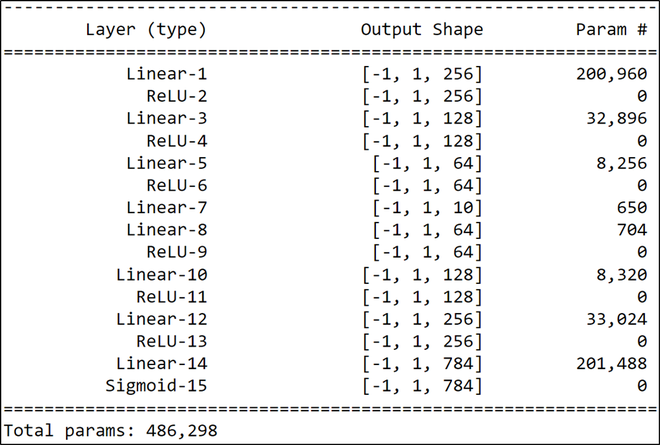 Model Architecture As described above, the encoder layers form the first half of the network, i.e., from Linear-1 to Linear-7, and the decoder forms the other half from Linear-10 to Sigmoid-15. We’ve used the torch.nn.Sequential utility for separating the encoder and decoder from one another. This was done to give a better understanding of the model’s architecture. After that, we initialize some model hyperparameters such that the training is done for 100 epochs using the Mean Square Error loss and Adam optimizer for the learning process. Python
Step 3: Training loop The training loop iterates for the 100 epochs and does the following things:
After the loop ends, we plot out the training loss to better understand the training process. As we can see, that the loss decreases for each consecutive epoch, and thus the training can be deemed successful. Python
Output: 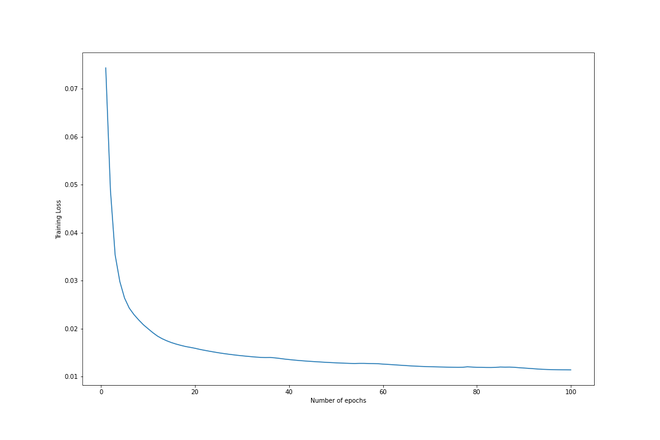 Training loss vs. Epochs Step 4: Visualizing the reconstruction The best part of this project is that the reader can visualize the reconstruction of each epoch and understand the iterative learning of the model.
We can see how the reconstruction improves for each epoch and gets very close to the original by the last epoch. Python
Output: 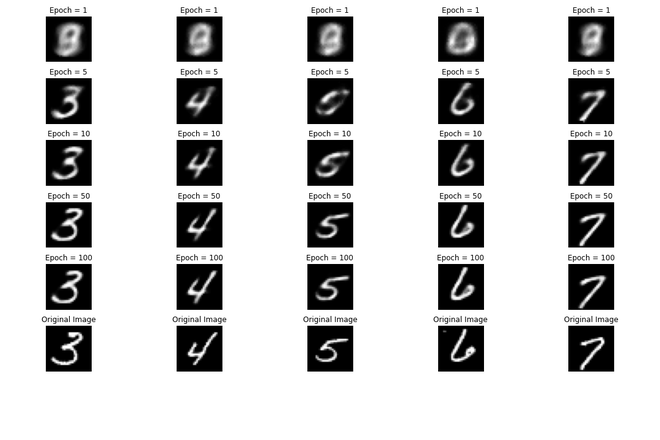 Visualizing the reconstruction from the data collected during the training process Step 5: Checking performance on the test set. Good practice in machine learning is to check the model’s performance on the test set also. To do that, we do the following steps:
As we can see, the reconstruction was excellent on this test set also, which completes the pipeline. Python
Output: 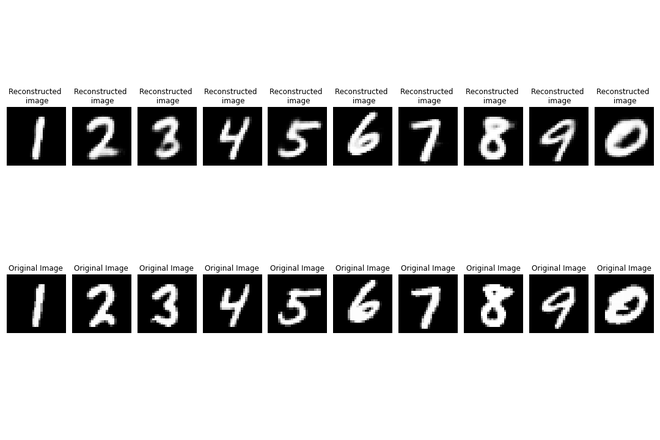 Verifying performance on the test set Conclusion:Autoencoders are fast becoming one of the most exciting areas of research in machine learning. This article covered the Pytorch implementation of a deep autoencoder for image reconstruction. The reader is encouraged to play around with the network architecture and hyperparameters to improve the reconstruction quality and the loss values. |
Reffered: https://www.geeksforgeeks.org
| AI ML DS |


Type: | Geek |
Category: | Coding |
Sub Category: | Tutorial |
Uploaded by: | Admin |
Views: | 12 |