|
Designing a video streaming app is a fun task to improve your development skills and design fun applications. Using Flutter, an open-source UI toolkit developed by Google, you can design for apps in iOS and Android, web and desktop all at once. Here, in this article, the reader will be introduced to the approach of developing a video streaming application in Flutter with the focus on the key actions and elements that are necessary to consider while implementing this type of application. As a result of completing this lesson, you will have a fully working application that can play a video from a URL with the ability to also have controls and navigation.
How to Build a Video Streaming App in FlutterTo develop a video streaming app using Flutter, there are certain delicate stages that must be followed diligently including; Follow these steps to create your own video streaming app: Follow these steps to create your own video streaming app:
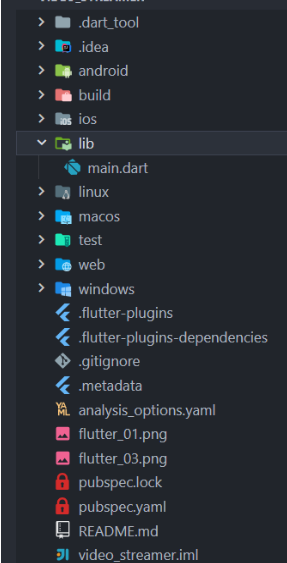
Project Directory StructureBefore diving into the code, let’s look at the directory structure of our project:
 Project Directory Structure Steps required for Video Streaming in FlutterIn a Flutter application, to play videos, it is necessary to request the video_player plugin, which displays the video material using a widget. Both network and asset videos are supported, that means that you can choose how exactly you want to use video playback in your application.
Step 1: Create a New Flutter ProjectOpen your terminal and create a new Flutter project by running the following command:
flutter create video_streaming_app Navigate to the project directory:
cd video_streaming_app Step 2: Add Video_Player package to Dependencies:To stream videos, we need to add the video_player package to our project. Open the pubspec.yaml file and add the following dependency:
video_player: ^2.9.1 Run flutter pub get to install the package.
Step 3: Import the necessary packagesImport the video_player package into your Dart file where you want to play the video:
Dart
import 'package:flutter/material.dart';
import 'package:video_player/video_player.dart';
Step 4: Initialise the VideoPlayerController
Create a VideoPlayerController and initialise it with a video source. This can be a network URL or a local asset.
For this example, we’ll use a network video:
Dart
  VideoPlayerController? _controller;
  String videoUrl =
      "https://flutter.github.io/assets-for-api-docs/assets/videos/bee.mp4";
  @override
  void initState() {
    super.initState();
    _controller = VideoPlayerController.networkUrl(Uri.parse(videoUrl))
      ..initialize().then((_) {
        setState(() {});
      });
  }
Step 5: Display the video Using VideoPlayer Widget
Use the VideoPlayer widget to display the video controlled by your VideoPlayerController.
We have also added Playback icon and a progress bar:
Dart
  @override
  Widget build(BuildContext context) {
    return Scaffold(
        backgroundColor: const Color(0xFF1F1F1F),
        appBar: AppBar(
          backgroundColor: const Color(0xFF121212),
          title: const Text(
            "Geeks For Geeks",
            style: TextStyle(color: Colors.white),
          ),
        ),
        body: Column(
          children: [
            _controller!.value.isInitialized
                ? AspectRatio(
                    aspectRatio: _controller!.value.aspectRatio,
                    child: VideoPlayer(_controller!),
                  )
                : const SizedBox(
                    width: double.infinity,
                    height: double.infinity,
                    child: Text(
                      "Something went wrong ",
                      style: TextStyle(color: Colors.red, fontSize: 28),
                    ),
                  ),
            VideoProgressIndicator(_controller!, allowScrubbing: true),
            Row(
              mainAxisAlignment: MainAxisAlignment.center,
              children: [
                IconButton(
                    onPressed: () {},
                    icon: const Icon(Icons.skip_previous, color: Colors.white)),
                IconButton(
                    onPressed: () {
                      _controller!.value.isPlaying
                          ? _controller!.pause()
                          : _controller!.play();
                    },
                    icon: Icon(
                        _controller!.value.isPlaying
                            ? Icons.pause
                            : Icons.play_arrow,
                        color: Colors.white)),
                IconButton(
                    onPressed: () {},
                    icon: const Icon(
                      Icons.skip_next,
                      color: Colors.white,
                    )),
              ],
            )
          ],
        ));
  }
Step 6: Dispose the controller created before
Dart
  @override
  void dispose() {
    _controller!.dispose();
    super.dispose();
  }
Step 7: Run the App: After completing the code, run your app using:
flutter run
Main Dart File Whole Program:
Dart
import 'package:flutter/material.dart';
import 'package:video_player/video_player.dart';

void main() {
  runApp(const MyApp());
}

class MyApp extends StatelessWidget {
  const MyApp({super.key});

  @override
  Widget build(BuildContext context) {
    return const MaterialApp(
      title: 'Video Player',
      home: VideoStreamer(),
    );
  }
}

class VideoStreamer extends StatefulWidget {
  const VideoStreamer({super.key});

  @override
  State<VideoStreamer> createState() => _VideoStreamerState();
}

class _VideoStreamerState extends State<VideoStreamer> {
  VideoPlayerController? _controller;
  String videoUrl =
      "https://flutter.github.io/assets-for-api-docs/assets/videos/bee.mp4";
  @override
  void initState() {
    super.initState();
    _controller = VideoPlayerController.networkUrl(Uri.parse(videoUrl))
      ..initialize().then((_) {
        setState(() {});
      });
  }

  @override
  void dispose() {
    _controller!.dispose();
    super.dispose();
  }

  @override
  Widget build(BuildContext context) {
    return Scaffold(
        backgroundColor: const Color(0xFF1F1F1F),
        appBar: AppBar(
          backgroundColor: const Color(0xFF121212),
          title: const Text(
            "Geeks For Geeks",
            style: TextStyle(color: Colors.white),
          ),
        ),
        body: Column(
          children: [
            _controller!.value.isInitialized
                ? AspectRatio(
                    aspectRatio: _controller!.value.aspectRatio,
                    child: VideoPlayer(_controller!),
                  )
                : const SizedBox(
                    width: double.infinity,
                    height: double.infinity,
                    child: Text(
                      "Something went wrong ",
                      style: TextStyle(color: Colors.red, fontSize: 28),
                    ),
                  ),
            VideoProgressIndicator(_controller!, allowScrubbing: true),
            Row(
              mainAxisAlignment: MainAxisAlignment.center,
              children: [
                IconButton(
                    onPressed: () {},
                    icon: const Icon(Icons.skip_previous, color: Colors.white)),
                IconButton(
                    onPressed: () {
                      _controller!.value.isPlaying
                          ? _controller!.pause()
                          : _controller!.play();
                    },
                    icon: Icon(
                        _controller!.value.isPlaying
                            ? Icons.pause
                            : Icons.play_arrow,
                        color: Colors.white)),
                IconButton(
                    onPressed: () {},
                    icon: const Icon(
                      Icons.skip_next,
                      color: Colors.white,
                    )),
              ],
            )
          ],
        ));
  }
}
Output Video :
|

