|
When developing Android applications, it can be essential to align the UI elements correctly to create a visually appealing and user-friendly interface. Baseline constraints in the ConstraintLayout can provide a powerful way to align the text views based on their text baselines. This article will guide you through the concept of the baseline constraints in Android.
Prerequisites- Basic understanding of Android Development.
- Android Studio is installed in your local system.
- Familiarity with ConstraintLayout.
- Basic understanding of the XML for designing Android layouts.
Base Line Constraints in AndroidBaseline constraints are the feature of the ConstraintLayout in Android that allows you to align the text baselines of the different views. It can be especially useful when dealing with the text views and inputting the fields in the forms where you want the text content to appear neatly aligned with the Android application.
When you use the baseline constraints, we can align the text of the different views based on their baselines. It can ensuring that the text appears aligned if font sizes or styles differ.
 How to use the Baseline ConstraintsWe can use the baseline constraints, we need to use the ConstraintLayout and specify the app:layout_constraintBaseline_toBaselineOf attribute in the XML layout file. This attribute can allow you to align the baseline of one view to the baseline of another.
Syntax:app:layout_constraintBaseline_toBaselineOf="@+id/temp>"
Example of Aligning the TextViews with EditTextsConsider the more practical example where you have the labels and input the fields that you want to align using the baseline constraints.
acitivity_main.xml
<?xml version="1.0" encoding="utf-8"?>
<androidx.constraintlayout.widget.ConstraintLayout xmlns:android="http://schemas.android.com/apk/res/android"
    xmlns:app="http://schemas.android.com/apk/res-auto"
    xmlns:tools="http://schemas.android.com/tools"
    android:layout_width="match_parent"
    android:layout_height="match_parent"
    tools:context=".MainActivity">

    <TextView
        android:id="@+id/textView1"
        android:layout_width="wrap_content"
        android:layout_height="wrap_content"
        android:text="Username:"
        android:textSize="18sp"
        android:textColor="@android:color/black"
        app:layout_constraintTop_toTopOf="parent"
        app:layout_constraintStart_toStartOf="parent"
        android:layout_marginStart="16dp"
        android:layout_marginTop="32dp" />

    <EditText
        android:id="@+id/editTextUsername"
        android:layout_width="0dp"
        android:layout_height="wrap_content"
        android:hint="Enter your username"
        app:layout_constraintBaseline_toBaselineOf="@+id/textView1"
        app:layout_constraintStart_toEndOf="@+id/textView1"
        app:layout_constraintEnd_toEndOf="parent"
        android:layout_marginStart="16dp"
        android:layout_marginEnd="16dp" />

    <TextView
        android:id="@+id/textView2"
        android:layout_width="wrap_content"
        android:layout_height="wrap_content"
        android:text="Password:"
        android:textSize="18sp"
        android:textColor="@android:color/black"
        app:layout_constraintTop_toBottomOf="@+id/textView1"
        app:layout_constraintStart_toStartOf="@+id/textView1"
        android:layout_marginTop="24dp" />

    <EditText
        android:id="@+id/editTextPassword"
        android:layout_width="0dp"
        android:layout_height="wrap_content"
        android:hint="Enter your password"
        android:inputType="textPassword"
        app:layout_constraintBaseline_toBaselineOf="@+id/textView2"
        app:layout_constraintStart_toEndOf="@+id/textView2"
        app:layout_constraintEnd_toEndOf="parent"
        android:layout_marginStart="16dp"
        android:layout_marginEnd="16dp" />

    <Button
        android:id="@+id/buttonLogin"
        android:layout_width="wrap_content"
        android:layout_height="wrap_content"
        android:text="Login"
        app:layout_constraintTop_toBottomOf="@+id/editTextPassword"
        app:layout_constraintStart_toStartOf="parent"
        android:layout_marginStart="16dp"
        android:layout_marginTop="32dp" />

    <Button
        android:id="@+id/buttonRegister"
        android:layout_width="wrap_content"
        android:layout_height="wrap_content"
        android:text="Register"
        app:layout_constraintTop_toTopOf="@+id/buttonLogin"
        app:layout_constraintStart_toEndOf="@+id/buttonLogin"
        android:layout_marginStart="16dp" />

</androidx.constraintlayout.widget.ConstraintLayout>
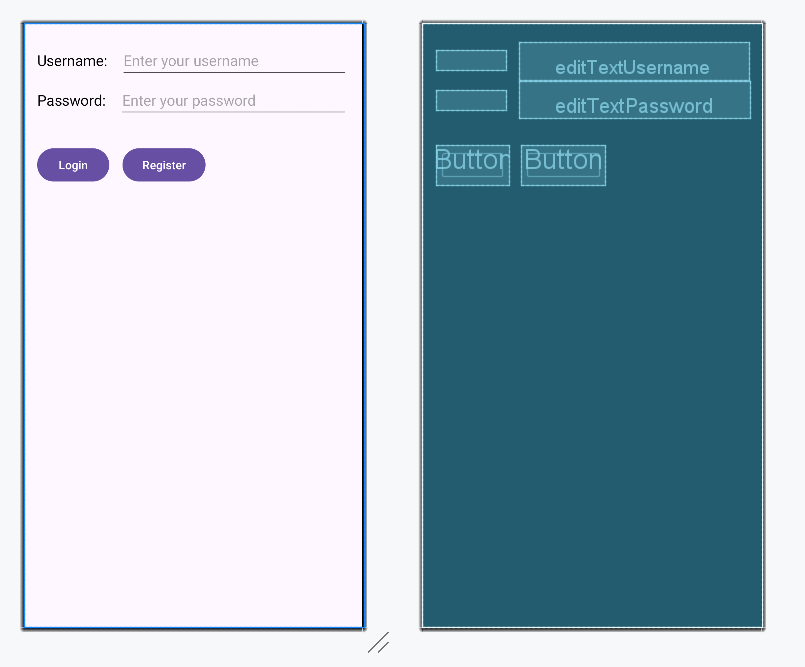
Output UI:
In this example, EditText fields are aligned with their repective TextView labels using the baseline constraints. It can ensure that the text in input fields aligns perfectly with the text in the labels.
Benefits of Using the Baseline Constraints- Consistency: It can ensure text can be aligned consistently across the different views.
- Readability: Improves the readability of the forms and text fields by the aligning text baselines.
- Professional Appearance: Give the UI a clean and professional look.
- Flexibility: It can allows for the different text sizes while maintaining alignments.
ConclusionBaseline Constraints in the ConstraintLayout are the powerful tool for the aligning text views in the Android applications. By aligning the baselines of the different views, we can ensure the consistent and professional looking UI. This article provided the indepth explanation of main concept along with example to help you get started with using baseline constraints in the Android projects.
|