|
This is a very simple app suitable for beginners to learn the concepts. In this article, we will learn to Build a Simple Music Player Application using Android Kotlin, where we will be using the inbuilt Music Player library provided.
Pre-requisites:
Step-by-Step Implementation to Create Music Player ApplicationLet us create the application Music Player:
Step 1: Opening/Creating a New ProjectTo create a new project in Android Studio please refer to How to Create/Start a New Project in Android Studio.
Note: Select Kotlin as the programming language.
Step 2: Add Lines in the Manifest File as the Prerequisite<uses-permission android:name="android.permission.READ_EXTERNAL_STORAGE" />
<uses-permission android:name="android.permission.INTERNET" /> Step 3: Designing the User Interface of the app In this app, we have used 4 components:
- ImageView: to show our given image for the song
- 3 Buttons:
- a play button to play our song
- a pause button to pause our song
- a stop button to stop our song
Note: if we press play after pressing the pause then our song will continue playing immediately after where it was paused but if we press play button after stop then our song will play from the beginning
Image of the UI is given below: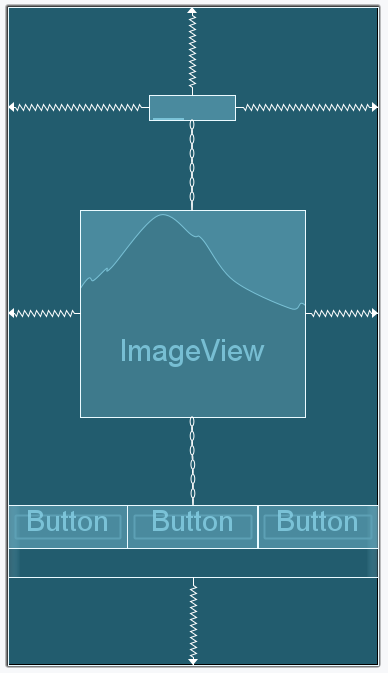
Set the id of all components and add the onClick methods with the buttons. Below is the XML code for the activity_main.xml file.
activity_main.xml
<?xml version="1.0" encoding="utf-8"?>
<androidx.constraintlayout.widget.ConstraintLayout xmlns:android="http://schemas.android.com/apk/res/android"
    xmlns:app="http://schemas.android.com/apk/res-auto"
    xmlns:tools="http://schemas.android.com/tools"
    android:id="@+id/main"
    android:layout_width="match_parent"
    android:layout_height="match_parent"
    tools:context=".MainActivity">

    <ImageView
        android:id="@+id/Song_Theme"
        android:layout_width="250sp"
        android:layout_height="230sp"
        app:layout_constraintBottom_toTopOf="@+id/linearLayout2"
        app:layout_constraintEnd_toEndOf="parent"
        app:layout_constraintHorizontal_bias="0.496"
        app:layout_constraintStart_toStartOf="parent"
        app:layout_constraintTop_toBottomOf="@+id/song_title"
        app:srcCompat="@drawable/gfg" />

    <LinearLayout
        android:id="@+id/linearLayout2"
        android:layout_width="match_parent"
        android:layout_height="80dp"
        android:orientation="horizontal"
        app:layout_constraintBottom_toBottomOf="parent"
        app:layout_constraintTop_toBottomOf="@+id/Song_Theme"
        tools:layout_editor_absoluteX="0dp" >

        <Button
            android:id="@+id/play_button"
            android:layout_width="wrap_content"
            android:layout_height="wrap_content"
            android:layout_weight="1"
            android:text="Play Button" />

        <Button
            android:id="@+id/pause_button"
            android:layout_width="wrap_content"
            android:layout_height="wrap_content"
            android:layout_weight="1"
            android:text="Pause Button" />

        <Button
            android:id="@+id/stop_button"
            android:layout_width="wrap_content"
            android:layout_height="wrap_content"
            android:layout_weight="1"
            android:text="Stop Button" />
    </LinearLayout>

    <TextView
        android:id="@+id/song_title"
        android:layout_width="wrap_content"
        android:layout_height="wrap_content"
        android:fontFamily="@font/alegreya_sc_italic"
        android:text="Song Name"
        android:textSize="20sp"
        app:layout_constraintBottom_toTopOf="@+id/Song_Theme"
        app:layout_constraintEnd_toEndOf="parent"
        app:layout_constraintHorizontal_bias="0.498"
        app:layout_constraintStart_toStartOf="parent"
        app:layout_constraintTop_toTopOf="parent" />
</androidx.constraintlayout.widget.ConstraintLayout>
Step 4: Adding the music file to our app Add the mp3 file to the raw folder. You can reach there by:
app-> res-> raw If there is no raw folder, then create it by right-clicking on res directory then:
res-> new-> directory Name the newly created directory as raw and add all the audio files in this folder. Drag and drop files here is not allowed. You have to copy your source file, then right-click on the raw directory and click paste. Use “show in explorer” (if you are using windows) to go to that particular file. Make sure that the new name contains all small alphabets. The only valid characters are (a-z and 0-9 and _ )
Step 5: Let’s code the functionality of our AppMake a object of MediaPlayer class named music. It is an inbuilt class in android package. All the properties of the MediaPlayer class can be used by this music object:
MediaPlayer music We will add our music file to this newly created object by using create function :
music = MediaPlayer.create(this, R.raw.sound);
Note: that there is no need to add .mp3 or .wav or whatever filetype you are using. Just add the name of the file. (I have named my file as sound.mp3 so used R.raw.sound)
The complete Java code: MainActivity.java file
MainActivity.kt
package org.horje.music_player_kotlin

import android.media.MediaPlayer
import android.os.Bundle
import android.widget.Button
import android.widget.TextView
import androidx.appcompat.app.AppCompatActivity

class MainActivity : AppCompatActivity() {

    private lateinit var music: MediaPlayer
    private lateinit var playButton: Button
    private lateinit var pauseButton: Button
    private lateinit var stopButton: Button
    private lateinit var songTitle: TextView

    override fun onCreate(savedInstanceState: Bundle?) {
        super.onCreate(savedInstanceState)
        setContentView(R.layout.activity_main)

        // Initialize views
        playButton = findViewById(R.id.play_button)
        pauseButton = findViewById(R.id.pause_button)
        stopButton = findViewById(R.id.stop_button)
        songTitle = findViewById(R.id.song_title) // Initialize songTitle

        // Create MediaPlayer instance with the song
        music = MediaPlayer.create(this, R.raw.song)

        // Set up button listeners
        playButton.setOnClickListener {
            if (!music.isPlaying) {
                music.start()
                songTitle.text = "Playing: Song"
            }
        }

        pauseButton.setOnClickListener {
            if (music.isPlaying) {
                music.pause()
                songTitle.text = "Paused: Song"
            }
        }

        stopButton.setOnClickListener {
            if (music.isPlaying) {
                music.stop()
                music.reset()
                // Reset the MediaPlayer to the song
                music = MediaPlayer.create(this, R.raw.song)
                songTitle.text = "Stopped: Enjoyed The Song?"
            }
        }
    }

    override fun onDestroy() {
        super.onDestroy()
        if (music.isPlaying) {
            music.stop()
        }
        music.release() // Release the MediaPlayer resources
    }
}
Output Application:
|