|
Machine learning (ML) is a vast field, with certain algorithms often overshadowing others due to their widespread use and popularity. However, some lesser-known algorithms offer unique advantages and deserve more attention. This article delves into some underrated ML algorithms, with a special focus on Nu-Support Vector Classification (NuSVC). We will explore its theoretical foundations, practical implementations, and provide a complete code example.
Understanding Nu-Support Vector Classification (NuSVC)The Nu-Support Vector Classification (NuSVC) algorithm is a variant of the traditional Support Vector Classification (SVC). Unlike SVC, which uses a parameter C to control the trade-off between margin maximization and classification error, NuSVC uses the parameter ν (nu), which represents an upper bound on the fraction of training errors and a lower bound on the fraction of support vectors.
- This provides a more intuitive way to control the number of support vectors and errors.
- NuSVC can be more flexible in adjusting the model complexity and is useful when the number of training samples is small.
- It also allows for the construction of non-linear decision boundaries using kernel functions, such as linear, polynomial, and RBF (Radial Basis Function) kernels.
This makes NuSVC suitable for a wide range of classification problems, particularly those involving complex and high-dimensional data.
Advantages of NuSVC- Intuitive Control: The ? (nu) parameter in NuSVC provides a straightforward way to control the fraction of support vectors and training errors. This allows for more flexibility in handling datasets with varying levels of noise and outliers.
- Robustness to Outliers: NuSVC is more robust to outliers and noisy data due to its ability to adjust the number of support vectors based on the parameter ?. This makes it a better choice when dealing with datasets that have a large number of outliers.
When to Use NuSVC- Handling Noisy Data: Use NuSVC when dealing with datasets that have a significant amount of noisy data or outliers. Its ability to adjust the number of support vectors makes it more effective in handling such datasets.
- Flexibility in Margin Control: Use NuSVC when you need more flexibility in controlling the margin. The ? parameter allows for a more nuanced control over the margin, which can be beneficial in certain scenarios.
Implementing Nu-Support Vector Classification in PythonTo implement NuSVC, we will use the scikit-learn library, a popular ML library in Python. Below is a step-by-step guide to implementing NuSVC for a classification task.
Step 1: load the dataset and import necessary libraries
Python
#importing the necessary libraries
import pandas as pd
import numpy as np
import matplotlib.pyplot as plt
import seaborn as sns
import warnings
warnings.filterwarnings('ignore')

# creating a dataset
df = pd.read_csv('/content/disease_growth_level.csv')

#first view of the dataset
df.head(10)
Output:
 first preview of the data Step 2: Introspect the data frameWe’ll analyze the dataset with respect to below techniques:
- Shape of the dataframe.
- checking for null values.
- columns of the dataframe.
- information of the columns.
- summary statistics of the dataframe.
- target variable distribution.
Python
# shape
df.shape

# dropping null values
df.isnull().sum()
df.dropna(inplace=True)

#dropping duplicates
df.duplicated().sum()
df.drop_duplicates(keep='first',inplace=True)

#columns
df.columns

#information of dataframe
df.info()

#summary statistics
df.describe()
Output:
Here we drop the null values as the ratio of null values are less and its a real world data.
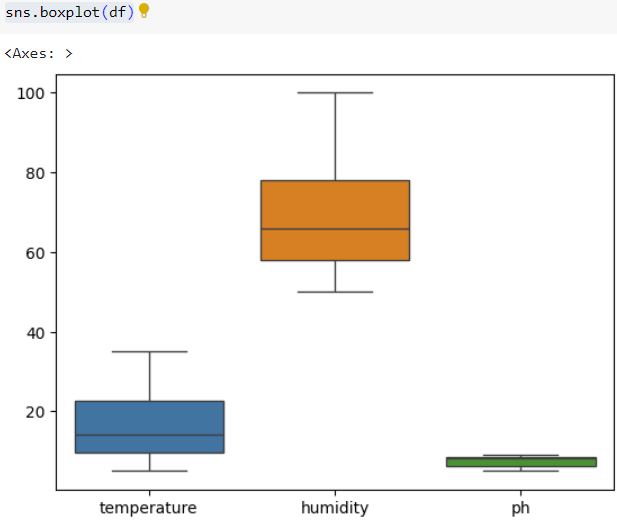
Step 3: Checking for outliers in datasetFor more, please refer to article published on :
Handling Outliers
Outlier-treatment
Python
# boxplot
sns.boxplot(df)
Output:
 Step 4: Feature EngineeringFor more, please refer to article published on : Feature Engineering
- Extracting time into hours and minutes using pandas.
- Dropping uneccesary columns.
- Encoding the type of columns having object into numerical values.
Python
# extracting time column into separate columns for hours and minutes
df.time = pd.to_datetime(df.time)
df['hour'] = df.time.dt.hour
df['minute'] = df.time.dt.minute

#hence dropping time column
df.drop('time',axis=1,inplace=True)

#dropping the date function from dataframe(not relevant in this scenario)
df.drop('date',axis=1,inplace=True)

#Feature encoding using Label Encoder
from sklearn.preprocessing import LabelEncoder
le = LabelEncoder()
df['ventilation'] = le.fit_transform(df['ventilation'])
df['light_intensity'] = le.fit_transform(df['light_intensity'])
df['disease growth possibility level'] = le.fit_transform(df['disease growth possibility level'])
Output:
<class 'pandas.core.frame.DataFrame'>
RangeIndex: 7124 entries, 0 to 7123
Data columns (total 8 columns):
 #   Column                            Non-Null Count  Dtype
---  ------                            --------------  -----
 0   date                              7124 non-null   object
 1   time                              7124 non-null   object
 2   temperature                       7124 non-null   float64
 3   humidity                          7124 non-null   int64
 4   ventilation                       7118 non-null   object
 5   light_intensity                   7118 non-null   object
 6   ph                                7118 non-null   float64
 7   disease growth possibility level  7124 non-null   object
dtypes: float64(2), int64(1), object(5)
memory usage: 445.4+ KB
Step 5: Feature Split followed by Imbalanced datasetFor more, please refer to article published on: Handling-Imbalanced-dataset
Handling the imbalanced dataset using imblearn library.
Python
#independent and dependent feature split, X and y
X = df.drop('disease growth possibility level',axis=1)
y = df['disease growth possibility level']

# imblearn for handling imbalance in the dataset
from imblearn.combine import SMOTETomek
from imblearn.under_sampling import NearMiss
smk = SMOTETomek(random_state=42)
X,y = smk.fit_resample(X,y)
Output:
Step 6: Implementing NuSVC Classification Algorithm - Train test split.
- Standard scaler for scaling the data.
- Model building.
- Model training.
- Building a predictive model.
- Accuracy metrics: confusion matrix, accuracy score,classification report.
- Pickle the model into pkl file.
Python
from sklearn.model_selection import train_test_split
X_train,X_test,y_train,y_test = train_test_split(X,y,test_size=0.33,random_state=42)

from sklearn.preprocessing import StandardScaler
sc = StandardScaler()
X_train = sc.fit_transform(X_train)
X_test = sc.transform(X_test)

#NuSVC model
from sklearn.svm import NuSVC
clf = NuSVC()
clf.fit(X_train,y_train)

#prediction
y_pred = clf.predict(X_test)

#classification metrics
from sklearn.metrics import accuracy_score,confusion_matrix,classification_report
print(accuracy_score(y_test,y_pred))
print(confusion_matrix(y_test,y_pred))
print(classification_report(y_test,y_pred))

#predicative model
#here i used the a row from dataframe for checking if the model predicts correctly
input_data = (22.40,82,1,0,6.9,8,30)
input_data_as_numpy_array = np.asarray(input_data)
input_data_reshaped = input_data_as_numpy_array.reshape(1,-1)
prediction = clf.predict(input_data_reshaped)
print(prediction)

#pickling the model
import pickle
pickle.dump(clf,open('model_mushroom.pkl','wb'))
Output:
You could download the pkl file from files sectionb, in the left-side panel.
Choosing the Right Parameters- Nu Parameter : This parameter controls the trade-off between the number of support vectors and margin errors. A higher $\nu$ value will result in more support vectors and fewer margin errors.
- Kernel: The choice of kernel (linear, polynomial, RBF) depends on the nature of the data. Linear kernels are suitable for linearly separable data, while non-linear kernels can handle more complex relationships.
- Gamma: This parameter defines the influence of a single training example. A low value means ‘far’ and a high value means ‘close’.
ConclusionNu-Support Vector Classification (NuSVC) offers a flexible and robust alternative to traditional SVC, particularly in scenarios involving noisy data and the need for nuanced margin control. By understanding its theoretical foundations and practical implementations, you can leverage NuSVC to tackle complex classification problems effectively. The provided code example demonstrates how to implement NuSVC using Python’s scikit-learn library, making it accessible for practical applications.
|