
|
|
Gatsby is a site framework that helps us to create static sites. Its static site generator (SSG) renders the site at build time and server it as static content to the client. It utilizes GraphQL for data handling, Node JS, and React for developing websites. Gatsby is known for its quickness, safety, and capability to develop extremely streamlined websites. we will build a Gatsby blog starting from the beginning. Approach
Steps to create a Gatsby Blog from ScratchStep 1: Start installing Gatsbythe
npm init gatsbyStep 2: Click yes to settingsThis command will generate a new Gatsby site for you before that it will ask a few questions and we have the provide that information for our site. You can answer those questions as I did for following the blog 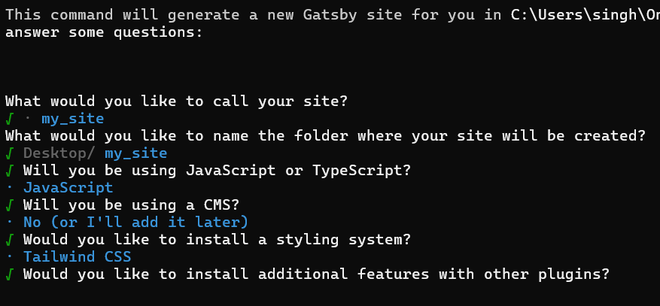 Step 3: Navigate to the Site folder cd my_siteStep 4: Start the development servernpm run develop Note: To view your website, go to http://localhost:8000/ Step 5: Set up Linting and FormattingLinting and formatting guarantees that your code is uniform and without errors. It automatically scans your code for problems and stylistic inconsistencies, and arrange it based on predefined rules. Install PrettierPrettier is a code formatter that follows specific guidelines to ensure uniform style, rewriting code based on these rules. It is compatible with various languages and can be incorporated into the majority of editors. Prettier eliminates any original styling and guarantees that all code produced adheres to a uniform style. npm install --save-dev prettierConfigure Prettier:Create a .prettierrc file in the root of your project and add your desired configuration. Here’s an example: { Create a .prettierignore file to specify files and directories to ignore: node_modules Install ESLintESLint is a linter tool used for detecting and resolving issues in JavaScript code. npm install --save-dev eslint eslint-config-prettier eslint-plugin-prettierConfigure ESLintCreate a .eslintrc.js file in the root of your project and configure it: Create a .eslintignore file to specify files and directories to ignore: node_modules Step 6: Add StylingCreate a global.css file in the src/styles directory and add the Tailwind directives: Update gatsby-browser.jsIn a Gatsby project, the gatsby-browser.js file is used for modifying and expand upon the default settings and functions of Gatsby’s browser APIs. It enables you to apply personalized logic while the Gatsby build process is running in the browser runtime phase. Import the global CSS file in the gatsby-browser.js file: // gatsby-browser.js Step 7: Add FontsFirst, open your global CSS file (e.g., src/styles/global.css) and add the @import rule at the top of the file to include the Google Fonts you need. /* src/styles/global.css */ Step 8: Install Tailwind CSS DependenciesTailwind CSS is a CSS framework that prioritizes utility classes for styling HTML elements right in the markup. Tailwind CSS differs from traditional CSS frameworks by providing a utility-first approach that is highly customizable, allowing developers to create unique designs without the need for writing custom CSS. npm install tailwindcss postcss autoprefixer add the Tailwind directives in global.css /* src/styles/global.css */ Configure Tailwind CSSmodule.exports = { You may have noticed, if you’re following along, that the CLI indicates two URL locations to view the project: You can now view my-gatsby-blog in the browser. Upon opening the GraphiQL explorer, we encounter multiple Explorer panels. All data to be explored in the project is accessible and relies on the configuration in the gatsby-config.js file. 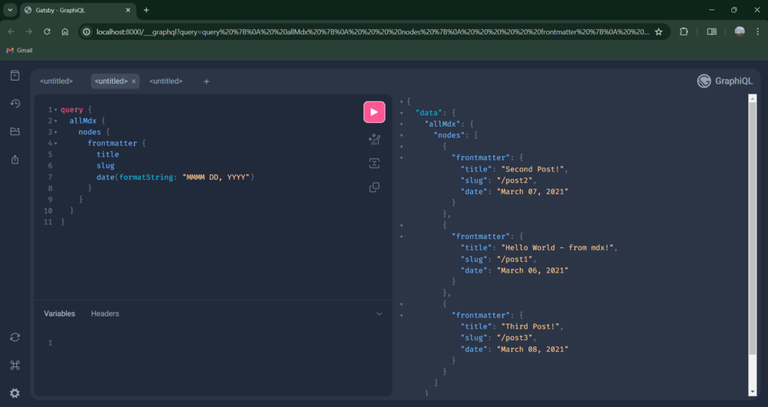 For editing your site now, you can open your site folder in your favorite code editor I am using VS code Step 9: Add Gatsby ConfigGatsby config is utilized to specify and set up the numerous Gatsby plugins available for use. Additional information about the Gatsby plugin ecosystem will be provided shortly. Currently, I will once more create the file in the terminal. This results in the creation of gatsby-config.js at the project’s root, enabling me to begin setting up Gatsby to parse the .mdx files I previously made. Here we are changing path for our content and site meta data Project structure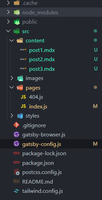 Front matterContent in post inside these ‘— —-‘ blocks is known as front matter. It’s like meta data for our blog which will be used to store information about our blog Example: time, date, author, title, slug etc. Post 1 --- Post 2 --- Post 3 --- Step 10: Create Index Page componentThe index.js file is the main entry point or homepage of the site. index.js determines the layout and information found on the main page of your Gatsby website. This is typically the initial page people encounter when they visit the main URL of your website (e.g., http://localhost:8000/).  Step 11: Create GraphQL QueryGraphQL is a query language that enables users to request specific information from a server. Gatsby utilizes GraphQL for components to specify their required data. This information is then passed to the component as props. We will see this code which is querying data from API and pass down to component. We can test this query in GraphQL explorer query SITE_INDEX_QUERY {  Step 12: Create 404 Page404.js file is responsible for managing the 404-error page that is displayed when a user attempts to visit a non-existent page. The 404 page offers a way to elegantly deal with requests for pages that do not exist. Instead of showing a standard browser error, it presents a personalized message with possible navigation options to assist users in locating desired information. 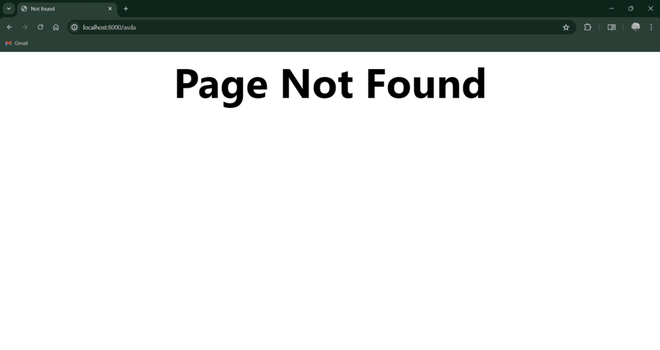 Step 13: Create Templates FolderTemplates directory is used to store template parts for dynamically generated pages. The createPages API in gatsby-node.js uses these templates to generate pages from sources such as Markdown files, CMS content, and other data sources. Inside templates folder we have to create a file blog-post.js which will be used as templates for our blog post Step 14: Create gatsby-nodegatsby-node.js is a special file. Using the createPages API, we can generate pages dynamically by pulling information from various sources like Markdown files, APIs, and CMSs. This is beneficial for creating a high volume of pages using data from outside sources. After creating gatsby-node.js if you click read more in blog page it will open you blog page.  Step 15: Restart the development servergatsby developConclusionIn this blog post, we developed a simple Gatsby website. Nevertheless, we didn’t address all aspects, like optimal methods and image utilization. These key elements are crucial for us to grasp and integrate in order to successfully build a professional-quality website. |
Reffered: https://www.geeksforgeeks.org
| Web Technologies |
Type: | Geek |
Category: | Coding |
Sub Category: | Tutorial |
Uploaded by: | Admin |
Views: | 15 |