|
When developing web applications with Angular, you might encounter situations where you need to include special characters in URLs. Special characters such as spaces, ampersands, question marks, and others often need to be encoded correctly to ensure the URL is valid and functions as expected. In this article, we’ll explore how to add special characters in URLs in Angular, ensuring they are properly encoded.
Understanding URL EncodingURLs can only be sent over the Internet using the ASCII character-set. Since URLs often contain characters outside the ASCII set, the URL has to be converted into a valid ASCII format. URL encoding involves replacing unsafe ASCII characters with a “%” followed by two hexadecimal digits.
For example:
- Space:
%20 - Ampersand:
%26 - Question mark:
%3F
Steps to Create an Angular ApplicationStep 1: Install Angular CLI
npm install -g @angular/cli Step 2: Create a Angular application using the following command
ng new my-angular-app
cd my-angular-app
Step 3: Run the Application
ng serve Project Structure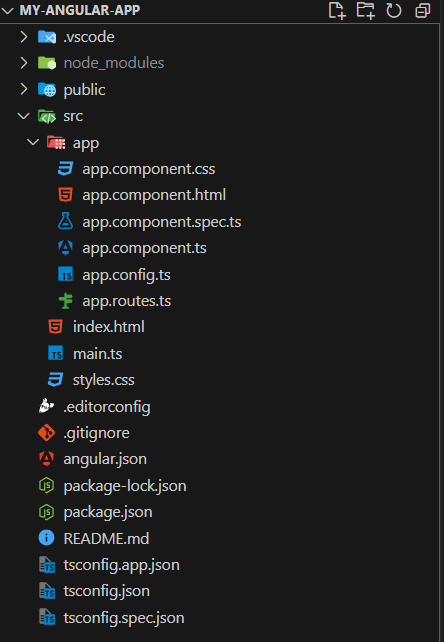 Folder Structure Dependencies"dependencies": {
"@angular/animations": "^17.3.0",
"@angular/common": "^17.3.0",
"@angular/compiler": "^17.3.0",
"@angular/core": "^17.3.0",
"@angular/forms": "^17.3.0",
"@angular/platform-browser": "^17.3.0",
"@angular/platform-browser-dynamic": "^17.3.0",
"@angular/router": "^17.3.0",
"rxjs": "~7.8.0",
"tslib": "^2.3.0",
"zone.js": "~0.14.3"
}Handling Special Characters in URLsIf we use special character in URLs directly, they can lead to unexpected behavior. Instead of using them directly we will use encodeURIComponent function which is used to encode special characters so that they can be used in URL’s without any issues. Let’s start with Angular’s Router for Navigation.
Approach 1: Using Angular Router for NavigationCreate a new file named special-chars-navigation.component.ts and add the following code:
JavaScript
// special-chars-navigation.component.ts

import { Component } from '@angular/core';
import { Router } from '@angular/router';

@Component({
    selector: 'app-special-chars-navigation',
    template: `<button (click)="navigateWithSpecialChars()">Navigate</button>`,
})
export class SpecialCharsNavigationComponent {
    constructor(private router: Router) { }

    navigateWithSpecialChars() {
        const specialChars = 'hello@world';
        this.router.navigate(['search'], {
            queryParams: { search_query: encodeURIComponent(specialChars) },
        });
    }
}
Update the app-routing.module.ts as well. It should look like this:
JavaScript
// app-routing.module.ts

import { NgModule } from '@angular/core';
import { RouterModule, Routes } from '@angular/router';
import { SpecialCharsNavigationComponent } from './special-chars-navigation.component.ts'

const routes: Routes = [
    {
        path: 'search', component: SpecialCharsNavigationComponent
    }
]
Output: When you click on the navigate button, you can see the character encoded URL in the browser.
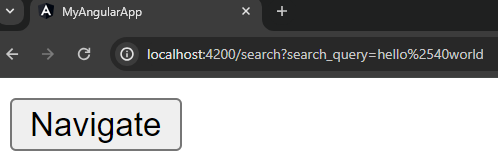 Using angular router’s navigation Approach 2: Manual Encoding for External LinksCreate a new file named manual-encoding.component.ts and add the following code:
JavaScript
// manual-encoding.component.ts

import { Component } from '@angular/core';

@Component({
    selector: 'app-manual-encoding',
    template: `<a [href]="url" target="_blank">External Link</a>`
})
export class ManualEncodingComponent {
    url: string;

    constructor() {
        const specialChars = 'manual@encoding';
        const encodedSpecialChars = encodeURIComponent(specialChars);
        this.url = `https://geekforgeek.com/search?q=${encodedSpecialChars}`;
    }
}
Update the app-routing.module.ts as well. The routes should look like this:
JavaScript
// app-routing.module.ts

import { NgModule } from '@angular/core';
import { RouterModule, Routes } from '@angular/router';
import { ManualEncodingComponent } from './manual-encoding.component.ts'

const routes: Routes = [
  {
    path: 'search', component: ManualEncodingComponent
  }
];
Output: When you click on the External Link it will redirect you to the respective url with the special character encoded.
 Manual Encoding for External Links Approach 3: Using Angular’s HttpClient for API CallsCreate a new file named http-client-example.component.ts and add the following code:
JavaScript
// http-client-example.component.ts

import { Component } from '@angular/core';
import { HttpClient, HttpParams } from '@angular/common/http';

@Component({
    selector: 'app-http-client-example',
    template: `<button (click)="makeRequest()">Make API Request</button>`
})
export class HttpClientExampleComponent {
    constructor(private http: HttpClient) { }

    makeRequest() {
        const specialChars = 'hello@world';
        const params = new HttpParams().set('query', encodeURIComponent(specialChars));

        this.http.get('https://api.example.com/search', { params })
            .subscribe(response => {
                console.log(response);
            });
    }
}
Update the app-routing.module.ts as well. The routes should look like this:
JavaScript
// app-routing.module.ts

import { NgModule } from '@angular/core';
import { RouterModule, Routes } from '@angular/router';
import { HttpClientExampleComponent } from './http-client-example.component.ts'

const routes: Routes = [
  {
    path: 'search', component: HttpClientExampleComponent
  }
];
Make sure to import HttpClientModule in app.module.ts
Output: When you will click on the Make API Request button you can see the API call in the console. It will give error as expected, I don’t have any API in the backend.
 Using Angular’s HttpClient for API Calls Conclusion- Angular Router: Automatically handles URL encoding when navigating within the app.
- External Links: Use encodeURIComponent to manually encode special characters.
- HttpClient: Automatically handles URL encoding when using HttpParams.
|