
|
|
In this article, we will learn how to add analytics to our Next.js app using Plausible. Adding analytics to any app is a crucial aspect of web development as it helps in understanding how the website is performing for users and how many visitors the website is getting. We will accomplish this by integrating Plausible for analytics. PrerequisitesApproachTo integrate Plausible Analytics with a Next.js app, add your site to Plausible, create a Next.js app, install the Using pages router in NextTo track your whole website, you can simply go inside the “pages/_app.js” files (or “src/pages/_app.js” if you are using src folder) and inside that you can import the “PlausibleProvider” from the “next-plausible” and cover your application inside it, as shown below: import PlausibleProvider from 'next-plausible' To enable localhost tracking, you can set the attributes “trackLocalhost” and “enabled” in your PlausibleProvider as shown below: <PlausibleProvider trackLocalhost enabled domain="<your-domain>">
Using app router in NextNext.js 13 came up with the app router which is a newer way to create pages and structure your website. To integrate the Plausible inside app router, you can simple include the “PlausibleProvider” inside your root layout i.e. “app/layout.js” (or “src/app/layout.js if you are using src folder”) and put it inside the “<head>” tag as shown below: import PlausibleProvider from "next-plausible"; For enabling the localhost tracking, you can add the “trackLocalhost” and “enabled” attributes to the “PlausibleProvider” as shown below: <PlausibleProvider Tracking custom events in plausibleTo track custom events, you can use the “usePlausible” hook provided by “next-plausible” and can easily track custom events as shown below: import { usePlausible } from 'next-plausible'const plausible = usePlausible(); Props accepted by the plausible function:
Steps to add your site on plausibleStep 1: Go to https://plausible.io/ and create an account (if not already created) or login into your account. Step 2: You will be prompted to ask your website details like domain and timzone to be reported. Fill them as shown in the image below: Plausible add site info Step 3: Click on “Add snippet” to add your website. You’ll be redirected to the below page:  Plausible add snippet page Step 4: Click on the “Verify your integration to start collecting data” button, which will redirect you to the analytics dashboard and you’ll be able to see the analytics once we start the tracking.  Plausible verifying your integration page Steps to create the Next.js applicationStep 1: To create your app, run the following npx command in your terminal to start the creation process: npx create-next-app@latestStep 2: Provide the necessary details to create your app as shown in the image below. 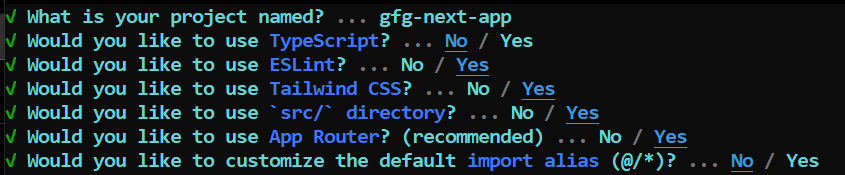 Providing the necessary details to create-next-app Step 3: Navigate to the project directory. cd gfg-next-appStep 4: Installing the next-plausible module using the below command: npm i next-plausibleStep 5: Run the development server using the below command: npm run devProject Structure: Folder structure | How to Add Analytics in Next.js with Plausible The updated dependencies in package.json file will look like: "dependencies": { Example 1: In this example, let’s add the “PlausibleProvider” from the “next-plausible” in our app and start tracking the page views in our plausible dashboard.
 Example 1: Homepage of our Next.app  Example 1: Output plausible dashboard Example 2: In this example, let’s create a custom button click event and track that event using plausible. Output: As you can see whenever we click the button, the event will be registered through plausible and could be seen in the dashboard with the props which we had passed to the “plausible” function.  Example 2: Webpage  Ecample 2: Plausible Dashboard Goal Conversion  Example 2: Plausible Dashboard Custom Properties Reference: next-plausible github link |
Reffered: https://www.geeksforgeeks.org
| ReactJS |
Type: | Geek |
Category: | Coding |
Sub Category: | Tutorial |
Uploaded by: | Admin |
Views: | 19 |