|
MongoDB authentication integration in Next.js with NextAuth.js enhances the security of web applications. Integrating authentication in a Next.js application using MongoDB as the database can be efficiently achieved with the NextAuth.js library. NextAuth.js is a complete open-source authentication solution for Next.js applications that supports various sign-in methods, including OAuth, Email, and Credentials.
PrerequisitesAuthentication types in NextJSNext.js supports various authentication methods. Here are the main ones:
- Credentials-based login (Email + Password): A standard choice for web applications is where users log in with an email and password. This method is familiar and easy to implement. It requires robust security measures to protect against threats like phishing attacks.
- OAuth Providers: This approach allows users to log in with their existing accounts on platforms like Google, GitHub, or Facebook.
- Custom Authentication: This method allows users to create their own authentication methods, such as token-based login. For example, when a user logs in successfully, their token is stored in local storage. The session for the user is then managed by comparing the token using JWT (JSON Web Token).
Steps to implement AuthenticationStep 1: Create a nextJS application by using this command
npx create-next-app myapp Step 2: Navigate to project directory
cd myapp Step 3: Install the necessary packages/libraries in your project using the following commands.
npm install next-auth mongoose Project Structure: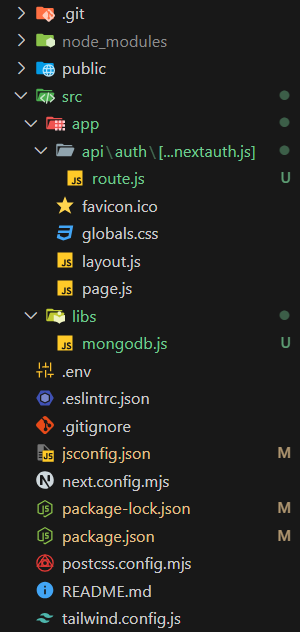 Next.js folder structure The updated dependencies in package.json file will look like:
"dependencies": {
    "next": "latest",
    "react": "latest",
    "react-dom": "latest",
    "next-auth": "^4.0.0",
    "@next-auth/mongodb-adapter": "^0.0.0",
    "mongodb": "^4.0.0"
  }
Steps for MongoDB connectionStep 1: Create a “libs/mongodb.js” file in your project folder
Step 2: Add these code to your “mongodb.js” file.
Note: Ensure your .env contains the MONGODB_URI and NODE_ENV
JavaScript
import { MongoClient } from 'mongodb';

const client = new MongoClient(process.env.MONGODB_URI, {
  useNewUrlParser: true,
  useUnifiedTopology: true,
});

let clientPromise;

if (process.env.NODE_ENV === 'development') {
  if (!global._mongoClientPromise) {
    global._mongoClientPromise = client.connect();
  }
  clientPromise = global._mongoClientPromise;
} else {
  clientPromise = client.connect();
}

export default clientPromise;
Example: Implementation of MongoDB Authentication In NextJS Using NextAuth.Js
JavaScript
import NextAuth from "next-auth/next";
import CredentialsProvider from "next-auth/providers/credentials";
import { clientPromise } from '../../../util/db';

export const authOptions = {
    providers: [
        CredentialsProvider({
            name: "credentials",
            credentials: {},
            async authorize(credentials) {
                const db = await connectToDatabase();
                const users = db.collection('users');
                const user = await users.findOne({
                    email: credentials.email,
                    password: credentials.password,
                });

                if (user) {
                    return Promise.resolve(user);
                }
                return Promise.resolve(null);
            },
  ],
    session: {
        strategy: "jwt",
    },
    secret: process.env.NEXTAUTH_SECRET,
    pages: {
        signIn: "/login",
    },
};

const handler = NextAuth(authOptions);

export { handler as GET, handler as POST };
import NextAuth from 'next-auth';
import Providers from 'next-auth/providers';
import { MongoClient } from 'mongodb';
import GoogleProvider from "next-auth/providers/google"

export default NextAuth({
    providers: [
        GoogleProvider({
            clientId: process.env.GOOGLE_CLIENT_ID,
            clientSecret: process.env.GOOGLE_CLIENT_SECRET,
            profile(profile) {
                return {
                    // Return all the profile information you need.
                    // The only truly required field is `id`
                    // to be able identify the account when added to a database
                }
            },
        })
    ],
    session: {
        jwt: true,
    },
    callbacks: {
        async session({ session, token }) {
            session.user.id = token.sub;
            return session;
        },
    },
    database: process.env.MONGODB_URI,
});
.env File structure: 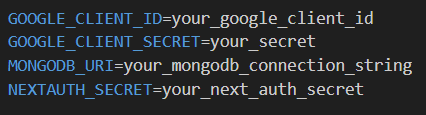 Ensure all these values are added in your .env file Output:
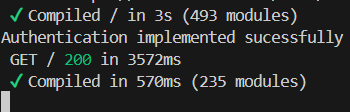 Check this output in your terminal ConclusionIn this article, we’ve set up authentication in a Next.js application using MongoDB and NextAuth.js. This includes configuring MongoDB connection, setting up NextAuth.js with MongoDB adapter, creating a sign-in page, and protecting pages. This setup provides a robust foundation for handling authentication in your Next.js applications with MongoDB.
|