|
Forms are an essential part of many web applications, allowing users to input data and interact with the website. Next.js, with its powerful features for building server-rendered React applications, provides an ideal platform for creating forms. In this article, we’ll explore step-by-step how to create a form in Next.js, covering everything from basic setup to form submission handling.
Output Preview:
 final form Prerequisites:Approach to create a NextJS form- Begin by setting up a Next.js project using the appropriate command (e.g.,
npx create-next-app) to initialize the project structure and dependencies. - Create a
<form> element and include input fields for text, textarea, number, radio, checkbox, and select-options, each with a corresponding label. - Add input elements like text, textarea, number, radio buttons, checkboxes, and select-options for user input.
- Incorporate buttons for form submission and resetting.
- Define CSS classes in a module file (e.g., Form.module.css) to style form elements.
- Manage form data using
useState hook to update state variables dynamically. - Implement
onChange event handlers to capture user input and update state variables. Ensure data validation for a seamless user experience.
Steps to Setup NextJS ApplicationStep 1: Create a NextJS application by using this command
npx create-next-app demonext Step 2: Navigate to project directory
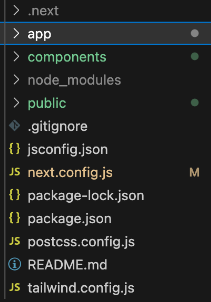
cd demonext Project Structure: The updated dependencies in package.json file will look like:
"dependencies": {
  "next": "12.1.0",
  "react": "^17.0.2",
  "react-dom": "^17.0.2"
}
Example: Implementation to create a form in NextJS.
CSS
/* form.module.css */

.form {
  max-width: 400px;
  padding: 20px;
  border: 1px solid #ccc;
  border-radius: 5px;
}

.label {
  display: block;
  margin-bottom: 5px;
}

.input,
.radio,
.select,
.button {
  width: 100%;
  padding: 8px;
  margin-bottom: 10px;
  border: 1px solid #ccc;
  border-radius: 4px;
  box-sizing: border-box;
}

.input[type="number"] {
  width: 100%;
}

.radio {
  margin-right: 10px;
}
.button {
  background-color: #1c5f3a;
  color: #fff;
  cursor: pointer;
}

.button:hover {
  background-color: #124127;
}
// components/Form.js

import React, { useState } from "react";
import styles from "./Form.module.css"; // Updated import path

const Form = () => {
    const [formData, setFormData] = useState({
        firstName: "",
        lastName: "",
        email: "",
        address: "",
        age: "",
        gender: "",
        interests: [],
    });

    const handleChange = (e) => {
        const { name, value, type, checked, options } = e.target;
        if (type === "checkbox") {
            const selectedOptions = Array.from(options)
                .filter((option) => option.selected)
                .map((option) => option.value);
            setFormData({ ...formData, [name]: selectedOptions });
        } else if (type === "radio" && checked) {
            setFormData({ ...formData, [name]: value });
        } else {
            setFormData({ ...formData, [name]: value });
        }
    };

    const handleSubmit = (e) => {
        e.preventDefault();
        console.log("Form Data:", formData);
    };

    return (
        <form className={styles.form} onSubmit={handleSubmit}>
            <label htmlFor="firstName" className={styles.label}>
                First Name:
            </label>
            <input
                type="text"
                id="firstName"
                name="firstName"
                value={formData.firstName}
                onChange={handleChange}
                className={styles.input} />

            <label htmlFor="lastName" className={styles.label}>
                Last Name:
            </label>
            <input
                type="text"
                id="lastName"
                name="lastName"
                value={formData.lastName}
                onChange={handleChange}
                className={styles.input} />

            <label htmlFor="email" className={styles.label}>
                Email:
            </label>
            <input
                type="email"
                id="email"
                name="email"
                value={formData.email}
                onChange={handleChange}
                className={styles.input} />

            <label htmlFor="address" className={styles.label}>
                Address:
            </label>
            <textarea
                id="address"
                name="address"
                value={formData.address}
                onChange={handleChange}
                className={styles.input} />

            <label htmlFor="age" className={styles.label}>
                Age:
            </label>
            <input
                type="number"
                id="age"
                name="age"
                value={formData.age}
                onChange={handleChange}
                className={styles.input} />

            <label className={styles.label}>Gender:</label>

            <span style={{ display: "flex" }}>
                <label
                    style={{ width: "20px" }}
                    htmlFor="male"
                    className={styles.label}>
                    Male
                </label>
                <input
                    type="radio"
                    id="male"
                    name="gender"
                    value="male"
                    checked={formData.gender === "male"}
                    onChange={handleChange}
                    className={styles.radio} />
            </span>
            <span style={{ display: "flex" }}>
                <label
                    style={{ width: "20px" }}
                    htmlFor="female"
                    className={styles.label}>
                    Female
                </label>
                <input
                    type="radio"
                    id="female"
                    name="gender"
                    value="female"
                    checked={formData.gender === "female"}
                    onChange={handleChange}
                    className={styles.radio} />
            </span>

            <label htmlFor="interests" className={styles.label}>
                Interests:
            </label>
            <select
                id="interests"
                name="interests"
                multiple
                value={formData.interests}
                onChange={handleChange}
                className={styles.select}>
                <option value="coding">Coding</option>
                <option value="reading">Reading</option>
                <option value="music">Music</option>
            </select>

            <button type="submit" className={styles.button}>
                Submit
            </button>
            <button type="reset" className={styles.button}>
                Reset
            </button>
        </form>
    );
};

export default Form;
//index.js

import Head from "next/head";
import { useEffect, useState } from "react";
import Form from "./form";

export default function Home() {
  return (
    <>
      <Head>
        <title>Create Next App</title>
        <meta name="description"
          content="Generated by create next app" />
        <meta name="viewport"
          content="width=device-width, initial-scale=1" />
        <link rel="icon" href="/favicon.ico" />
      </Head>
      <main>
        <div
          style={{
            height: "100vh",
          }}>
          <Form />
        </div>
      </main>
    </>
  );
}
Step to Run Application: Run the application using the following command from the root directory of the project
npm run dev Output: Your project will be shown in the URL http://localhost:3000/
ConclusionBuilding forms in Next.js requires paying close attention to details and following the best ways of doing things to make sure users have a smooth experience. This involves using clear HTML elements like input boxes and buttons, checking data both on the user’s side and on the server to make sure it’s correct, making sure anyone can use the form easily, making the form look good on different devices, and making sure hackers can’t mess with it. By doing these things right, your Next.js forms will work well and users will find them easy to use.
|


