|
|
When you fork a repository, you create a copy of it under your own account. However, as the original repository updates with new features, bug fixes, and improvements, you’ll want to keep your forked repository up-to-date with these changes. This is where adding an upstream remote in Git comes into play. In this article, we’ll explore the process of adding an upstream remote to your forked repository, fetching changes from the original repository, and keeping your fork synchronized with the latest updates. Table of Content What is upstream?The upstream repository is the original project repository from which your repository was forked or cloned. It’s the official source where the project is maintained and updated. When you fork a repository on platforms like GitHub, GitLab, or Bitbucket, the original repository becomes your upstream repository. In Git, a remote is a repository hosted on a server, such as GitHub or GitLab. The term “upstream” refers to the original repository that you forked from. By adding an upstream remote, you establish a connection to the original repository, allowing you to track changes and pull updates into your forked repository. How to Add Upstream in Git?Adding an upstream repository in Git involves configuring your local repository to recognize and fetch changes from the original project repository. Here’s a step-by-step guide to adding an upstream repository: Step 1: Clone the forked repositoryYou can clone you forked repository using `git clone` command: git clone <link_of_your_fork>
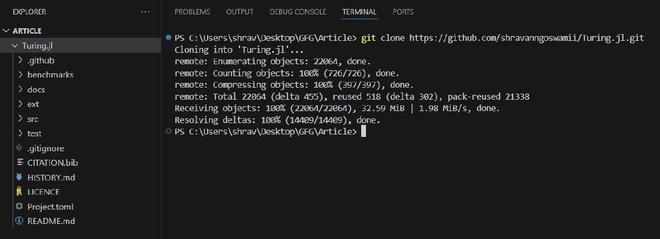
for example purpose, lets clone an open source project Turing.jl: git clone https://github.com/shravanngoswamii/Turing.jl.git
Git Clone Step 2: Navigate to Cloned RepoNow navigate to the clone of your forked repository using `cd` command: cd <your_cloned_repo>
After navigating, check the name of remote repository using: git remote -v
for example, cd Turing.jl  Navigating to the repo Step 3: Add Upstream RemoteYou can see that the name of the clone of your forked repository is `origin`. So now just add the original repository as an upstream using: git remote add upstream <upstream_repository_URL>
for example, git remote add upstream https://github.com/TuringLang/Turing.jl.git
Step 4: Verify Upstream RemoteYou can verify that the upstream remote has been added correctly by listing the configured remotes using the git remote -v command: git remote -v
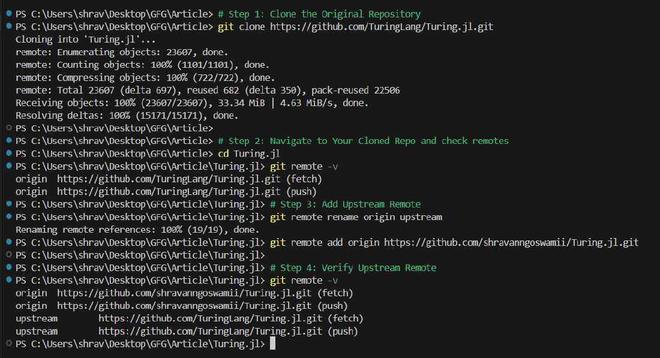
 Upstream Remote Add Upstream after Cloning the Original RepoStep 1: Clone the Original RepositoryIf you haven’t already cloned the original repository, start by cloning it to your local machine using the git clone command. Replace <original_repository_url> with the URL of the original repository: git clone <original_repository_url>
for example, git clone https://github.com/TuringLang/Turing.jl.git
Step 2: Navigate to Your Cloned RepoChange directory into your cloned repository. If you’ve already cloned original repo, navigate to its directory using the cd command: cd <your_cloned_directory>
for example, cd Turing.jl
Now the names of remote repositories using: git remote -v
Step 3: Add Upstream RemoteWhen you clone the original repository then the name of your original clone repo is `origin`, so just change the name of your cloned repo to `upstream` using: git remote rename origin upstream
Now you cloned repository is an upstream but you cannot directly push the changes into that if you are working with any project that you do not have write access to so now you have to add your forked repository as an origin using: git remote add origin <forked_repo_link>
for example, git remote add origin https://github.com/shravanngoswamii/Turing.jl.git
Step 4: Verify Upstream RemoteYou can verify that the upstream remote has been added correctly by listing the configured remotes using the git remote -v command: git remote -v
 How to Add Upstream in Git? |
Reffered: https://www.geeksforgeeks.org
| Git |
| Related |
|---|
| |
| |
| |
| |
| |
Type: | Geek |
Category: | Coding |
Sub Category: | Tutorial |
Uploaded by: | Admin |
Views: | 15 |