|
|
JUnit 5 is a widely used testing framework in the Java ecosystem. It is the successor of JUnit 4 and is designed to address its limitations. JUnit framework allows the developers to write and run the tests for their Java code. These tests help ensure that the code functions correctly and continues to work as expected as changes are made. JUnit 5 provides a variety of annotations and one such annotation is `@RepeatedTest`. In this article, let us understand about @RepeatedTest annotation in JUnit 5. PrerequisitesTo understand this, we need to have some prerequisites.
@RepeatedTest in JUnit 5@RepeatedTest annotation is used in JUnit 5 in order to specify the number of times the test method should execute. This annotation is used to measure the Robustness of a specific test case. Syntax of @RepeatedTest@RepeatedTest (value, name)
Where,
IDE Setup for Implementing @RepeatedTest( Step By Step Implementation)Here, we are using Eclipse IDE for Java and Web Developers. You may also use other platforms like IntelliJ, Spring suite tool, Spring Initializer, etc. Step 1: Creation of Project
Recommended requirements:Project type: Maven
Packaging: Jar
Java Version: 8
Language: Java
Step 2: Adding dependenciesLet us configure our `pom.xml` file with the following dependencies: JUnit Jupiter API:The JUnit Jupiter API is the part of JUnit 5 framework which provides annotations, assertions, and other features for defining and running test cases and serves as a programming model for writing tests in Java. To add the JUnit Jupiter API in pom.xml file, copy and paste the following code. XML
Project Setup for ApplicationNow, that the project setup is ready, let us look into an example to understand how to write and run test cases of JUnit using the Maven tool. Step 1: Create a new package in the `src/test/java`, right-click on `src/test/java` > new > package.
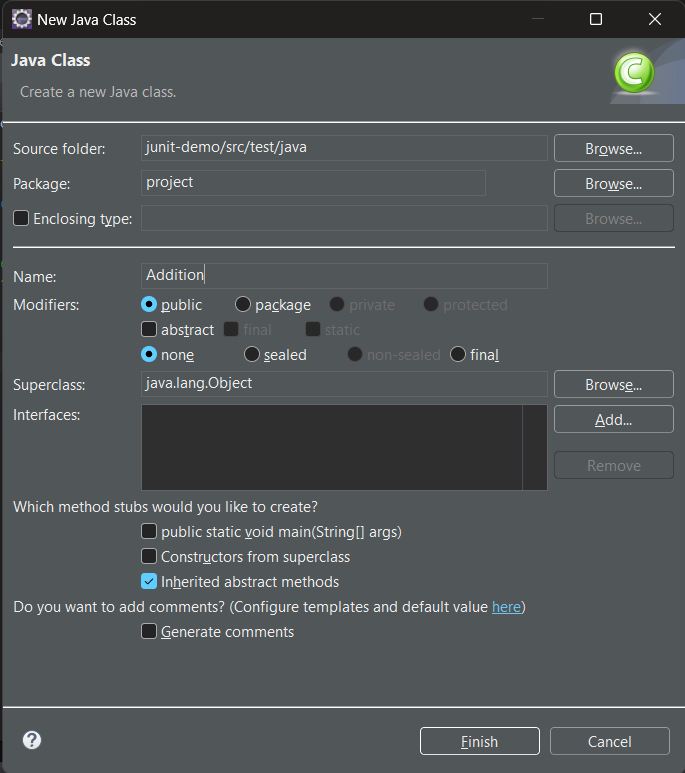
Step 2: Create a class in the package and name it as per your requirement. i.e. `Addition`. To create a class, right-click on package > new > class
Step 3: Write the logic which you want to test in `Addition.java`. Java
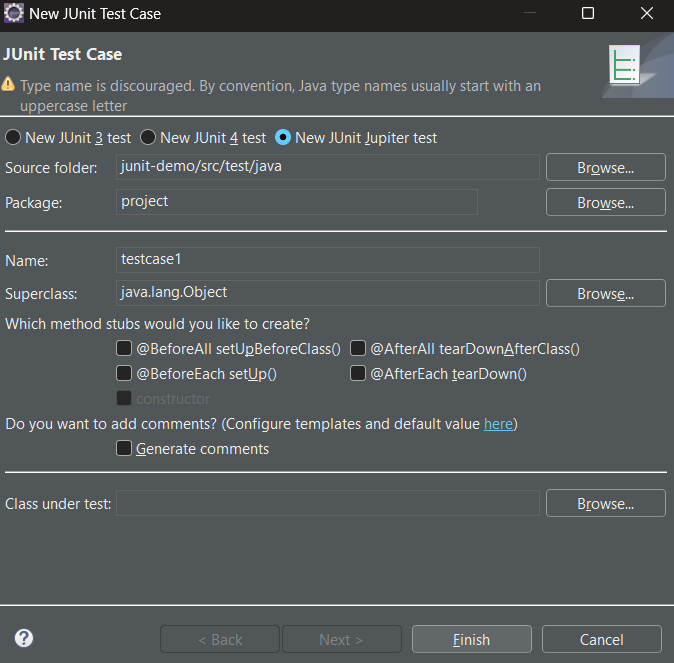
Step 4: Now, create a test case inside the package by right click on the package > new > others > java > JUnit > JUnit test case.
Example for Test Case1Test Script: Let us write the first test case i.e. `Testcase1`. Java
Steps to run the ApplicationTo run the application, Go to project explorer > right click on your project > Run as > Spring Boot App.
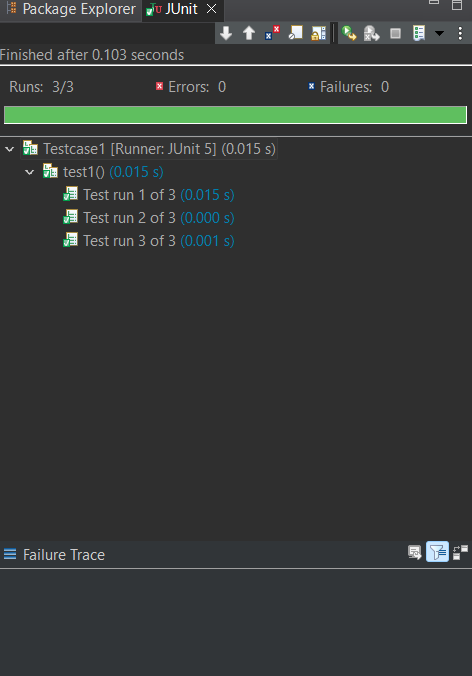
Output of the above ProgramJUnit view:
Console view:
Explanation of the Above Program:In the above code snippet, the `Testcase1` is annotated with `@RepeatedTest()` along with the `value` as `3` representing that the test should execute 3 times. we have defined the `test1` method in which we have created the `addition` object for `Addition.java` and calculated the sum and stored in `actual` variable. We have asserted the result by comparing the `actual` and `expected` values with `assertEquals` method. Example for Test Case2Test Script: Let us write the first test case i.e. `Testcase2`. Java
Output of JUnit 5 ProgramJUnit view:
Console view:
Explanation of the above Program:In the above code snippet, the `Testcase2` is annotated with `@RepeatedTest()` along with the `value` as `3` and `name` as `Test run {currentRepetition} of {totalRepetitions}` representing that the test should execute 3 times and displaying the current and total repeatition values. we have defined the `test1` method in which we have created the `addition` object for `Addition.java` and calculated the sum and stored in `actual` variable. We have asserted the result by comparing the `actual` and `expected` values with `assertEquals` method. |
Reffered: https://www.geeksforgeeks.org
| Advance Java |
| Related |
|---|
| |
| |
| |
| |
| |
Type: | Geek |
Category: | Coding |
Sub Category: | Tutorial |
Uploaded by: | Admin |
Views: | 13 |


