.webp)
|
|
Google Docs is a platform for creating, editing, and storing documents online. It allows multiple users to collaborate on the same document in real time. Hanging Indentation in Google Docs is one of the most used features in Google Docs as it ensures the hanging indent on google docs. If you’re preparing a bibliography, crafting a citation, or formatting a report, knowing how to make a hanging indent in Google Docs is a valuable skill. In this article, you will learn the easy different steps to create a hanging indent on Google Docs, as well as the shortcut to do a hanging indent in Google Docs ensuring your documents meet academic and professional standards. How to do a hanging indent on Google Docs Google Docs offers different types of indentation including Right, Left, and Hanging. Hanging indentation means indenting the subsequent lines of the same paragraph while leaving the first line unintended. Table of Content
What is Hanging Indent in Google DocsA hanging indent Google Docs is a formatting style where the first line of a paragraph is aligned to the left margin, and all subsequent lines are indented to the right. This format is commonly used in academic papers, bibliographies, and reference lists. Different Methods to Create a Hanging Indent in Google DocsMaking our text or documents into hanging indent gives a professional and attractive flavor to our document. So there are different types of methods to make hanging indentation in google docs. So below we have discussed all the methods along with their detailed steps to make the text into a hanging indent. We will discuss below ways to do a Hanging Indent on Google Doc. How to do Hanging Indent in Google DocsStep 1: Launch Google DocsOpen Google Docs in your Web Browser. Step 2: Open the DocumentNow, Open the document in which we want to perform the Indentation using Ruler.  Open the Document Step 3: Select the Text or ParagraphAfter opening the document for applying hanging indent into it, we need to select the text or paragraph. .webp) Select the Text or Paragraph Step 4: Adjust the Left Indent in the RulerOnce you’ve highlighted the text for a specific paragraph, the next step is to apply hanging indentation. To do this, locate the ruler positioned just below the customization panel. Within the ruler, you’ll make the necessary adjustments to the indentation measurement, which can be observed as you modify it.  Adjust the Left Indent in the Ruler
How to Create a Hanging Indent in Google Docs using the Indentation OptionsStep 1: Launch Google DocsOpen Google Docs in your web browser. Step 2: Open the Google DocumentOpen the document in which you need to perform the indentation. .webp) Open the Document Step 2: Select the TextNow select the text or the content of the paragraph in which you need to perform the hanging indent. .webp) Selecting the Text Step 3: Go to the Format TabSelect the “Format” option located at the top panel or the upper section of our main screen.  Clicking on the Format Tab Step 4: Select Align & Indent from the Drop down MenuUpon clicking the “Format” tab, a range of options will be presented. Seek out “Alignment and Indent” within these choices. When selected, additional options will appear, allowing you to choose the desired indentation settings.  Selecting Indentation Options Step 5: Select Hanging Special Indent and Click ApplySubsequently, a compact window will emerge. Inside this window, you will encounter an option named “Special Indent.” Opt for this option, which will trigger a drop down menu to appear, and within it, select “Hanging.” Upon completing this step, just click on the “Apply” button, and your hanging indent will be implemented. 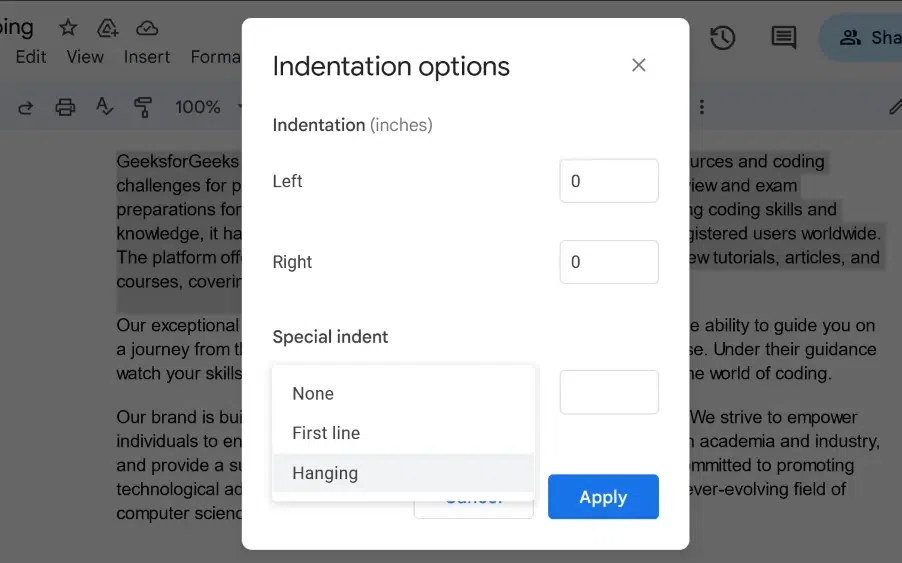 Selecting Hanging Indent Step 6: Preview Hanging IndentYour hanging indent in being successfully applied to the selected paragraph, in which the first line of the paragraph is the same as the initial state, and the rest of the paragraph lines are indented in the hanging format. 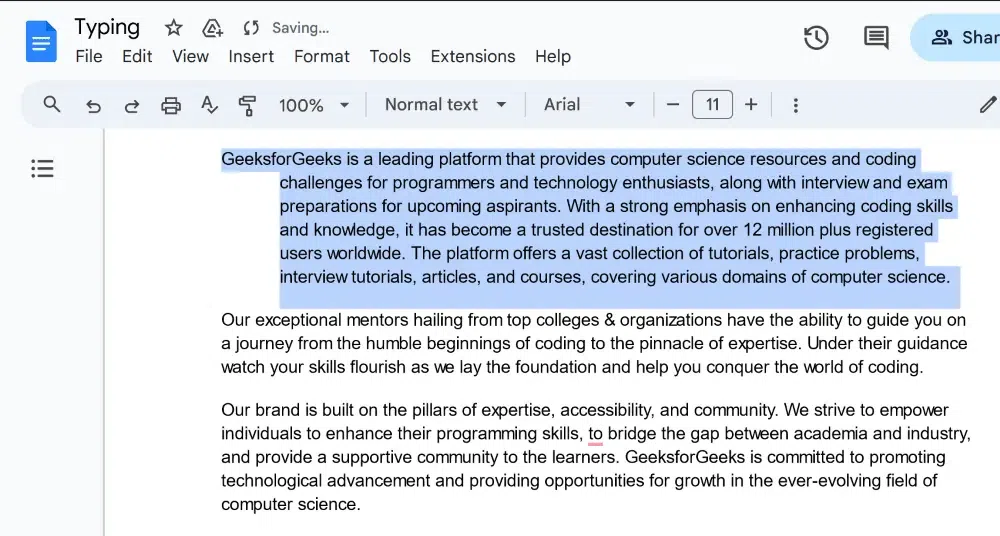 Preview Results How to do a Hanging Indent on Google Docs using a Keyboard ShortcutUsing a keyboard shortcut, we can create a hanging indent in Google Docs:
How to Create a Hanging Indent in Google Docs on iPadFollow the below steps to create an hanging indent in Google Docs on iPad: Step 1: Launch Google Docs AppStep 2: Now Include your citationStep 3: Go to the Format IconTouch the “A” icon located in the upper right corner of the app. Step 4: Tap on “Paragraph“Step 5: Tap on Upward Arrow in Line SpacingIn the “Line Spacing” section, tap the upward arrow once to change it from 1.5 to 2, making it double-spaced. Step 6: Move to the BeginningPlace your cursor after the first line of your citation, then press the “Return” key on your iPad keyboard. This will move your cursor to the beginning of the second line in your citation. Step 7: Click on Format Icon and select “Right Indent”Again, tap the “A“ icon in the top right corner of the app and Select the “Right Indent” option. Step 10: Citation DoubledNow, your citation will be double-spaced with a hanging indent. To close the paragraph options, tap the center of your screen. ConclusionCreating a hanging indent in Google Docs is straightforward and enhances the readability of your documents. If you’re working on academic papers or professional reports, mastering this formatting technique is essential. By using this article you’ve learned how to do hanging indent in Google Docs, making it easier to apply hanging indentation in Google Docs for various purposes. Now you can effortlessly create a hanging indent on Google Docs. Mastering the hanging indent Google Docs method improves your document’s layout and presentation. Hanging Indent in Google Docs – FAQsHow can I make a hanging indent in Google Docs?
How to do hanging indent on Google Docs 2024?
How do I indent on Google Docs second line?
How do you indent a table in Google Docs?
How do you insert a hanging indent?
|
Reffered: https://www.geeksforgeeks.org
| Google Workspace |
Type: | Geek |
Category: | Coding |
Sub Category: | Tutorial |
Uploaded by: | Admin |
Views: | 14 |