
|
|
In Angular, Components are the fundamental building blocks of an application. Understanding the lifecycle of these components is crucial for effective Angular Development. Angular provides several lifecycle hooks that allow developers to tap into key moments in a Component’s lifecycle and execute custom logic during those times. Component Lifecycle StagesThe component lifecycle in Angular consists of several stages:
Lifecycle HooksAngular provides a set of lifecycle hooks that allow developers to execute code at specific stages of a component’s lifecycle. 1. ngOnChangesIt is called before ngOnInit (if the component has bound inputs) and whenever one or more data-bound input properties change. It is used to respond to changes in input properties. ngOnChanges(changes: SimpleChanges) { 2. ngOnInitIt is Called once, after the first ngOnChanges. It is used to initialize the component after Angular first displays the data-bound properties. ngOnInit() { 3. ngDoCheckIt is called during every change detection run, immediately after ngOnChanges and ngOnInit. It is used to detect and act upon changes that Angular can’t or won’t detect on its own. ngDoCheck() { 4. ngAfterContentInitIt is called once after the first ngDoCheck. It is used to perform any additional initialization required for the content. ngAfterContentInit() { 5. ngAfterContentCheckedIt is called after ngAfterContentInit and every subsequent ngDoCheck. It is used to act upon any changes after the content has been checked. ngAfterContentChecked() { 6. ngAfterViewInitIt is called once after the first ngAfterContentChecked. It is used to perform additional initialization required for the view. ngAfterViewInit() { 7. ngAfterViewCheckedIt is called after ngAfterViewInit and every subsequent ngAfterContentChecked. It is used to act upon any changes after the view has been checked. ngAfterViewChecked() { 8. ngOnDestroyIt is called immediately before Angular destroys the component. It is used to clean up any resources, such as subscriptions and event handlers, to avoid memory leaks. ngOnDestroy() { Step-by-Step Guide to Create a Standalone Angular ComponentStep 1: Install Angular CLIEnsure you have Node.js installed. Then, install Angular CLI globally: npm install -g @angular/cliStep 2: Create a New Angular ProjectCreate a new Angular project: ng new angular-gfg Step 3: Generate a Standalone ComponentGenerate a new standalone component called user-profile: ng generate component user-profile --standaloneFolder StructureFolder Structure Dependencies"dependencies": { Step 4: Implement Lifecycle Hooks in UserProfileComponentStep 5: Run the ApplicationRun the application to see the lifecycle hooks in action: ng serveOpen your browser and navigate to http://localhost:4200. You should see the component displayed along with the console logs showing the lifecycle hook calls. Output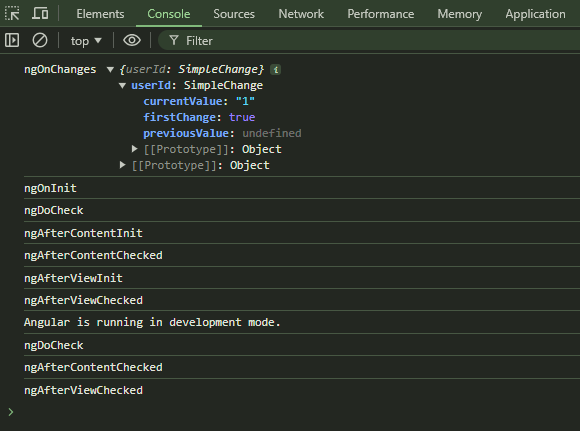 Component Lifecycle in Angular |
Reffered: https://www.geeksforgeeks.org
| AngularJS |
Type: | Geek |
Category: | Coding |
Sub Category: | Tutorial |
Uploaded by: | Admin |
Views: | 21 |