|
MongoDB Atlas is a cloud-based database service that offers robust features and scalability for managing our data. Here we will use Express.js for the server framework and Mongoose for interacting with MongoDB. And also we use the Ejs for our front end to render the simple HTML form. In this tutorial, we will go through the process of how to connect with username/password to Mongodb using native node.js driver.
PrerequisitesSteps to Connect with Username/Password to MongoDB using native node.js DriverStep 1: Create a New Directory First, create a new directory for your project and navigate into it.
mkdir Your_folder_name
cd Your_folder_name
Step 2: Initialize a New Node.js ProjectAfter that, you have to Initialize a new node project using npm.
npm init -y Step 3: Install the required packagesThen install the required package using npm.
npm install express mongodb ejs nodemon Step 4: Register to the MongoDB atlasAfter that, you need to register to the MongoDB Atlas to store the data in a MongoDB Atlas. Then you can see the page like the image below.
 Home page Step 5: Create a ClusterThen You need to create a cluster for that click on the “create” button and choose the free tier (M0). Click on the “Create Deployment” button.
 Cluster Creation Step 6: Create a database userA username and password can be autogenerated, but you can change those and provide a good username and a password, avoid any special characters (#!@$%^_&) in your password otherwise you can not connect it with the database. Once you are done, click on the ‘Create Database User’ button.
.gif) Username and Password Step 7: Choose a connection methodOnce you have done all the steps, select the connection method as the first option (“Drivers”).
.gif) Choose a connection method as Drivers Step 7: Copy the connection stringNow, you have to copy the string and paste it into your project. YOu have to replace the <username> and <password> to your actual username and password.

Then copy the connection string as shown below:
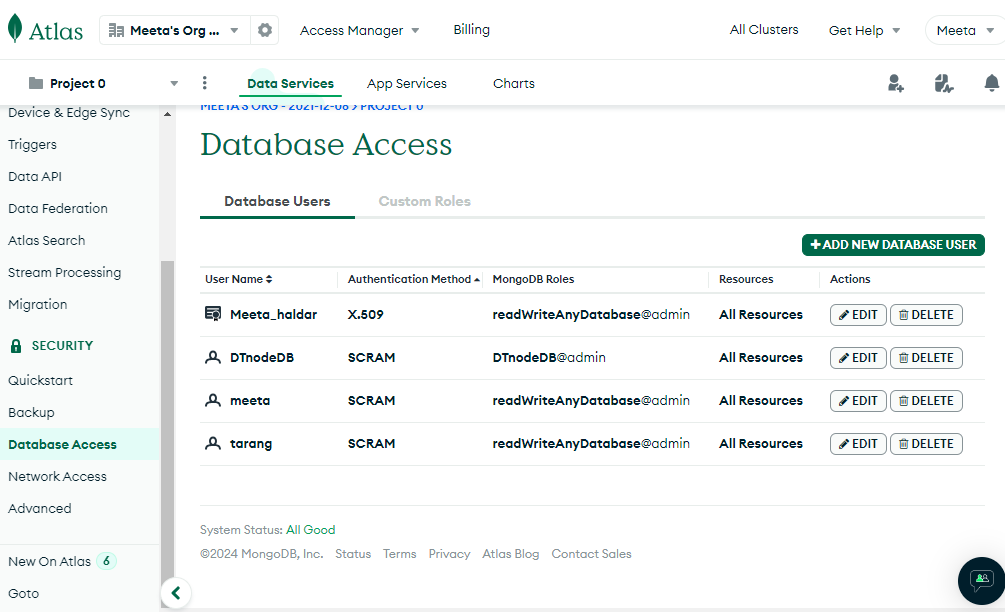
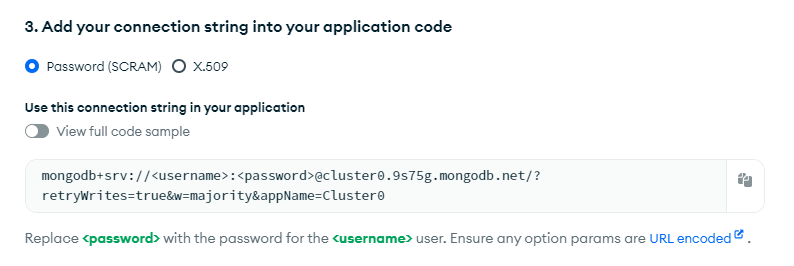 Copy the URL and paste your username and password Step 7: Create a Database userYou have to click on “Database Access” and it will leads you to the page where you can create a new user(if you have not already one). you can give them any access according to yourself. Then replace the <username> and <password> to your actual username and password.
 Project Structure: Folder structure Updated dependencies: "dependencies": {
"ejs": "^3.1.10",
"express": "^4.19.2",
"mongo": "^0.1.0",
"mongodb": "^6.8.0",
"nodemon": "^3.1.4"
}Example: Below is the code example of how to Connect with username/password to mongodb using native node.js driver
HTML
<!-- index.ejs -->
<!DOCTYPE html>
<html lang="en">

<head>
    <meta charset="UTF-8">
    <meta name="viewport"
          content="width=device-width,
                   initial-scale=1.0">
    <title>Task Management</title>
    <link rel="stylesheet" href="./styles.css">
</head>

<body>
    <h1>Task Management</h1>
    <a href="/add-task">Add New Task</a>
    <ul>
        <% tasks.forEach(task=> { %>
            <li><strong>
                    <%= task.name %>:
                </strong>
                <%= task.description %>
            </li>
            <% }) %>
    </ul>
</body>

</html>
<!-- addTask.ejs -->
<!DOCTYPE html>
<html lang="en">

<head>
    <meta charset="UTF-8">
    <meta name="viewport"
          content="width=device-width,
                   initial-scale=1.0">
    <title>Add Task</title>
    <link rel="stylesheet" href="/styles.css">
</head>

<body>
    <h1>Add a New Task</h1>
    <form action="/add-task" method="POST">
        <label for="name">Task Name:</label>
        <input type="text" id="name" name="name" required>
        <label for="description">Task Description:</label>
        <textarea id="description" name="description" required></textarea>
        <button type="submit">Add Task</button>
    </form>
</body>

</html>
body {
    font-family: Arial, sans-serif;
    background-color: #f4f4f4;
    color: #333;
    margin: 0;
    padding: 0;
    display: flex;
    justify-content: center;
    align-items: center;
    height: 100vh;
    flex-direction: column;
}

h1 {
    margin-bottom: 20px;
}

ul {
    list-style-type: none;
    padding: 0;
}

li {
    background: #fff;
    margin: 5px 0;
    padding: 10px;
    border-radius: 5px;
    box-shadow: 0 0 5px rgba(0, 0, 0, 0.1);
}

form {
    display: flex;
    flex-direction: column;
}

label {
    margin: 5px 0;
}

input,
textarea,
button {
    margin: 5px 0;
    padding: 10px;
    border-radius: 5px;
    border: 1px solid #ccc;
}

button {
    background-color: #28a745;
    color: white;
    border: none;
    cursor: pointer;
}

button:hover {
    background-color: #218838;
}
// server.js....


const express = require('express');
const path = require('path');
const { getTasks, addTask } = require('./task');

const app = express();
const port = 3000;

// Middleware
app.set('view engine', 'ejs');
app.use(express.urlencoded({ extended: true }));
app.use(express.static(path.join(__dirname, 'public')));

// Routes
app.get('/', async (req, res) => {
    try {
        const tasks = await getTasks();
        res.render('index', { tasks });
    } catch (error) {
        res.status(500).send(error);
    }
});

app.get('/add-task', (req, res) => {
    res.render('addTask');
});

app.post('/add-task', async (req, res) => {
    const { name, description } = req.body;
    try {
        await addTask({ name, description });
        res.redirect('/');
    } catch (error) {
        res.status(500).send(error);
    }
});

app.listen(port, () => {
    console.log(`Server is running on http://localhost:${port}`);
});
// db.js

const { MongoClient } = require('mongodb');

const uri =
    'YOUR_URL_OF_MONGO_DRIVE';

const client = new MongoClient(uri, {

});

const connectDB = async () => {
    try {
        await client.connect();
        console.log('Connected to database');
        return client.db();
    } catch (error) {
        console.error('Error connecting to database', error);
        process.exit(1);
    }
};

module.exports = connectDB;
// task.js

const { MongoClient } = require('mongodb');
const connectDB = require('./db');

let db;
(async () => {
    db = await connectDB();
})();

const getTasks = async () => {
    return await db.collection('tasks').find().toArray();
};

const addTask = async (task) => {
    await db.collection('tasks').insertOne(task);
};

module.exports = { getTasks, addTask };
Step to run the project
nodemon server.js Output:
.png) Output for task add. Database Output:
.png) Database Output
|