|
Next.js is a powerful React framework that helps developers build fast, user-friendly web applications. One of the advanced features it offers is generateImageMetadata, which helps in generating and optimizing metadata for images in your Next.js applications. This feature is important for improving SEO and ensuring your images load quickly and efficiently.
SyntaxThe generateImageMetadata function is typically used within the Next.js configuration or in a custom server setup.
import { generateImageMetadata } from 'next/image-metadata';

const metadata = generateImageMetadata(imagePath, options);ParametersimagePath (string): The path to the image file for which metadata is to be generated.options (object): An optional object to customize the metadata generation. This can include various parameters such as width, height, quality, and more.
Options Objectwidth (number): Desired width of the image.height (number): Desired height of the image.quality (number): Image quality (0-100).
ReturnsThe generateImageMetadata function returns an object containing the following properties:
src (string): The URL of the image.width (number): The width of the image.height (number): The height of the image.alt (string): The alt text for the image.
Uses of generateImageMetadata- SEO Optimization: Proper image metadata improves SEO by providing search engines with relevant information.
- Performance: Optimized images load faster, enhancing user experience.
- Accessibility: Alt text and other metadata improve accessibility for users relying on screen readers.
Steps to Create the ProjectStep 1. Create Next.js ProjectUse Create Next App to establish a new Next.js project named my-image-project.
npx create-next-app my-image-project Note : Select Page Router instead of App Router ( by defualt )
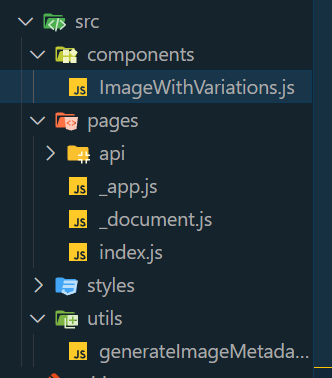
Step 2. Navigate to the Project Directorycd my-image-project Project Structure project struture used page router Dependenciesdependencies :
{
"react": "^18",
"react-dom": "^18",
"next": "14.2.4"
}
Example: Illustration to design a generateImageMetadata App with Next.
- create ImageWithVariations.js file in src/components folder
- create generateImageMetadata.js file in src/utils folder
- Update index.js file
JavaScript
// utils/generateImageMetadata.js
export const generateImageMetadata = () => {
  return [
    { id: 1, alt: "Small example image", size: "small", width: 100, height: 100 },
    { id: 2, alt: "Medium example image", size: "medium", width: 200, height: 200 },
    { id: 3, alt: "Large example image", size: "large", width: 300, height: 300 }
  ];
};
// components/ImageWithVariations.js
import React from 'react';

const ImageWithVariations = ({ metadata }) => {
  return (
    <div>
      {metadata.map((data) => (
        <img
          key={data.id}
          src="https://media.geeksforgeeks.org/wp-content/uploads/20240603201539/
          Aspect_ratio_-_16x9svg.png"
          alt={data.alt}
          width={data.width}
          height={data.height}
        />
      ))}
    </div>
  );
};

export default ImageWithVariations;
// pages/index.js
import React from 'react';
import { generateImageMetadata } from '../utils/generateImageMetadata';
import ImageWithVariations from '../components/ImageWithVariations';

const HomePage = () => {
  const metadata = generateImageMetadata();

  return (
    <div>
      <h1>Image Variations</h1>
      <ImageWithVariations metadata={metadata} />
    </div>
  );
};

export default HomePage;
Step to Run Application: Run the application using the following command from the root directory of the project
npm run dev Output: Your project will be shown in the URL http://localhost:3000/
 image varies size due to different metadata
|


