|
JGit is lightweight and it is a Java library implementing the Git version control system. It can allow the developers to perform the Git operators programmatically within Java applications. Making it a powerful tool for integrating Git functionalities into Java projects.
Prerequisites- Java Development Kit installed on your computer.
- Maven for dependency management.
JGit in JavaJGit can allow you to create and manipulate the Git repositories programmatically. We can initialize the new repository and add the files to it, commit changes and more. This article will show you how to create the local Git repository and add the file and commit it using JGit.
Implementation of Create a local repository with JGitStep 1: Create the Maven ProjectCreate the new maven project using the IntelliJ idea. Once create the project then the file structure looks like the below image.
 Step 2: JGit DependencyOpen the pom.xml file and add the JGit dependency into the project.
    <!-- https://mvnrepository.com/artifact/org.eclipse.jgit/org.eclipse.jgit -->
        <dependency>
            <groupId>org.eclipse.jgit</groupId>
            <artifactId>org.eclipse.jgit</artifactId>
            <version>6.9.0.202403050737-r</version>
        </dependency>
Step 3: Create the Main class and put the below code.
Java
package org.example;


import org.eclipse.jgit.api.Git;
import org.eclipse.jgit.api.errors.GitAPIException;
import org.eclipse.jgit.lib.PersonIdent;

import java.io.File;
import java.io.FileWriter;
import java.io.IOException;

public class Main {

    public static void main(String[] args) {
        File localPath = new File("C:\\Users\\Mahesh\\Desktop\\local-repo");
        File myFile = new File(localPath, "example.txt");

        try {
            // Initialize a new repository
            Git git = Git.init().setDirectory(localPath).call();
            System.out.println("Initialized repository at: " + git.getRepository().getDirectory());

            // Create the file
            FileWriter writer = new FileWriter(myFile);
            writer.write("Hello, JGit!");
            writer.close();

            // Add the file to the repository and commit it
            git.add().addFilepattern("example.txt").call();
            git.commit().setMessage("Initial commit")
                    .setAuthor(new PersonIdent("Your Name", "[email protected]"))
                    .call();

            System.out.println("Committed file to repository at: " + git.getRepository().getDirectory());
        } catch (IOException | GitAPIException e) {
            e.printStackTrace();
        }
    }
}
pom.xml
XML
<?xml version="1.0" encoding="UTF-8"?>
<project xmlns="http://maven.apache.org/POM/4.0.0"
         xmlns:xsi="http://www.w3.org/2001/XMLSchema-instance"
         xsi:schemaLocation="http://maven.apache.org/POM/4.0.0 http://maven.apache.org/xsd/maven-4.0.0.xsd">
    <modelVersion>4.0.0</modelVersion>

    <groupId>org.example</groupId>
    <artifactId>local-jgit</artifactId>
    <version>1.0-SNAPSHOT</version>

    <properties>
        <maven.compiler.source>17</maven.compiler.source>
        <maven.compiler.target>17</maven.compiler.target>
        <project.build.sourceEncoding>UTF-8</project.build.sourceEncoding>
    </properties>

    <dependencies>
        <!-- https://mvnrepository.com/artifact/org.eclipse.jgit/org.eclipse.jgit -->
        <dependency>
            <groupId>org.eclipse.jgit</groupId>
            <artifactId>org.eclipse.jgit</artifactId>
            <version>6.9.0.202403050737-r</version>
        </dependency>
    </dependencies>

</project>
Step 4: Run the applicationIt will show the below output.
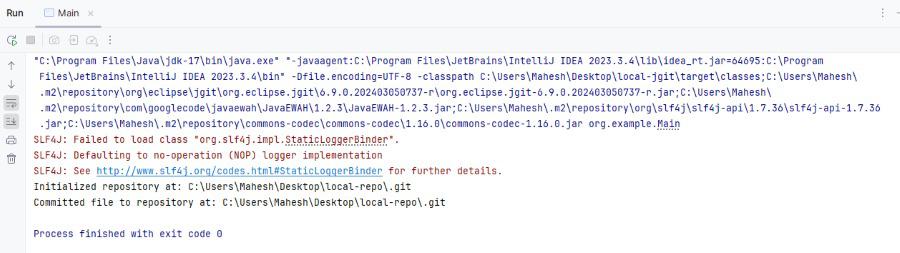 Result Local Repository ConclusionUsing the JGit, We can easily create and manipulate the Git repositories programmatically in Java. This article will covered the steps to set up the environment and initialize the Git repository, add the file and commit it using JGit.
|