
|
|
Configuring DNS in Linux is an essential task for ensuring your system can resolve domain names correctly and access the internet smoothly. Whether you are setting up a DNS server, changing DNS settings, or troubleshooting network issues, understanding how to configure DNS in Linux is crucial. In this guide, we will provide a step-by-step tutorial on how to set up and configure DNS in Linux, covering various methods and tools to help you achieve optimal DNS performance. Quick Highlights on DNS Server System
How to Install DNS Server Software on Linux?Step 1: Open the Linux Terminal & execute the following command to update already installed packages on Linux. Command: sudo apt update
Step 2: At last, use the below-mentioned command to Install DNS Server BIND on Linux. Command: sudo apt install bind9
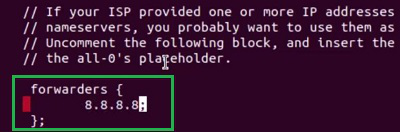
So, you have to perform these steps to Install BIND on Linux, if you have not performed it beforehand. Then, the following configuration process is stated. How to Configure DNS on Linux?To Enable DNS Server on Linux, the following configurations should be performed. We will start with configuring Named Config Files. 1. Configure DNS on Linux by Configuring the Named Config FilesStep 1: In the BIND Server, there are Config Files are present where we have to make the changes. To open such files the following command will be used. Command: sudo nano /etc/bind/named.conf.options
Step 2: Now, under the Forwarders make the following changes as you can see in the image. We have to add the sample IP Address of Google.
2. Configure DNS on Linux by Adding Forward & Reverse LookupStep 1: To add Forward & Reverse Lookup in Linux, the below-mentioned command will be used. It will open the file to make changes. Command: sudo nano /etc/bind/db
Step 2: Make the Serial Number Zero for the proper configuration there.
3. Configure DNS on Linux by Restarting BIND Server & StatusStep 1: It is time to Restart the BIND Server after making the changes. To do that, the following command should be used. Command: sudo systemctl restart bind9
Step 2: Now, it is time to check the Status of the BIND Server that it is running now or not. To do that, the following command will be used. Command: sudo systemctl status bind9
4. Configure DNS on Linux by Binding with UTF FirewallStep 1: At last, the configuration with Uncomplicated Firewall (UTF) should be done. We will enable the UTF with BIND. For that purpose, the below command will be used. Command: sudo utf allow bind9
Step 2: Now, if we are going to check the Status of the Firewall, we will find the BIND is added to the firewall which implies the end of the configuration. Command: sudo utf status
ConclusionConfiguring DNS in Linux is a straightforward process that can greatly enhance your system’s network performance and reliability. By following the steps outlined in this guide, you can easily set up and manage DNS settings on your Linux system. As Linux has the Linux Command Line Tool, this complex process can be completed with a couple of Linux Commands. Also Read
How to Configure DNS on Linux – FAQsHow can I configure DNS on Linux?
How can I install DNS Server Software on Linux?
Can I use public DNS servers in Linux?
How do I Configure a DNS server in Linux?
How do I troubleshoot DNS issues in Linux?
|


Reffered: https://www.geeksforgeeks.org
| TechTips |
Type: | Geek |
Category: | Coding |
Sub Category: | Tutorial |
Uploaded by: | Admin |
Views: | 12 |