
|
|
Are you looking to enhance your document’s structure and make it more reader-friendly? Adding headings in Google Docs is a simple yet powerful way to organize your content. Whether you need to add headings in Google Docs, add a header in Google Docs, or even add a header in Google Sheets, mastering these features can significantly improve your document’s readability and presentation. Headings help break up large blocks of text, making it easier for your audience to navigate and understand your information. In this article, you are going to learn the steps to add and customize headings in Google Docs using Format Tab and Menu Bar, ensuring your documents look professional and polished. Let’s go through the steps and learn how to efficiently add headers to your Google Docs! How To Add Headings in Google Docs Table of Content
What is a Heading or Header in Google DocsIn Google Docs, a heading is a distinct type of text that appears larger than the regular document text. These headings serve as a crucial organizational tool, dividing the document into sections, and enhancing readability and structure. Google Docs offers several types of headings, each with its unique characteristics and purposes, allowing users to efficiently categorize and present content. Types of Headers in Google Docs
How to Add Headings in Google Docs for DesktopFor adding the Headings in Google Docs, we have different types of ways and approaches, which can help us to add headings titles, and subtitles in our document. Below we have listed the methods through which we can add the Headings in Google Docs.
How to Add Header in Google Docs using Menu BarStep 1: Go to Google Docs and Open a DocumentIn the very first step, we need to visit the Google Docs official website, from which we are allowed to create and edit the documents. Navigate to the Google Docs website. Use the following link to visit the official Google Docs website and open the document in which we need to add Headings.  Go to Google Docs and Open a Document Step 2: Click on the Style Drop-down BoxAfter opening the document, navigate to the Menu Bar, in the menu bar you will see various options, so from these options, we need to look for the Style drop-down which has the sub-options as “Normal text, Title, Headings” in the Format menu etc. So we need to click on this drop-down to select the appropriate option. 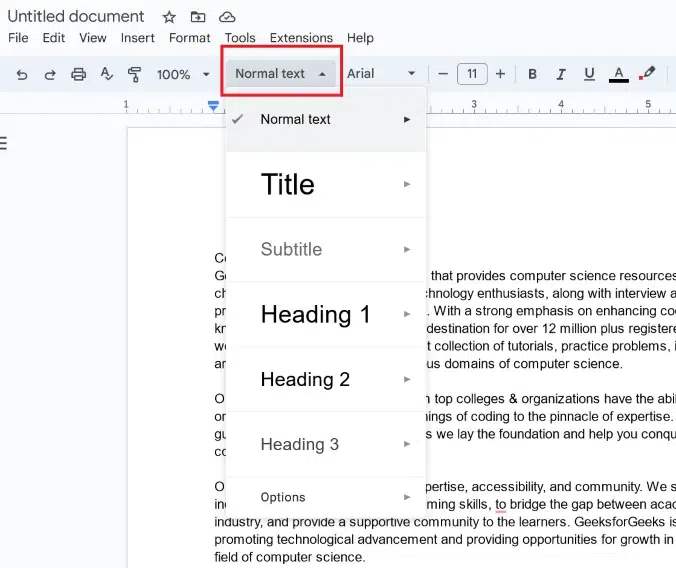 Click on Style drop-down menu Step 3: Select Heading FormFrom the sub-options, we need to select the option of the Heading. We need to choose any of the Heading Forms as Heading 1, Heading 2, etc. as per our requirement.  Select your Heading Form Step 4: Click on ApplyAfter selecting the required Heading, click on the Apply option, so that it will get added to our text.  Click on “Apply Heading” Step 5: Preview Heading in the DocumentThe heading that we have selected will be added to our document successfully.  Heading Added successfully How to Add Header in Google Docs using Format TabFollow the below steps to add heading in Google docs using format tab Step 1: Go to the Format TabAfter opening the document in which we need to add the Headings, we need to find the Format Tab which is placed on the top open the editing space of Google Docs. You can also refer to the below screenshot for navigation.  Go to the Format menu Step 2: Select Paragraph StylesAfter clicking on the Format Tab, you will see the list of sub-options, so from these sub-options, we need to select the option of “Paragraph Styles“.  Select Paragraph Styles Step 3: Choose a Heading FormNow, after clicking on the “Paragraph Styles” options, there will be a list of different Headings Forms. So from this list, we need to select the required form. 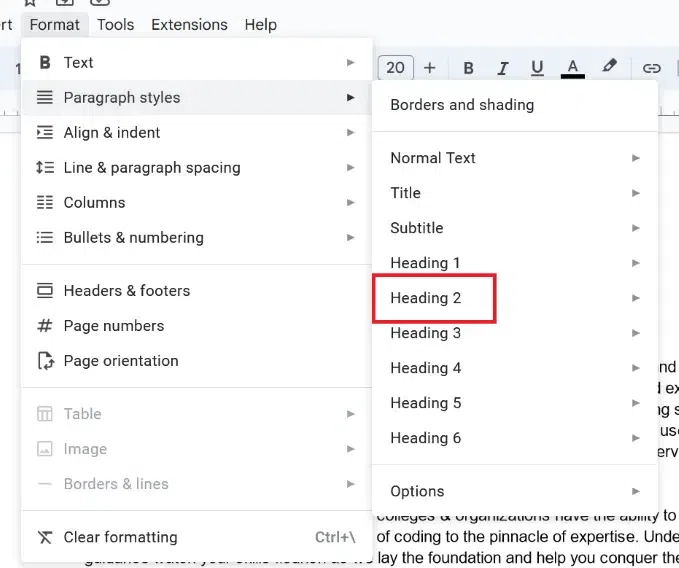 Choose Heading Form Step 4: Click on Apply Selected HeadingAfter selecting the Heading Form, we need to click on the option of “Apply Heading 2”. This will apply to the selected Heading in our document. In the below screenshot, you can see that our selected Heading is been added to the document.  Click on “Apply selected Heading” Step 5: Preview Heading in the DocumentThe heading that we have selected will be added to our document successfully.  Heading Added successfully Keyboard Shortcuts for Google Docs to Add Heading (for Windows, Linux & Mac)In this section, we will see some of the shortcuts through which we can add the Headings to our documents rather than following lengthy steps. Below we have added the shortcuts that will help us to add the Headings using Keyboard keys.
How to Remove Headings in Google DocsIn some of the cases, we don’t require Headings in our document, so we can either remove them by deleting the text or else we can also convert them to regular text. So follow the below steps to remove header in Google Docs. Step 1: Select the HeadingTo remove the Heading from our document, we need to select Heading with the mouse or by using the Keyboard keys. In the below screenshot, you can see that we have selected the Heading, which we will convert to normal text.  Select the Heading Step 2: Click on the Style Drop-down BoxAfter selecting the Heading, click on the Style Drop-Down Box which is shown in the below screenshot.  Click on Style drop-down box Step 3: Select the Option Normal textFrom the list of items in the drop-down box, we need to select the option of Normal Text. This will convert our Heading into Normal Text. Click on the Apply Normal Text option to apply the changes.  Select Normal Text Step 4: Click on “Apply Normal Text and Heading RemovedAfter clicking on the Apply option, the Heading will get removed or it will get converted into the normal text same as the other text in the document.  Click on Apply Normal Text The heading that we have selected will be removed from our document successfully.  Heading Removed Successfully How to Add Headings in Google Docs on Mobile DevicesThe feature of adding Headings is not limited to the PC or Laptop devices, but we can also add the Headings on Mobile Devices. To add the Headers in Google Docs, follow the below specified steps and perform it proper manner. Step 1: Install and Open Google DocsFirstly, we have to open the Google Docs application, as the Google Docs features can be accessed using the mobile application. If you do not have it, you can install it using the Play Store application. .webp) Install and Open Google Docs Step 2: Open the DocumentAfter installing or Opening the application, we need to open the document in which we need to add the Headings. In the below screenshot, you can see that, we have opened the Document in which we will be adding Heading. .webp) Open the Document Step 3: Click on Format IconAfter opening the document in which we will be adding the Headings, we need to click on the Format Icon which is placed at the top-notch of the application window. .webp) Click on “Format icon” Step 4: Click on Style OptionAfter clicking on the Format Icon, we need to click on the Style option. In the below screenshot, you can see the navigation for a better understanding. .webp) Click on “Style Option” Step 5: Select the Heading FormIn the Style list, we can select the required Heading and add it to our document.  Select the Heading Form Step 6: Preview Added HeadingAfter selecting the required Heading Form, it gets reflected or added to our document. In the below screenshot, you can see that we have successfully added the Headings from the Mobile device. .webp) Heading Added successfully ConclusionIn conclusion, headings in Google Docs website is an useful feature that enables users to have better structure and flow of the document contents. Headings can make the look and feel more professional of the document. We can also use this heading to add a Table of Contents in Outline. The steps for adding the Headings are easy and simple in Google Docs as we have discussed in above sections, using different ways we can add the Headings in our document or how do I insert heading in Google Docs. Also, we can use the heading in the Mobile application of Google Docs such as on Google Docs mobile, Google Docs iPad, which makes broad use of the Heading feature in Google Docs. How To Add Headings in Google Docs – FAQsWhat is the need for using heading in Google Docs?
How to add an Outline in Google Docs?
How to add table of contents in Google Docs?
How do you headers in Google Docs MLA?
Is it possible to customize the heading according to the user in Google Docs?
|
Reffered: https://www.geeksforgeeks.org
| Google Docs |
| Related |
|---|
| |
| |
| |
| |
| |
Type: | Geek |
Category: | Coding |
Sub Category: | Tutorial |
Uploaded by: | Admin |
Views: | 14 |