
|
|
In this article, we’ll take you through the entire process of creating an Ubuntu server on an AWS EC2 instance from scratch. Whether you’re new to Amazon Web Services (AWS) or just looking to set up a new server, this step-by-step tutorial will cover everything you need to know. We’ll start right from the beginning and guide you all the way to launching your instance. Amazon EC2, or Elastic Compute Cloud, is a cloud computing service provided by AWS. It allows you to run your applications on EC2 servers without needing to manage the underlying hardware. You can set up EC2 instances securely using VPCs, subnets, and security groups. Additionally, you can adjust the size and capacity of your EC2 instances based on your application’s needs by using autoscaling groups. This lets you scale up or down depending on the traffic your application receives. Steps to Create Ubuntu Server on EC2 InstanceThere are the following steps to create an Ubuntu server on an AWS EC2 instance:- Step 1: First, log in to your AWS account. If you don’t have one, you can create it on the official AWS website. Once logged in, search for “EC2” in the search bar, which will take you to the EC2 dashboard where you can see an overview of your instances. Click the “Launch Instance” button on this page to start configuring your EC2 instance. Configure Instance Step 2: Now, choose an Amazon Machine Image (AMI), specifically Ubuntu, and select the instance type. We will select the General Purpose t2.micro instance because it is eligible for the free tier. .jpg)
Step 3: In the Key pair (login) section, you can select an existing key pair or create a new one. 
Step 4: In the Network section, use the default VPC and select an existing security group or create a new one. We will add HTTP, HTTPS, and SSH ports for the EC2 instance. HTTP and HTTPS will allow web requests from anywhere in the world, and SSH will enable connection to the EC2 instance from a local machine. 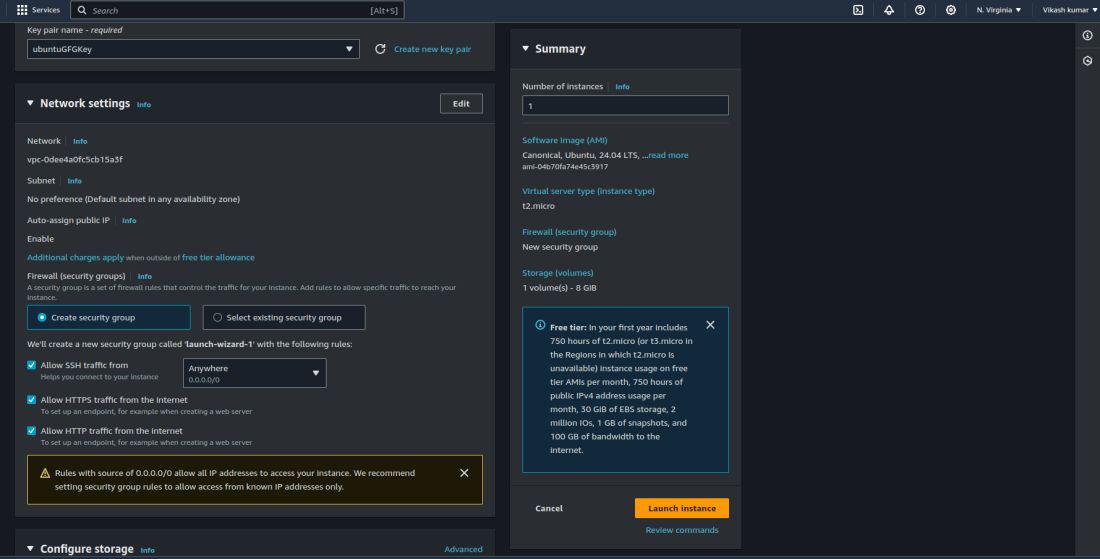
Step 5: In the Configure Storage section, configure the storage size and type. Remember that only up to 30 GB of gp3 storage is eligible for the free tier. .jpg)
Step 6: Click the “Launch Instance” button to launch the EC2 instance. 
Finally, your Ubuntu server on the AWS EC2 instance is now created. You can deploy your applications on it and connect to it from your local machine using SSH. 
Configuring Ubuntu ServerAccessing Instance via SSH:To connect an AWS Ubuntu EC2 Instance with your local machine using SSH, follow these steps: Step 1: Install the SSH Client on Your Local MachineEnsure that you have an SSH client installed on your local machine. For most Unix-based systems (Linux, macOS), an SSH client is already available. For Windows, you might use tools like PuTTY or Windows Subsystem for Linux (WSL). Step 2: Go to the Directory Where the Generated Key Pair is StoredNavigate to the directory where your key pair was downloaded. Step 3: Ensure Your Key is Not Publicly ViewableRun the following command to set the appropriate permissions for your key pair: chmod 400 "<Key-pair-name.pem>"
Note: Replace “<Key-pair-name>” with the name of your downloaded key pair file. Step 4: Connect to Your EC2 Instance Using SSH
The Example will looks like this: ssh -i "ubuntuGFG.pem" [email protected]
Note: Replace “ubuntuGFG.pem” with the name of your key pair file if it is different. The username ubuntu is typically used for Ubuntu instances on AWS. Adjust the command if your instance uses a different default username (e.g., ec2-user for Amazon Linux). 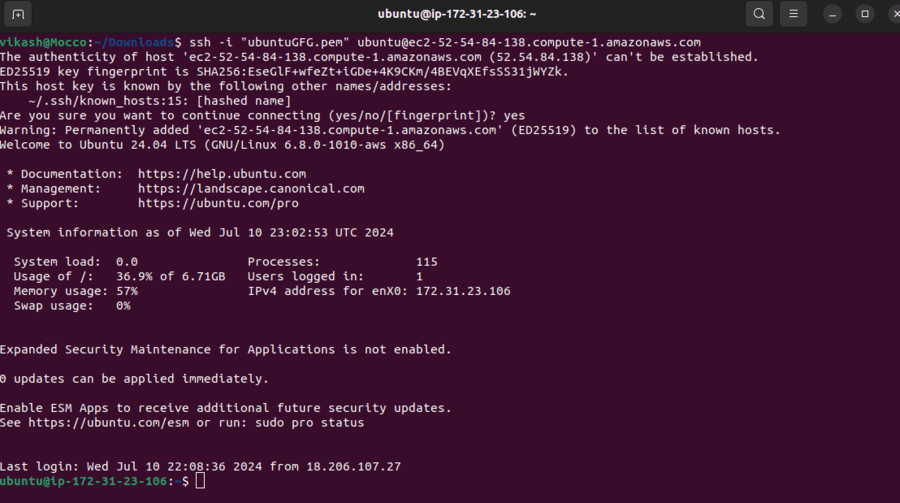
Initial Server Setup:Once you have connected to the instance using SSH, you should update the packages and set up a firewall for security. Creating a new user is not strictly necessary but recommended. 1. Update PackagesFirst, update the package list and upgrade all installed packages to their latest versions. sudo apt update 2. Set Up a FirewallUse ufw (Uncomplicated Firewall) to set up a firewall. By default, allow only SSH (port 22) and then enable the firewall. sudo apt install ufw -y You can also allow other ports as needed. For example, to allow HTTP (port 80) and HTTPS (port 443): sudo ufw allow 80/tcp 3. Create a New User with Sudo PrivilegesCreate a new user and add them to the sudo group to grant them administrative privileges. Create a new user: sudo adduser newusername
Follow the prompts to set the password and other details for the new user. Add the new user to the sudo group: sudo usermod -aG sudo newusername
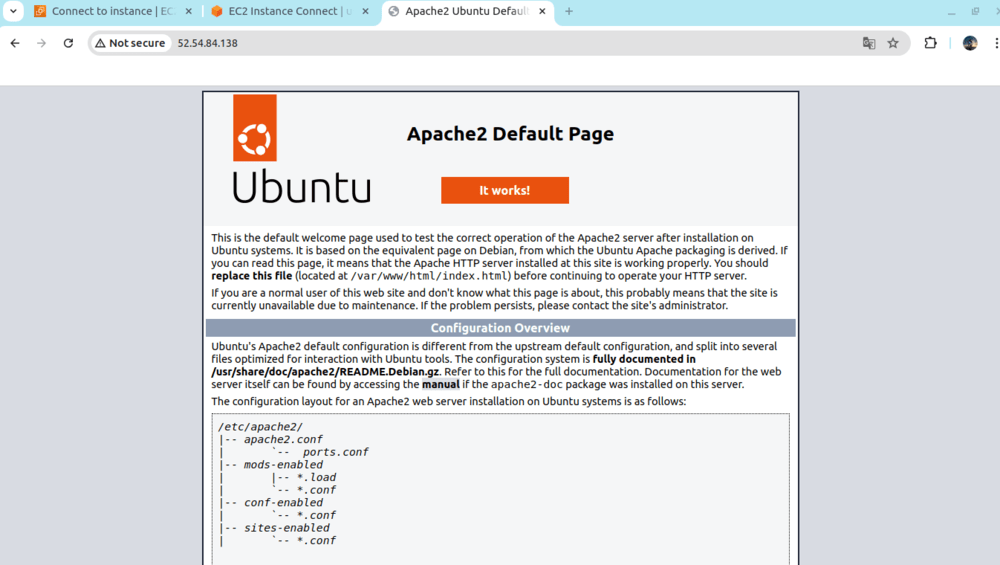
Deploying and Managing Applications:Installing and Configuring Software:To install the required common software packages and services like Apache, MySQL, and PHP, follow these steps: 1. Install Apachesudo apt update Once installed, you can enable Apache to start on boot and verify that it is running: sudo systemctl start apache2 Note: You can verify that Apache is working by visiting your server’s public IP address in your web browser. You should see the default Apache welcome page. 2. Install MySQLsudo apt install mysql-server -y 3. Install PHPsudo apt install php libapache2-mod-php php-mysql -y
Create Ubuntu Server on AWS EC2 Instance – FAQsWhat are the benefits of using Ubuntu Server on AWS EC2?
How do I launch an Ubuntu Server instance on AWS EC2?
How can I connect to my Ubuntu Server instance?
|
Reffered: https://www.geeksforgeeks.org
| Amazon Web Services |
| Related |
|---|
| |
| |
| |
| |
| |
Type: | Geek |
Category: | Coding |
Sub Category: | Tutorial |
Uploaded by: | Admin |
Views: | 18 |