|
|
Google Docs is the favourite text editor of many users due to its cloud-based behaviour. Different types of features significantly improve the structure and quality of the main text. One of the core features of Google Docs is adding an outline to a Google Docs document. Outline in Google Docs offers a road map or provides an organized overview of our documents. If you are creating any research paper, a report, or a business proposal, then using an outline can streamline your writing process and also enable us or help us to maintain the logical structure of our document. Here, we will see the steps to add an outline in our Google document. Also, we will see the steps for mobile devices. Table of Content What is the Outline feature in Google Docs?The outline feature in Google Docs is a dynamic tool that functions like a Table of Contents, providing a visual representation of a document’s structure through a sidebar linked to headings. It allows efficient navigation by letting users click on headings to jump to sections. Changes to headings, like additions or deletions, are immediately updated in the outline, but customization options for fonts and colors do not apply, maintaining content consistency. In contrast, the traditional Table of Contents (ToC) does not update automatically, users must manually refresh it after making changes to headings. Nonetheless, it offers a higher degree of customization, allowing adjustments to indents, heading sizes, and font styles and colors, which are not available in the outline feature. These customizations pertain solely to the ToC’s appearance and do not impact the document’s actual content. 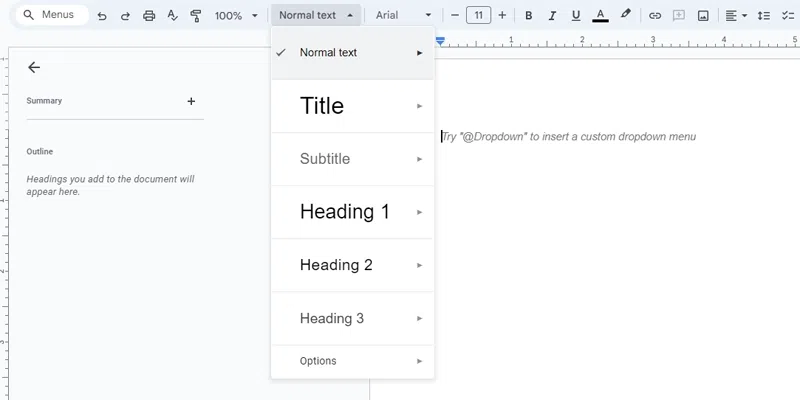 Example of Outline Feature in Google Docs How to Enable Outline in Google DocsFollow the steps below to add the outline feature in your Google Docs: Step 1: Go to Google DocsLaunch Google Docs in your web browser.  Launch Google Docs Step 2: Open Google DocumentUpon accessing the Google Docs website, there are two pathways for document access:
With the two option, you have the freedom to craft the content and generate a new file or document from the ground up.  Open the Document Step 3: Go to View TabTo access the outline feature, navigate to the top panel of the screen and click on the “View” option. Within the dropdown menu, you will locate the “Outline” option. .webp) Opening View Tab Step 4: Select Show OutlineTo access the outline view, you should click on the “Display” dropdown menu and then select the “Show Outline” option. Alternatively, there is a shortcut available that allows you to quickly view the document’s outline.
 Add Outline Step 5: Click on Outline IconOnce you’ve chosen the “Show Outline“, you will see an option on the left side of your document, a new icon will appear. Click on this icon to reveal and view the outline of your document.  Select Outline Step 6: Preview Outline ChangesAfter clicking on the icon, the detailed outline of our document will get displayed. This will help us to navigate the entire document very easily.  Outline Displayed How to Create and View an Outline in Google DocsFollow the Steps to Create and View Outline in Google Docs: Step 1: Go to the Menu Bar & Select Normal TextTo insert a heading or subheading into the outline, you must click on the “normal text” option found within the Google Docs menu bar.  Select Normal Text Step 2: Select Heading 1Upon selecting the “normal text” option, a list of various heading styles will appear. From this list, you should choose “Heading 1” and then click on “Apply Heading 1.”  Select heading 1 Step 3: Type Heading 1 TextOnce you’ve chosen the “Heading 1” option, you should now go ahead to enter the text that you want to define as “Heading 1” throughout your document.
 Enter Text Step 4: Heading Added to the OutlineNow in the below screenshot, we can see that the heading which we have added in the document has been added in the overall outline of the document.  Heading Added How to Enable Outline Feature in Google Docs on MobileStep 1: Open Google DocsLaunch Google Docs in your Mobile Phone, for this you need to install Google Docs App from Play store or App Store.  Installing Google Docs Step 2: Open the DocumentFrom the list of documents as per our choice, we can open the document for which we need to manage the outline.  Document Opened Step 3: Tap on Three Vertical Dots to open more optionsNow navigate to the top-right corner of the mobile screen. There, you’ll find an icon of three vertical dots. Tap on this icon to access a comprehensive list of additional options.  Clicking on More Options Step 4: Select Document OutlineFrom the list of sub-options, we need to find the option of Document outline and need to click on it.  Selecting Document Outline Option Step 6: Preview Outline Displayed in your DocumentAfter clicking on the specific option, we can see that our entire outline of the document will get displayed. We can easily navigate to any of the headings by using the outline list. .webp) Outline Displayed ConclusionIn conclusion, the feature of adding an outline to our Google Docs document can help improve the reliability and overall impact of our content. By having a structured framework that highlights headings and subheadings, we can transform our document into the perfect guide for the readers. Managing outlines are adding outlines in Google Docs helps to break down complex topics into manageable sections. And also assures the proper logical flow that will be easy to follow to the readers and viewers. Also ReadHow to Create an Outline in Google Docs – FAQsWhat is meant by Outline in Google Docs?
How do you add an outline in Google Docs?
What is the shortcut for outline in Google Docs?
|
Reffered: https://www.geeksforgeeks.org
| Google Docs |
| Related |
|---|
| |
| |
| |
| |
| |
Type: | Geek |
Category: | Coding |
Sub Category: | Tutorial |
Uploaded by: | Admin |
Views: | 15 |